

Paper is one of the most affordable and accessible craft materials you will ever work with. Whether you have a full Sunday afternoon or just an hour between tasks, there is something deeply satisfying about turning a flat sheet into something beautiful with your own hands.
These paper crafts are designed with adults in mind, they are calming, rewarding, and genuinely impressive when finished. From delicate quilling art to bold geometric sculptures, each project here costs little, teaches real skills, and produces results worth displaying or gifting. Pick one that matches your mood, clear your table, and start making something.
1. Paper Quilling Frames
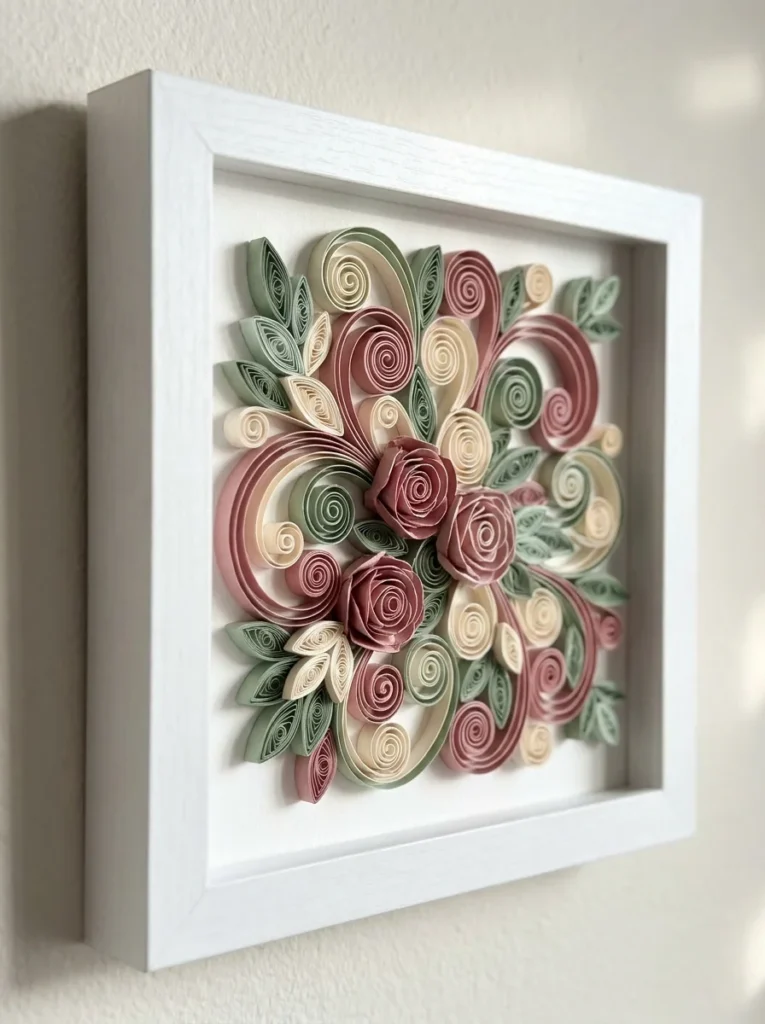
Paper quilling is the art of rolling thin paper strips into coils and shaping them into designs.
It sounds fiddly, but it is surprisingly relaxing once you get the rhythm.
All you need to start:
- A pack of pre-cut quilling strips (around $4–6 at any craft store)
- A quilling tool or a toothpick
- White glue
- A simple printed template underneath a piece of glass or wax paper
Start with basic coil shapes, tight circles, teardrops, and marquise shapes. Arrange them into a flower or leaf pattern. Once dry, glue the piece to a card stock backing and frame it.
The whole project costs under $10 if you already own a frame.
Beginner tip: Work on a foam board so you can pin your shapes in place while the glue sets. This keeps everything aligned without frustration.
Quilling scales well, too. Start with a small 4×4 card. Later, try a full 8×10 framed piece for a wall display.
The finished results look genuinely professional. People rarely believe it is made from paper strips.
2. Paper Flower Bouquets
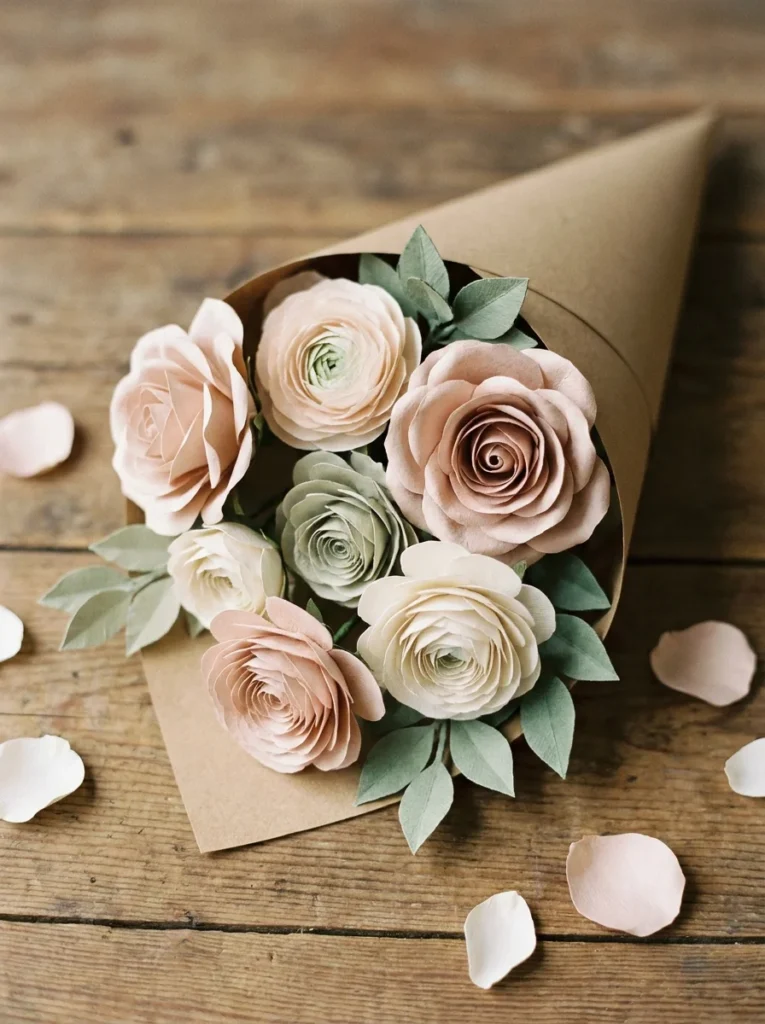
Paper flowers do not wilt. That alone makes them worth making.
They work as home décor, gift toppers, or long-lasting table centrepieces. And they are far cheaper than real flowers for events.
Start with crepe paper. It stretches slightly, which makes it much easier to shape petals than regular printer paper.
Here is the basic process:
- Cut petal shapes in layers, small, medium, large
- Curl the edges with a pencil or skewer
- Layer and glue from inside outward
- Wrap a floral wire stem with green paper tape
A pack of crepe paper costs about $5 and makes dozens of flowers.
Want a fuller look fast? Try coffee filter flowers. Dye the filters with food colouring, let them dry, then layer and gather them at the base with wire. The result is a soft, watercolour-looking bloom.
Roses, peonies, and dahlias are the most popular starting points. Look for free petal templates online — hundreds exist in printable PDF form.
Once you make one, you will likely make twenty. They are that satisfying to produce.
3. Origami Geometric Bowls
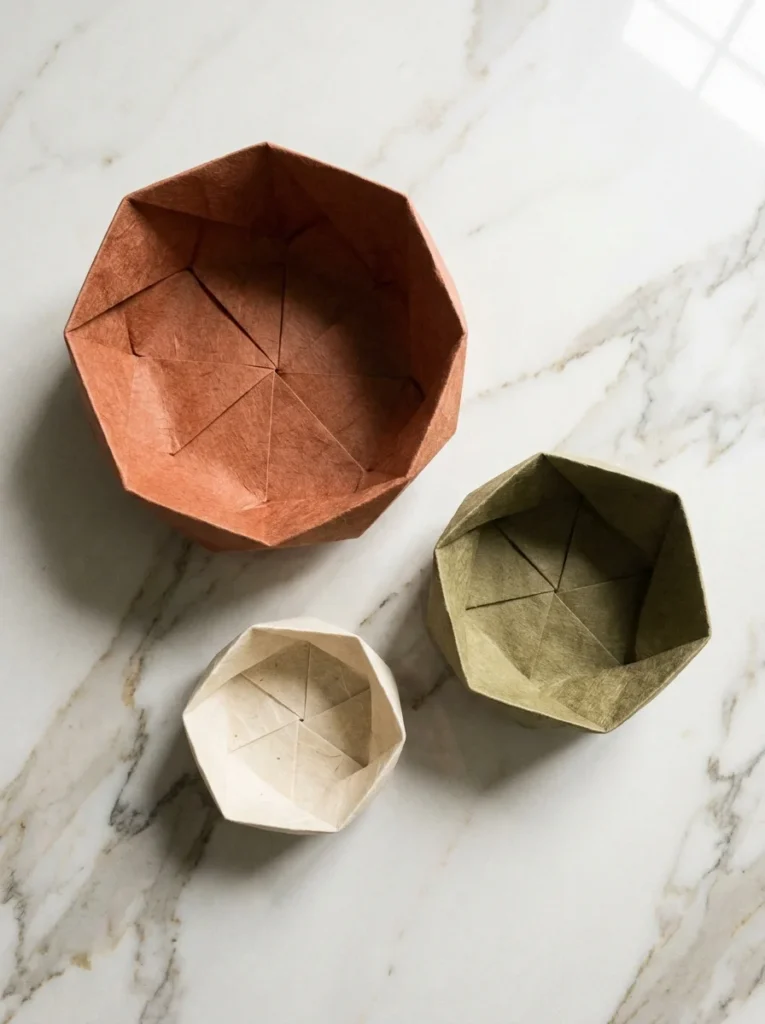
Origami bowls are functional and beautiful. You can use them to hold jewellery, paper clips, or keys on a desk.
The most popular style for beginners is the square origami tray, sometimes called a masu box.
You only need one square sheet of paper. No glue. No scissors.
Here is the key to a clean fold: score each crease firmly with a bone folder or the flat edge of a butter knife before folding. Soft creases make sloppy results.
Paper recommendations for bowls:
- Cardstock for something sturdy and practical
- Patterned scrapbook paper for something decorative
- Washi paper for a refined, Japanese aesthetic
A pack of origami paper costs $3–8 and gives you 50–100 sheets.
More advanced geometric bowls use a style called modular origami, where multiple folded units lock together without glue. The Sonobe unit is a popular starting point.
You can make a small decorative bowl using just 12 units of regular copy paper cut into squares.
Practical tip: Line the finished bowl with a small piece of felt or fabric if you want to use it for jewellery. It protects your pieces from scratching.
4. Decoupage Vases and Jars
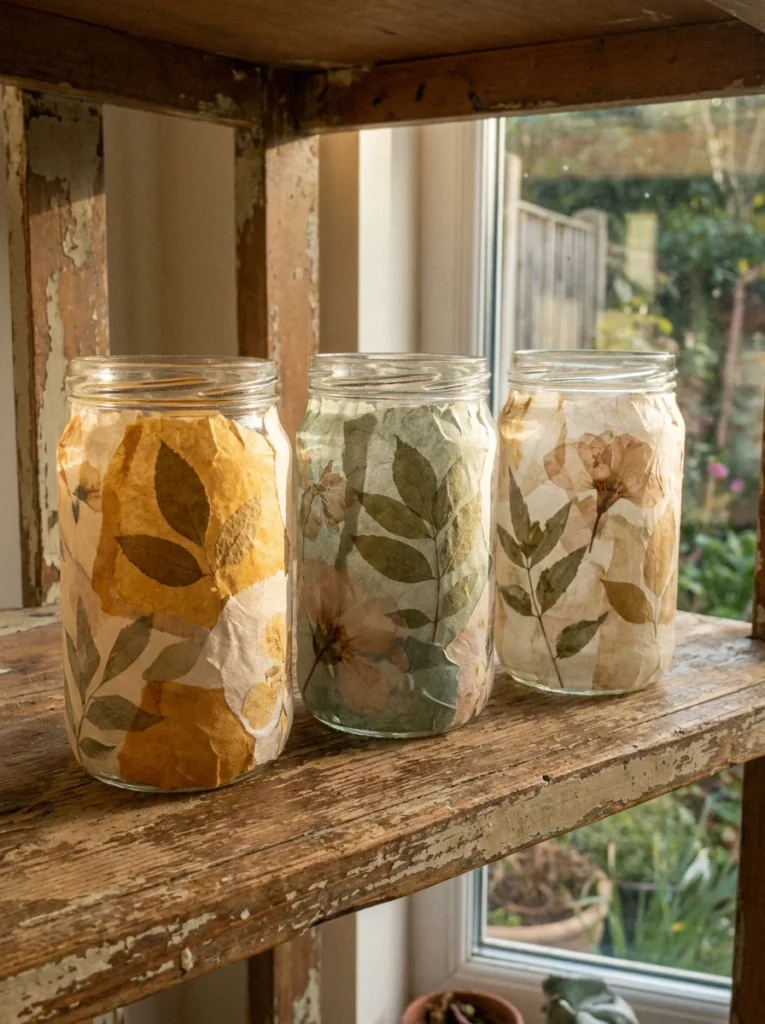
Decoupage is one of the simplest paper crafts you can do, and the results look genuinely polished.
The process: tear or cut paper, glue it onto a surface, seal it. That is essentially it.
What you can decoupage:
- Glass jars or bottles (perfect for candle holders)
- Terracotta pots
- Old wooden trays or boxes
- Canvases for wall art
You do not need to buy Mod Podge if you are on a tight budget. Mix equal parts white PVA glue and water. It works identically for most surfaces.
Use tissue paper for soft, translucent colour effects. Use magazine pages or book pages for a vintage look. Use patterned napkins for an elegant, detailed finish, napkins are especially thin and adhere without visible edges.
Step-by-step for a glass jar:
- Clean and dry the jar
- Brush a layer of glue onto a small section
- Press your paper piece down and smooth out air bubbles
- Let each section dry before moving on
- Seal the entire surface with two final coats of diluted glue
Total cost: around $2–5 if you use recycled jars and papers you already own.
5. Paper Cut Shadow Boxes
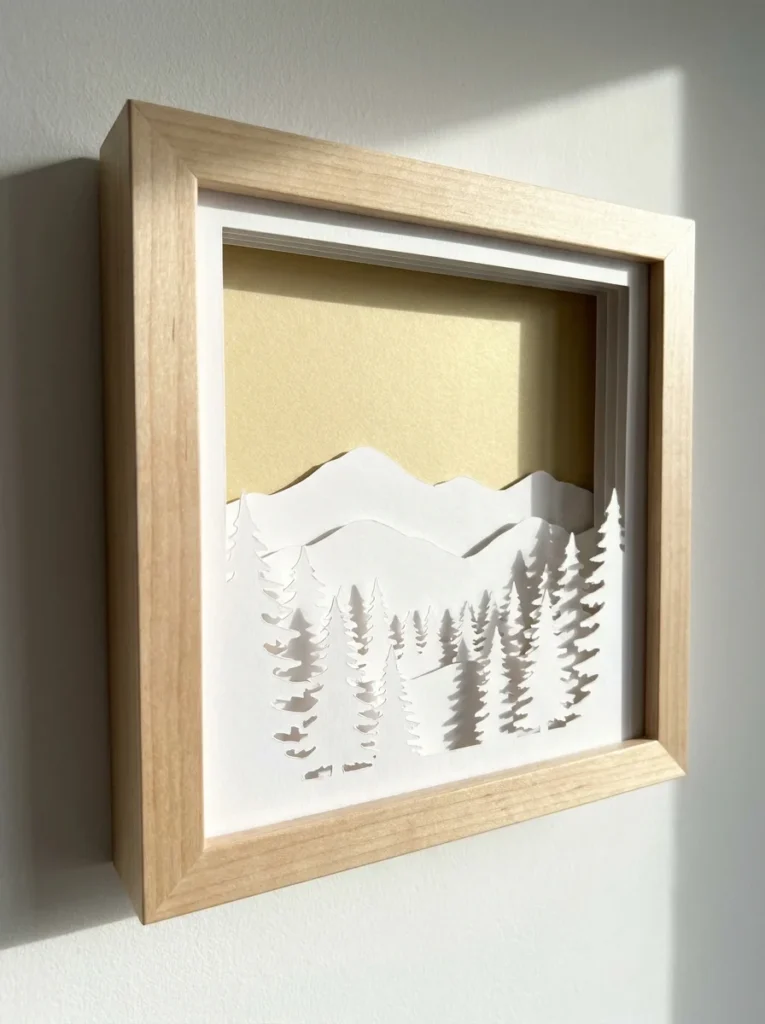
Layered paper cut art creates a 3D scene inside a picture frame. The shadow effect between each paper layer is what makes it so striking.
It looks like it took weeks. Most pieces take a few hours.
Basic materials:
- A deep shadow box frame (thrift stores often stock these for $3–6)
- White or coloured cardstock
- A craft knife and cutting mat
- Foam mounting squares or small foam pieces for spacing layers
Start with a simple silhouette, a single tree, a city skyline, or a mountain range. Print your template, trace it onto cardstock, and cut with a craft knife.
The magic is in the layers. Cut 3–5 versions of your scene, each slightly different — the foreground detailed, the background simpler. Separate each layer by 1–2 cm using foam squares.
When light hits the layers, they cast shadows on each other. The result looks deeply dimensional.
Colour options:
- All white for a clean, minimal look
- Ombre from dark to light for a gradient effect
- Complementary colours for something bolder
The whole project costs under $15 if you use a secondhand frame.
6. Book Folding Art
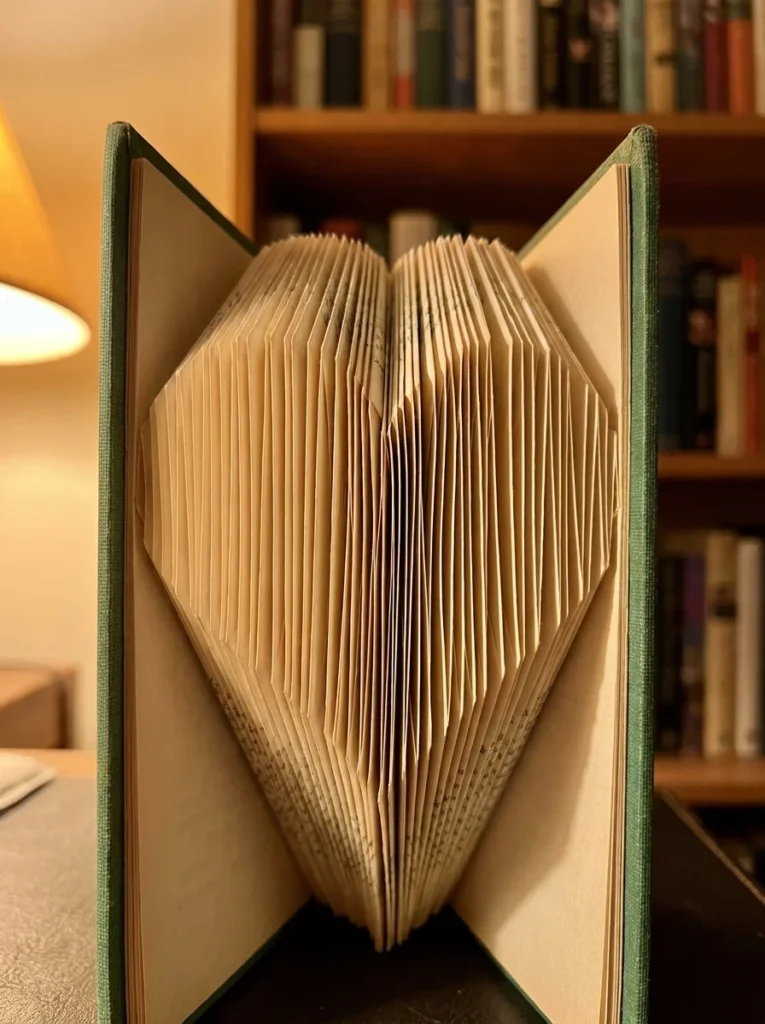
Book folding art transforms an old hardcover book into a 3D word or shape sculpture.
View it from the front and you see a crisp heart, word, or geometric pattern formed by the folded edges of the pages.
What you need:
- Any old hardcover book with enough pages (200+ pages recommended)
- A printed pattern (free templates are available for download online)
- A ruler and pencil for marking measurements
The basic technique: mark two points on each page according to your pattern, fold the corner of the page to each mark, and repeat across every page. The folds accumulate into a shape.
It takes patience. A word like “LOVE” might involve 300 individual folds. But it is deeply meditative — once you settle into the rhythm, it becomes almost hypnotic.
Cost: Almost nothing. Use a book from a charity shop or one you no longer read. The only purchase might be a printed pattern if you cannot find a free one online.
Display tip: Stand the finished book on a small easel or prop it open at 90 degrees so the shape is visible.
This makes an outstanding personalised gift, especially with someone’s name or initials.
7. Washi Tape Wall Art
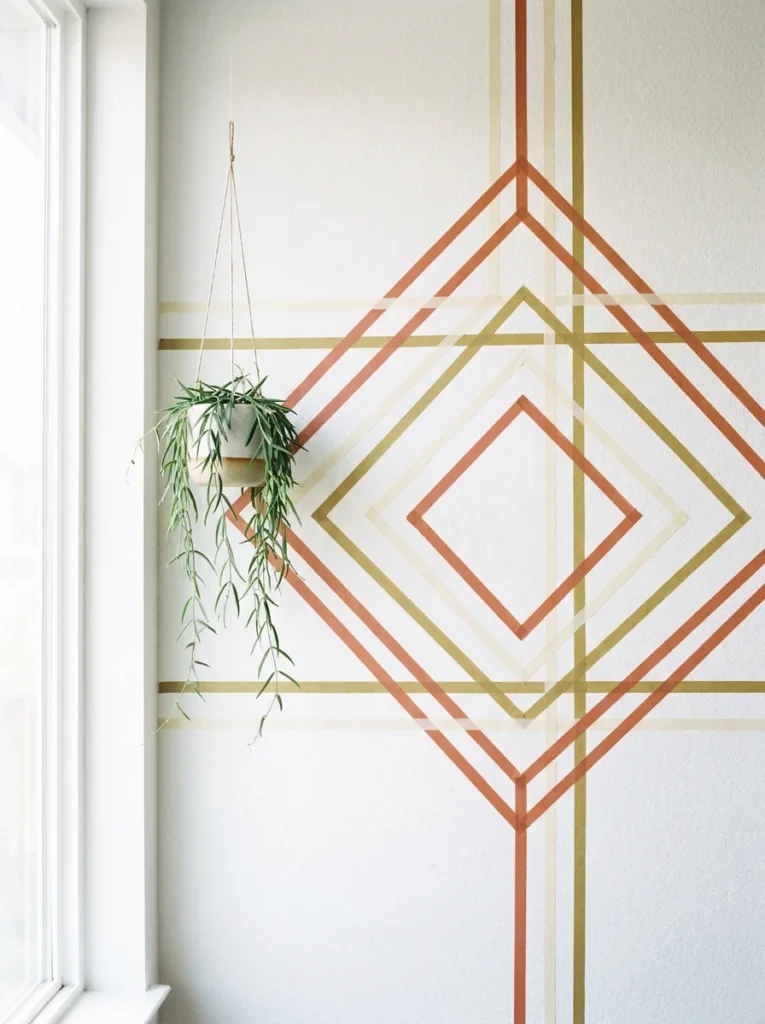
Washi tape wall art is renter-friendly, removable, and costs very little.
It removes cleanly from most painted walls without leaving marks, which makes it perfect if you want to change your décor seasonally.
Popular design ideas:
- A simple grid or diamond pattern
- Overlapping triangles in tonal colours
- A large-scale geometric mural
- Framing a section of wall like a faux panel
How to plan your design: Use painter’s tape or light pencil marks to sketch your layout first. Then apply your washi tape over or in place of those guide marks. A level and a ruler prevent wonky lines.
Washi tape rolls cost around $1–3 each. A small collection of five rolls gives you enormous design options.
Colour tip: Stick to three colours maximum for a cohesive look. A warm, a neutral, and a dark shade work well together without looking chaotic.
You can also frame washi tape art. Apply your tape design directly onto a piece of white card stock, then pop it into a frame. Instant, low-cost wall art that looks intentional.
This is also a wonderful weekend activity to share, two people working on a geometric mural together makes the time pass quickly.
8. Paper Mache Bowls
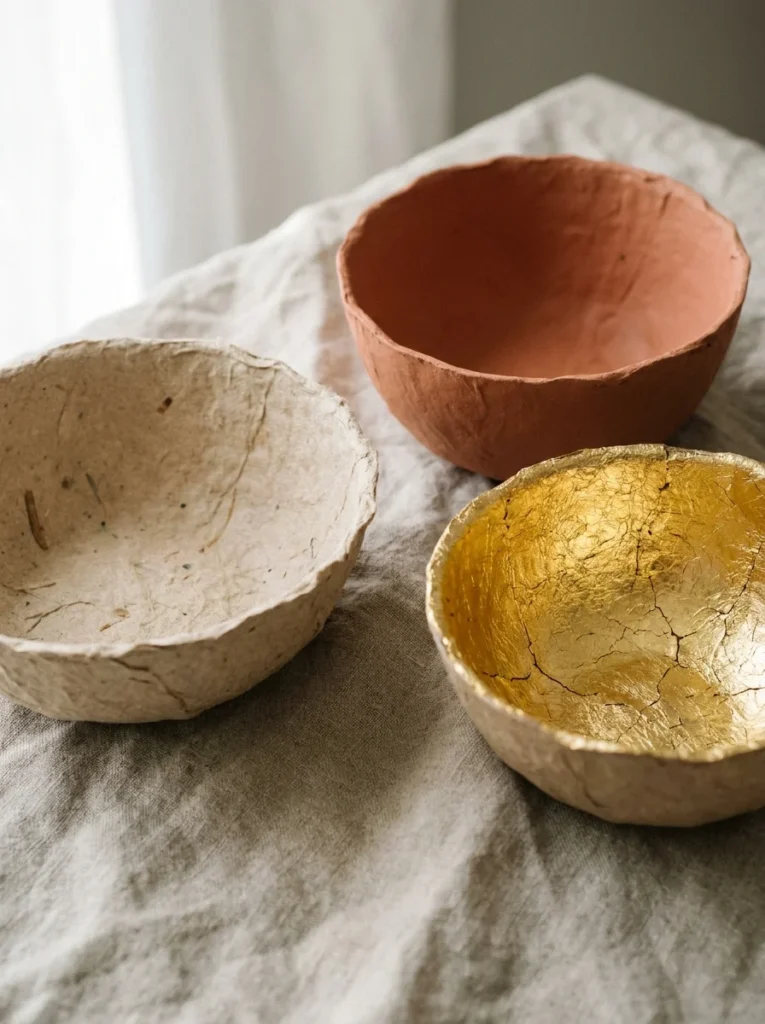
Paper mache is an old technique, but the results are genuinely beautiful when finished well.
You can create lightweight, durable bowls that look like ceramic when painted and sealed.
Two methods for bowl shapes:
Balloon method: Blow up a round balloon to your desired bowl size. Apply paste-soaked newspaper strips over the bottom half. Let dry, pop the balloon, and trim the edges.
Mould method: Coat a real bowl with petroleum jelly. Layer your paper strips over it. When dry, the paper bowl lifts off cleanly and holds its shape.
Basic paste recipe:
- 1 part plain flour
- 2 parts water
- Mix until smooth
Apply 3–4 layers minimum, letting each layer dry completely before the next. More layers mean more strength.
Finishing options:
- Sand lightly, then paint with acrylic paint
- Apply gold or silver leaf around the rim
- Seal with varnish for a wipeable, practical surface
Total cost: under $5 using newspaper and flour from your kitchen.
The finished bowls work as decorative catch-alls, fruit holders, or gift containers. They look far more expensive than they are.
9. Paper Marbling
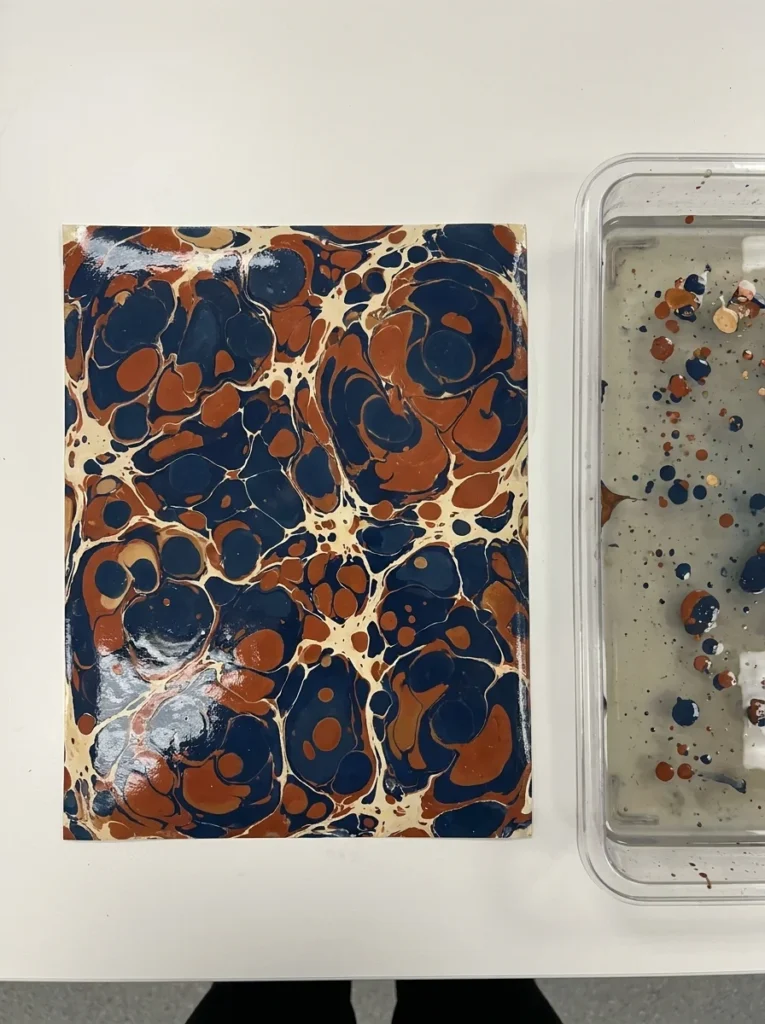
Marbled paper looks like something from an expensive stationery boutique. Making it at home is easier than most people expect.
Two beginner-friendly methods:
Shaving cream method: Spray a thin layer of shaving cream into a tray. Drop acrylic paint spots across the surface. Swirl lightly with a toothpick. Press a sheet of paper down, lift, and scrape off the cream. The pattern transfers to the paper.
Carrageenan size method: This is the traditional approach using a thickened water solution. It takes more preparation but produces more refined, detailed results.
For a weekend project, the shaving cream method is the better starting point. No special materials needed beyond paper and a few colours of acrylic paint.
Best uses for marbled paper:
- Book covers and journal wraps
- Gift wrap for small items
- Decoupage material
- Framed art pieces
- Card making
Cost: Around $3–5 if you already own acrylic paints. A can of shaving cream costs very little.
No two pieces of marbled paper are identical. That is part of what makes it special, every sheet is an original.
10. Iris Folding Cards
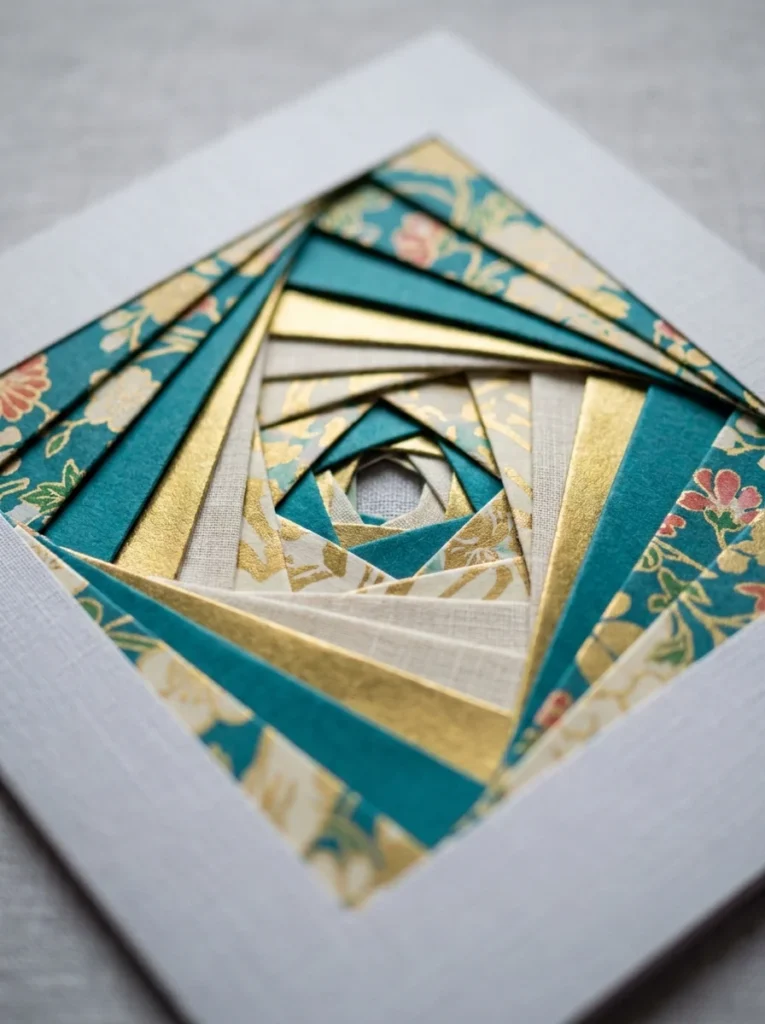
Iris folding is a technique where strips of paper are folded and layered in a spiral pattern over an aperture cut in a card.
The result is a geometric, almost kaleidoscopic design that is endlessly satisfying to make.
What you need:
- A card blank with a shape cut out of the front (a heart, square, circle, or diamond)
- Strips of patterned paper or wrapping paper, about 2–3 cm wide
- A printed iris folding template (free ones are available online)
- Tape
The template sits under your card as a guide. You tape strips of paper, face down — across the aperture, working from the outside inward in a rotating pattern. When you flip the card over, the design is revealed.
Paper choices matter. Use three or four different patterns or tones that work together. Alternating between solid and patterned strips creates nice contrast.
Cost: Very low. Use scrap paper, old gift wrap, or origami paper you already own.
Each card takes 20–40 minutes. They make extraordinary birthday and holiday cards that people keep rather than throw away.
The technique looks complicated but the template does all the planning work for you.
11. Paper Bead Jewellery
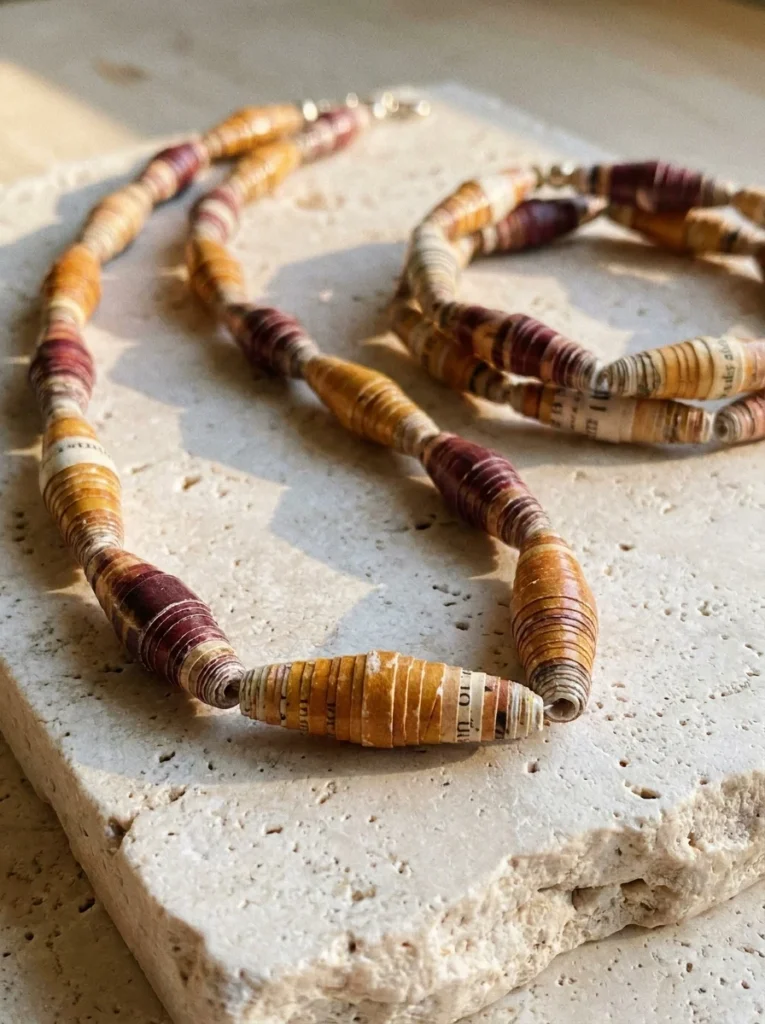
Paper beads have been made for centuries. They are lightweight, surprisingly strong when sealed, and cost almost nothing to make.
How to make them:
Cut long, thin triangles from magazine pages, patterned paper, or coloured paper. Starting at the wide base, roll the triangle tightly around a skewer or toothpick. Glue the narrow tip down. Slide the bead off carefully. Repeat.
Apply two coats of clear nail polish or varnish to seal each bead. This makes them water-resistant and gives them a slight gloss.
Bead variations:
- Wide triangles make barrel-shaped beads
- Very long, narrow triangles make elegant tube beads
- Rectangles rolled at an angle make cylinder beads
String the finished beads on jewellery cord, elastic, or wire. Mix paper beads with wooden or glass beads for a more layered look.
Cost: Near zero if you use magazine pages. The only real expense is jewellery findings, clasps and cord, which cost a few dollars at a craft store.
Paper bead necklaces sell well at craft markets for $10–20. They are also one of the most popular paper crafts to make in batches for gifting.
12. Pinwheel Mobiles
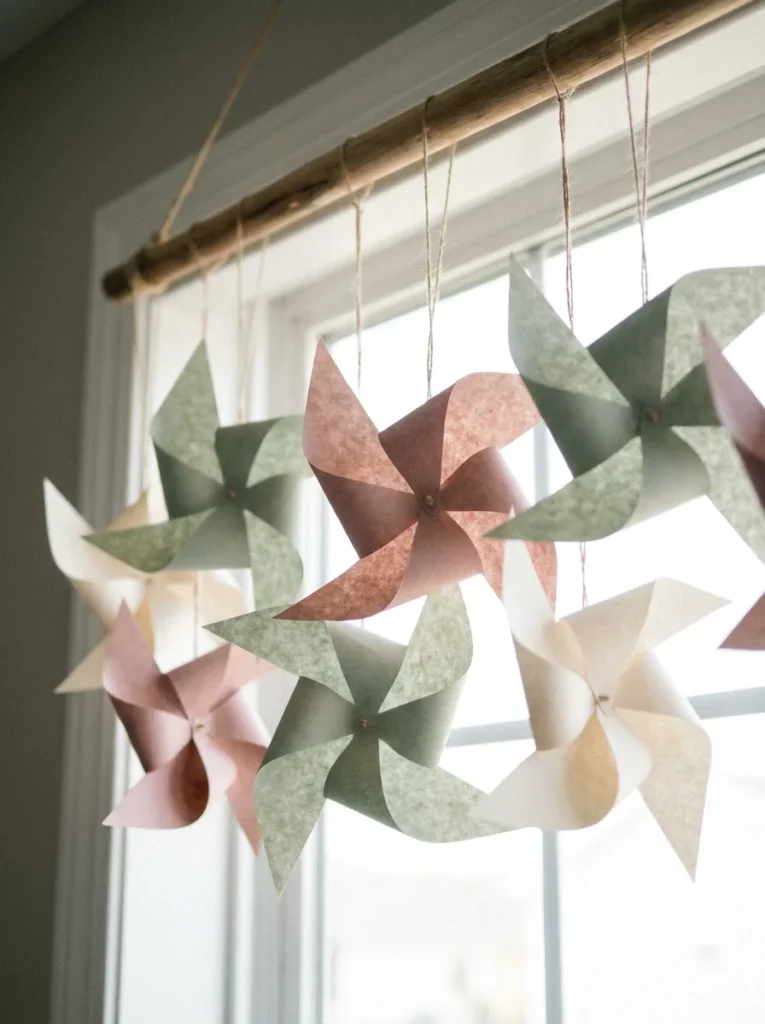
A pinwheel mobile brings gentle movement and colour to any room. It is one of the quickest paper crafts to finish in a single sitting.
Basic pinwheel steps:
- Cut a square of paper — any size from 10–25 cm
- Score diagonal lines from each corner toward the centre, stopping 2–3 cm short of the middle
- Fold every other point into the centre
- Push a brad or pin through all layers and the centre
For a mobile, hang multiple pinwheels at different heights from a wooden dowel using thin string or invisible thread. Vary the sizes for a more interesting composition.
Paper choices:
- Scrapbook paper in coordinated patterns
- Patterned origami paper
- Painted watercolour paper for a hand-made feel
- Foil paper for reflective movement
Finishing detail: Add a small bead at the centre of each pinwheel before securing the brad. It makes the finished piece look more polished.
Cost: Under $5 for all materials, less if you use paper you already own.
Pinwheel mobiles work beautifully in nurseries, above dining tables, or as window decorations. They move with even the gentlest indoor air current, which makes them feel alive.
13. Layered Paper Landscape Art
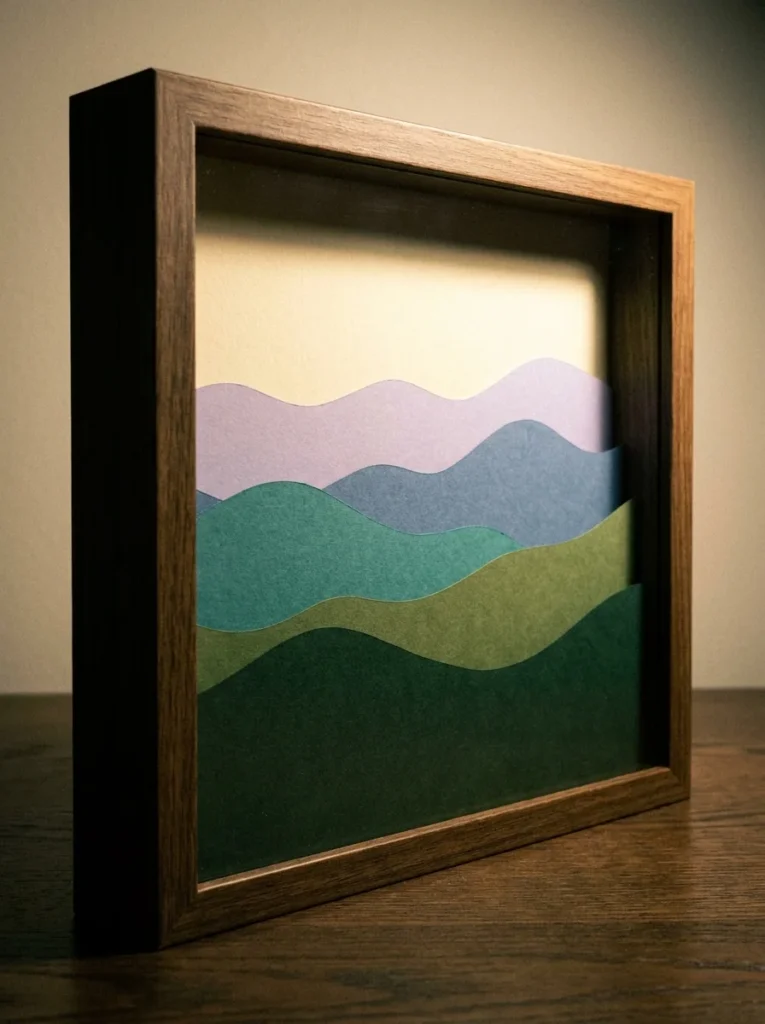
Layered landscape art is a form of paper engineering where cut silhouettes stack inside a deep frame to create a scene with real perspective.
It is one of the most striking things you can make with card stock and basic scissors.
Choose your scene:
- Rolling hills and a setting sun
- A mountain range with pine forest
- An ocean horizon with wave layers
- A cityscape silhouette at dusk
How to plan your layers: Work from back to front. Your rearmost layer is the simplest and lightest in colour, a sky or background. Each layer forward becomes progressively darker and more detailed.
Cut each layer from a single piece of card stock. Overlap the layers so the cut edges of each one peek above the layer in front.
Spacing the layers: Use foam mounting squares or small blocks of corrugated cardboard between each layer. The gap allows shadow to form, this is what creates the dimensional effect.
Frame depth: You need a deep frame (sometimes called a shadow box) to accommodate the stacked layers. Charity shops stock these regularly.
Cost: $5–15 depending on your frame source. The card stock itself is inexpensive.
Finished pieces make beautiful, personalised gifts when you recreate a meaningful landscape, a mountain someone climbed, a coastline they love.
14. Accordion Mini Books
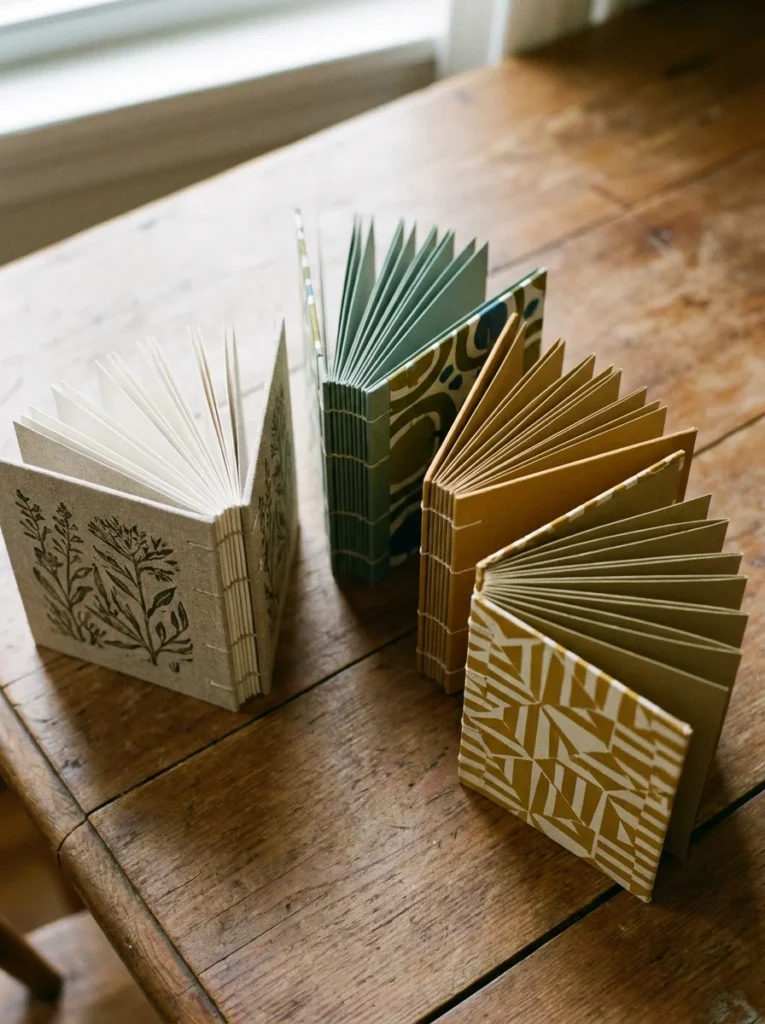
Accordion books are folded from a single long strip of paper or card, creating pages that fan out in both directions.
They are simple to make and function as sketchbooks, travel journals, photo albums, or art pieces.
Basic construction:
Cut or tape together a long strip of card stock. Fold it back and forth at even intervals like a fan. Add a decorative cover to the front and back panels.
Uses for accordion books:
- Gratitude journals: Write one entry per panel
- Photo books: Print or paste small photos into each panel
- Gift books: Fill with hand-written notes, poems, or memories for someone special
- Art practice books: Use each panel for a quick daily sketch
Binding options: Leave the book loose so it fans open fully. Or add a ribbon closure to hold it shut. Cover boards can be made from thick cardstock, thin wood veneer, or even recycled cereal box card covered with decorative paper.
Cost: A few sheets of card stock and decorative paper for the cover, under $3.
The accordion format is especially good for visual storytelling. Opened fully and laid flat, all panels are visible at once, like a panoramic illustration.
15. Paper Mosaic Art
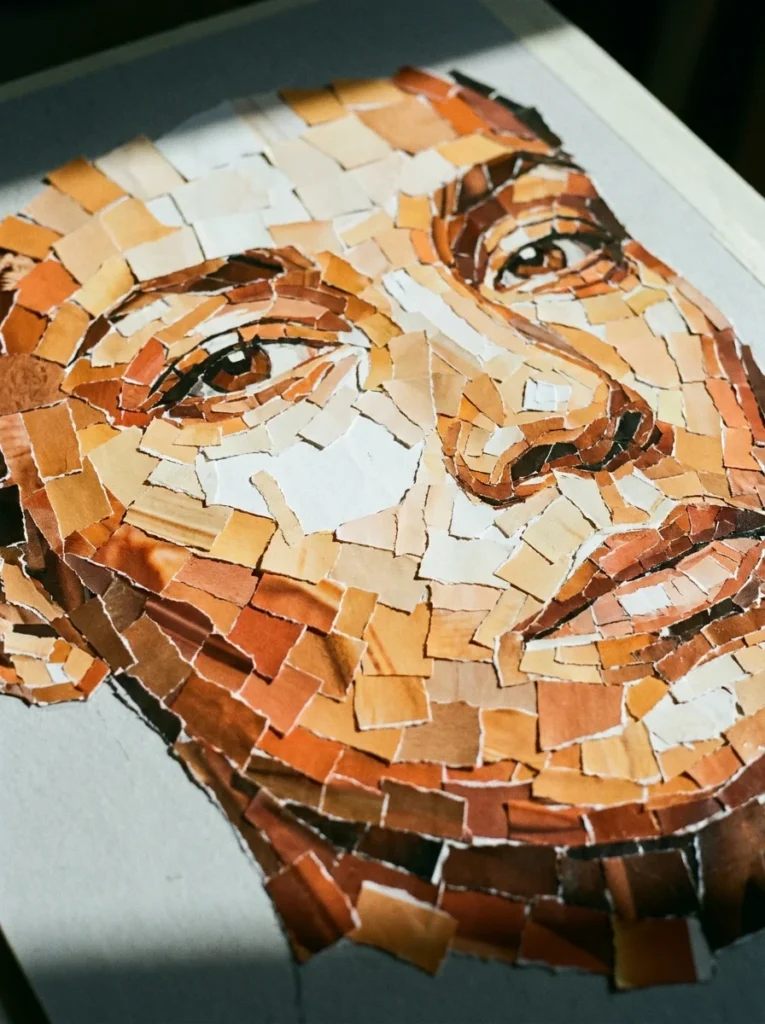
Paper mosaic art uses small pieces of torn or cut paper to build up an image, the same principle as tile mosaic, but with paper.
The result can look painterly, graphic, or almost photographic, depending on your technique.
Two approaches:
Cut paper mosaic: Use a craft knife or scissors to cut paper into uniform small squares. Arrange and glue them in rows with small gaps between pieces.
Torn paper mosaic: Tear magazine pages or coloured paper into irregular pieces. Overlap and layer them to fill a shape. The torn edges blend more softly than cut edges.
Starting project ideas:
- A simple animal silhouette filled with magazine paper
- A landscape using colour-sorted magazine pieces (blues for sky, greens for land)
- A portrait in tonal ranges of warm and cool colours
Best paper sources:
- Old magazines (free)
- Coloured tissue paper
- Paint swatches from a hardware store (also free)
Cost: Nearly zero. Magazines are free at libraries. PVA glue is cheap.
Practical tip: Sort your paper pieces by colour before you start. Having small organised piles of each tone makes the process much faster and more enjoyable.
16. Paper Weaving Coasters
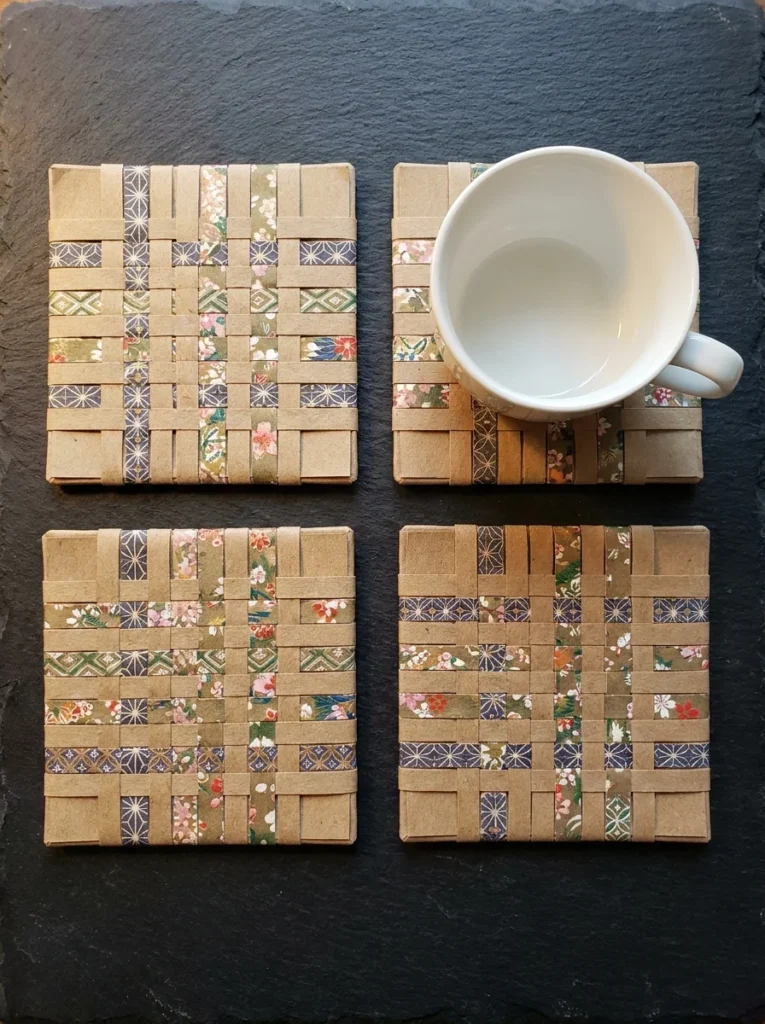
Paper weaving produces a surprisingly sturdy, textural result when done with the right paper.
For coasters, you need paper that is both thick and pliable. Kraft paper and watercolour paper work very well.
Basic weaving process:
Cut one sheet into horizontal strips. These are your warp strips, lay them parallel with small gaps between.
Cut a second sheet (in a contrasting colour or pattern) into vertical strips. Weave these over and under the warp strips, alternating the pattern each row.
Secure the edges with a strip of washi tape or a thin border of glue.
To make coasters practical:
- Use at least two layers of thick paper for rigidity
- Seal the finished coaster with two coats of clear varnish or Mod Podge
- Add a piece of felt to the base to protect surfaces
Beginner patterns:
- Simple over-under (plain weave), the easiest starting point
- Diagonal weave for a herringbone effect
- Checkerboard using contrasting colours
A set of four matching coasters costs less than $5 in materials and makes a thoughtful handmade gift.
Tip: Laminating the finished coasters (at a copy shop for around $1 each) makes them genuinely waterproof and long-lasting.
17. Kirigami Paper Sculptures

Kirigami is the Japanese art of cutting and folding paper to create three-dimensional forms.
Unlike origami, kirigami allows cuts, and it is the cuts that make the structures possible.
Simple beginner project, the pop-up arch:
- Fold a piece of card in half
- Make two parallel cuts from the fold inward, about 2 cm apart and 4 cm deep
- Push the cut section toward you and crease at the base
- Open the card, the section now pops up as a 3D form
This basic technique scales into incredibly complex pop-up structures: staircases, cathedrals, cityscapes.
Paper choice matters here. Use paper that holds a crease cleanly, cardstock or heavy bond paper. Thin paper collapses and loses its shape.
Where to find templates: Search “kirigami architecture templates” for free downloads. Many designers share printable cut files online. Even as a beginner, printed templates let you create impressive, complex results.
Cost: One sheet of card stock per project. A sharp craft knife is the only real tool investment.
Kirigami sculptures make striking desk art. They also photograph beautifully because of the way light plays across the cut forms.
18. Paper Roll Art
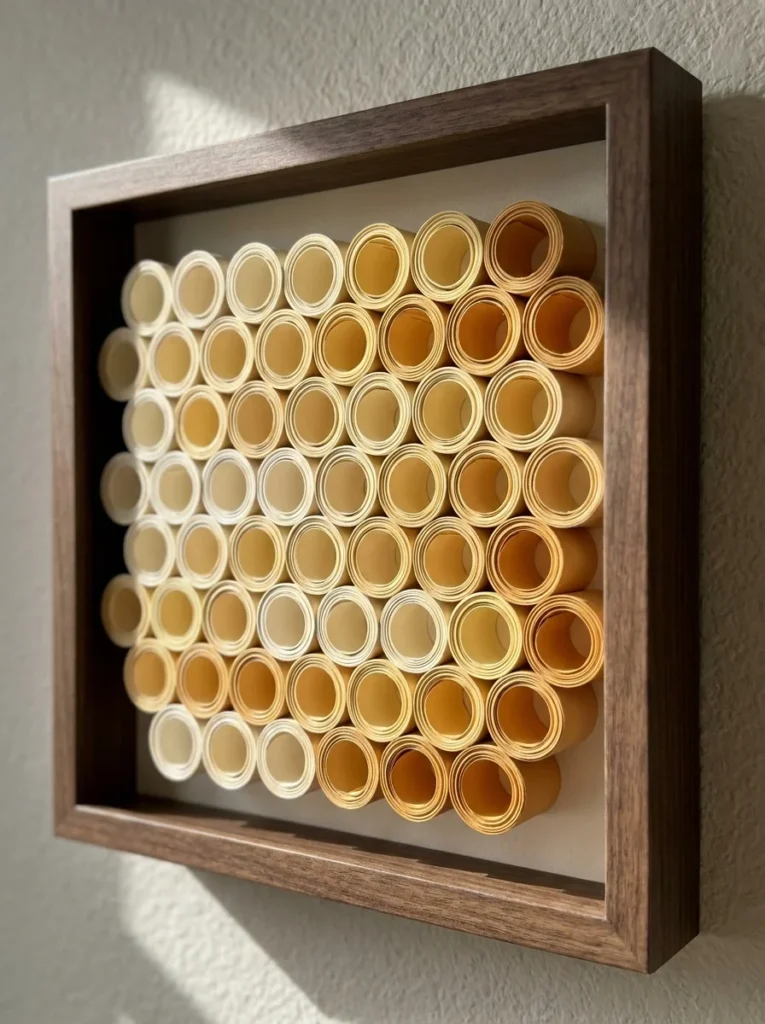
Toilet paper rolls and paper towel rolls are among the most underused craft materials available.
Collected over a few weeks, they become raw material for dimensional wall art that looks genuinely gallery-worthy.
Two popular paper roll art approaches:
Honeycomb grid: Cut rolls into equal-length sections. Paint or decorate them individually. Arrange into a grid and glue together. Frame in a shadow box.
Mosaic sculpture: Cut rolls into varying lengths. Stand them upright on a backing board, arranged in a pattern. Paint the whole piece once assembled for a uniform, graphic effect.
Paint options:
- Spray paint in a single metallic colour for a unified, sculptural feel
- Acrylic paint in gradient tones from one colour family
- Leave raw kraft paper unpainted for a natural, textural look
Framing: A shadow box frame from a charity shop or discount store works perfectly. The depth of the box contains the rolls without squashing them.
Cost: Almost free if you collect rolls over time. Paint and a shadow box are the only purchases, around $5–10 total.
This is an excellent project for using materials you would otherwise throw away.
19. Envelope Art and Origami Envelopes

A handmade envelope transforms any letter, card, or small gift into something memorable before it is even opened.
Origami envelope method:
- Use a square piece of paper, any size, 15–30 cm works well
- Fold all four corners to the centre
- Fold the bottom third up
- Fold the top third down to overlap
- Tuck the top flap into the pocket of the bottom flap
The result is a clean, self-closing envelope that needs no glue.
Decorated envelopes: Take plain white envelopes and customise them with stamps, watercolour washes, washi tape borders, or stamped patterns. Even a simple watercolour wash across the flap makes an envelope look special.
Lining envelopes: Cut a piece of patterned paper slightly smaller than the open envelope and glue it inside. This is a classic stationery technique that feels extremely luxurious.
Best papers for origami envelopes:
- Origami paper (pre-cut squares, $3–8 per pack)
- Wrapping paper off-cuts
- Old atlas or map pages for a vintage, personalised look
Handmade envelopes pair beautifully with folded notecards and wax seals. A set makes a wonderful gift for a letter-writing friend.
20. Pop-Up Greeting Cards
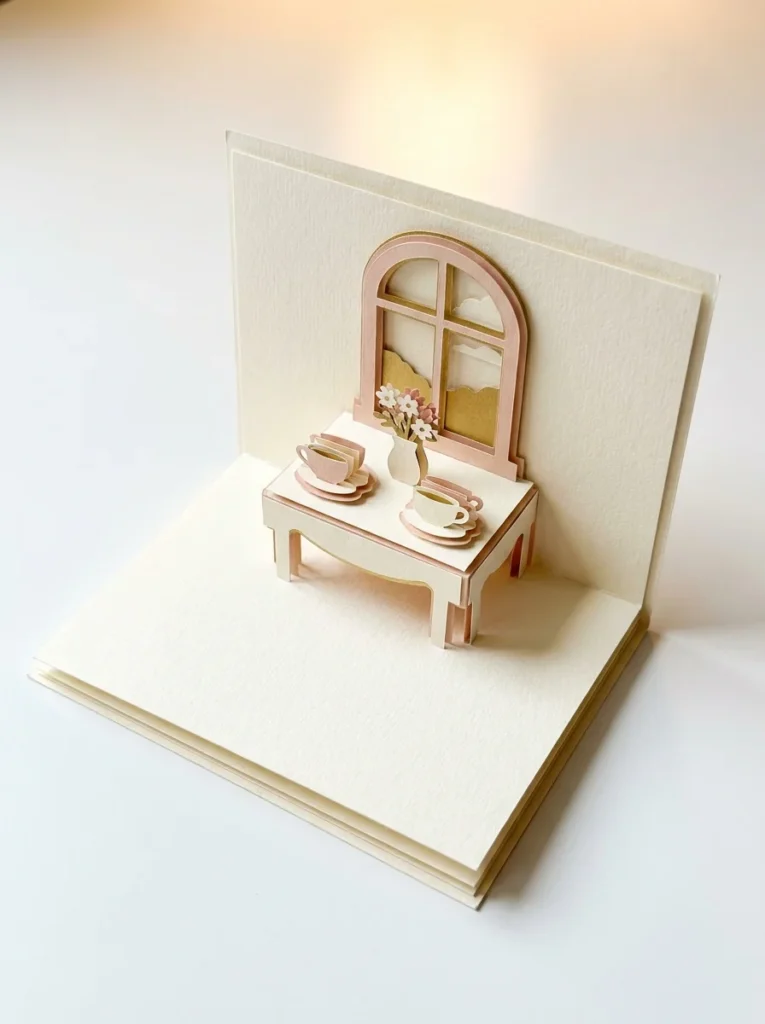
Pop-up cards take a little patience to engineer, but the moment someone opens one and a scene rises from the flat card, the reaction makes it worth every fold.
Simplest pop-up technique, the box:
- Fold a piece of card in half
- Cut two parallel slits from the fold — equal length and parallel to each other
- Fold the cut tab forward and crease firmly
- Open the card carefully; the tab pops forward
From that basic structure, you can attach any flat paper shape to the front of the tab, a flower, a house, a cake, a name.
More complex pop-ups: Use separate smaller cards slotted together inside the main card at different heights. This creates a layered, multi-element scene.
Paper choice: Medium-weight cardstock (not too thick, not too thin) is easiest to work with. Very thick card is hard to fold cleanly; thin paper collapses under its own weight.
Cost: A few sheets of card stock and a craft knife. Under $3 per card.
Plan your design on scrap paper first. Test the pop-up mechanism before committing to your final decorated version.
21. Botanical Paper Pressing Art
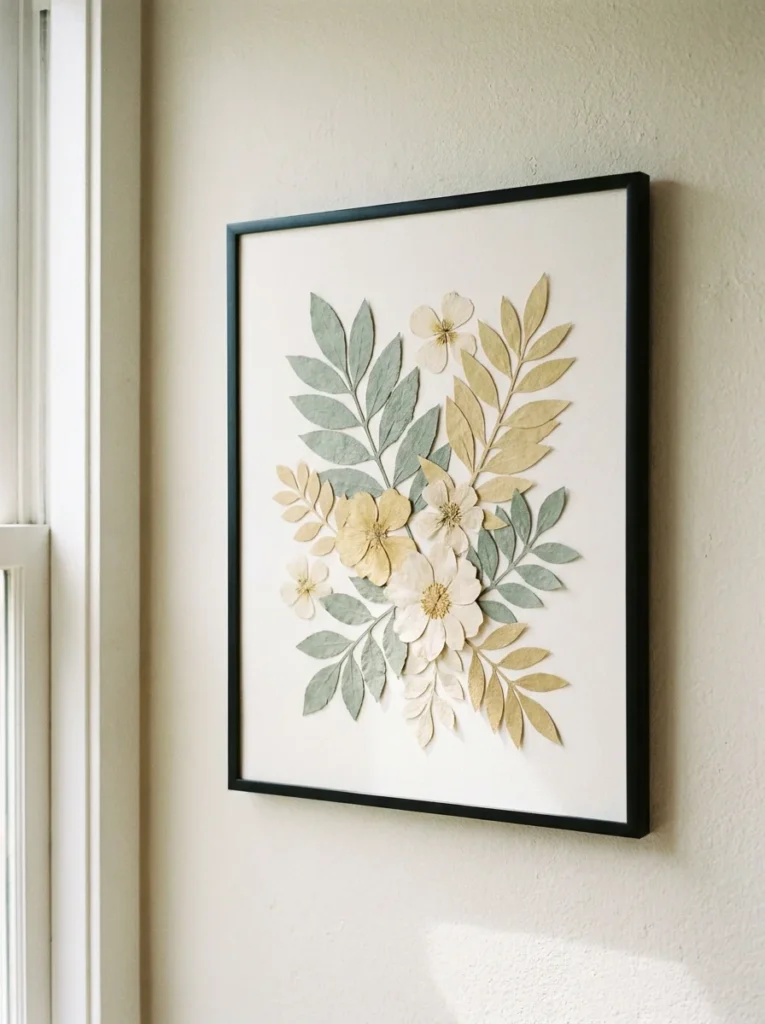
Pressed botanical art using real plants is beautiful, but pressed paper botanicals give you full control over colour, size, and composition.
You cut and shape paper plants, press them flat, and mount them like a scientific botanical illustration.
How to make paper botanicals:
Leaves: Cut leaf shapes from green card stock or watercolour paper. Draw in veins with a fine pen or score them gently with a craft knife for a raised effect.
Flowers: Layer and cut petal shapes. Curl edges slightly before pressing them flat. Overlap petals for a more naturalistic look.
Pressing: Place your paper elements under heavy books for 24 hours if you want them perfectly flat.
Mounting and display: Arrange your botanicals on a piece of watercolour paper or card stock. Glue lightly. Frame with a simple white or black frame.
Style references to consider: Georgian botanical illustration, Japanese botanical print, Scandinavian minimalist nature art.
Cost: Card stock, a frame, and basic adhesive. Under $8 total.
This project rewards patience. The more carefully you cut and detail each element, the more convincingly plant-like the result appears. It is extremely calming to work on.
22. Handmade Paper Making
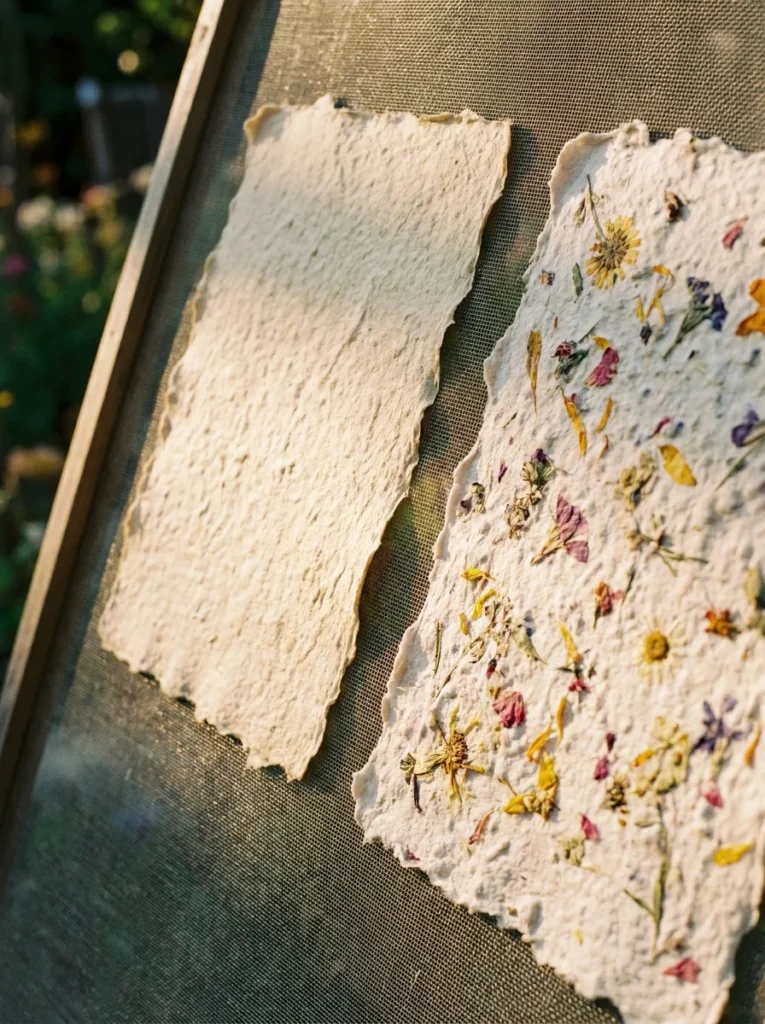
Making your own paper from scratch is slower than buying it, but it produces something entirely unique and deeply satisfying.
Every sheet you make is one-of-a-kind.
Basic equipment:
- A mould and deckle (a wooden frame with mesh, can be made from two matching picture frames for under $5)
- A large tub or washing-up basin
- Old newspaper or scrap paper to recycle
- A blender
- Felt or cloth sheets for pressing
Process overview:
- Tear paper into small pieces and soak in water for a few hours
- Blend with water into a smooth pulp (called slurry)
- Dip your mould into a tub of water mixed with pulp
- Lift out and let the water drain through the mesh
- Flip the wet sheet onto felt, press firmly, and let dry
Add texture and beauty:
- Press in dried flower petals before drying
- Add coffee grounds or dried herbs for colour and texture
- Use coloured tissue paper in the pulp for a tinted result
Drying time: 24–48 hours flat or on a line.
The finished sheets can be written on, painted on, or framed as art pieces in themselves. No two will ever look the same.
23. Paper Straw Weaving Wall Art
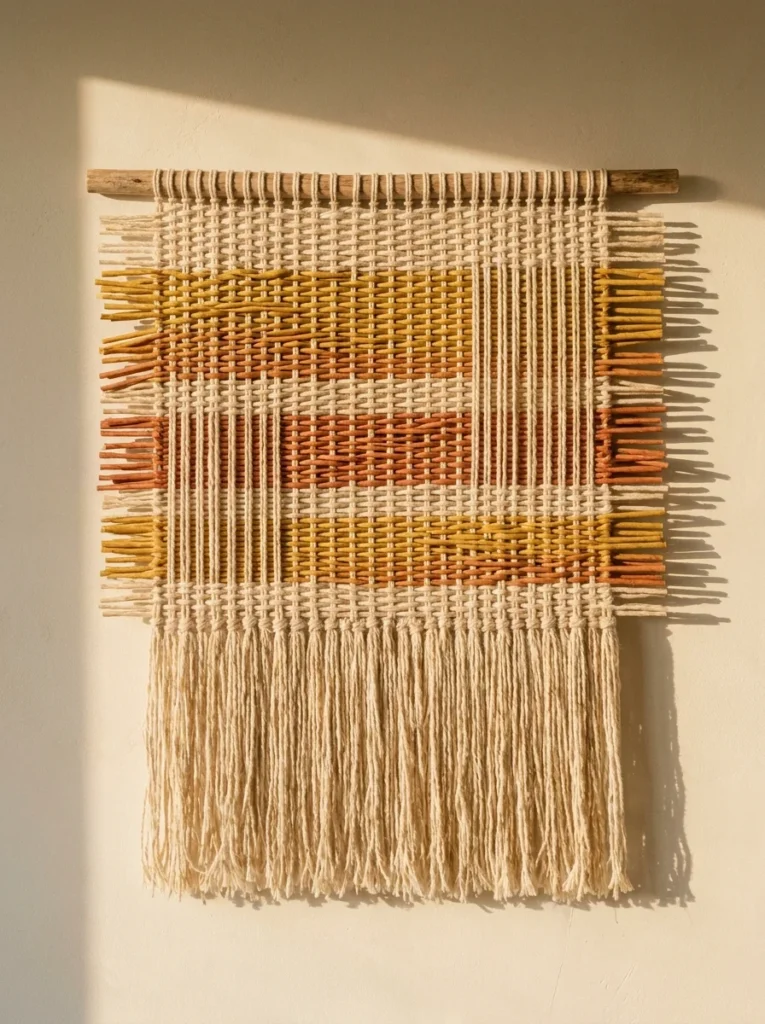
Paper straws are typically thought of as a drinks accessory. As a weaving material, they create surprisingly attractive wall art.
Their tubular structure gives weavings a rigid, sculptural quality that yarn alone cannot replicate.
What you need:
- Paper straws in your chosen colours (packs of 100 cost $3–5)
- A piece of card stock or foam board as a loom base
- Yarn or thread as the warp threads
- A wooden dowel or stick for hanging
Setup:
Cut notches along the top and bottom of your card board loom, about 1 cm apart. Thread yarn through these notches to create vertical warp threads.
Weave paper straws horizontally through the warp threads, alternating over and under. Push each straw down firmly against the previous one.
Design options:
- Single colour throughout for a clean, minimal look
- Alternating tones for a stripe effect
- Mixing straws and yarn rows for texture variation
Add fringe to the bottom using cut lengths of yarn for a completed, finished look.
Cost: Under $8 for all materials, including the wooden dowel.
The finished piece looks like considered textile art. It works in living rooms, bedrooms, or as part of a gallery wall.
24. Paper Collage Art
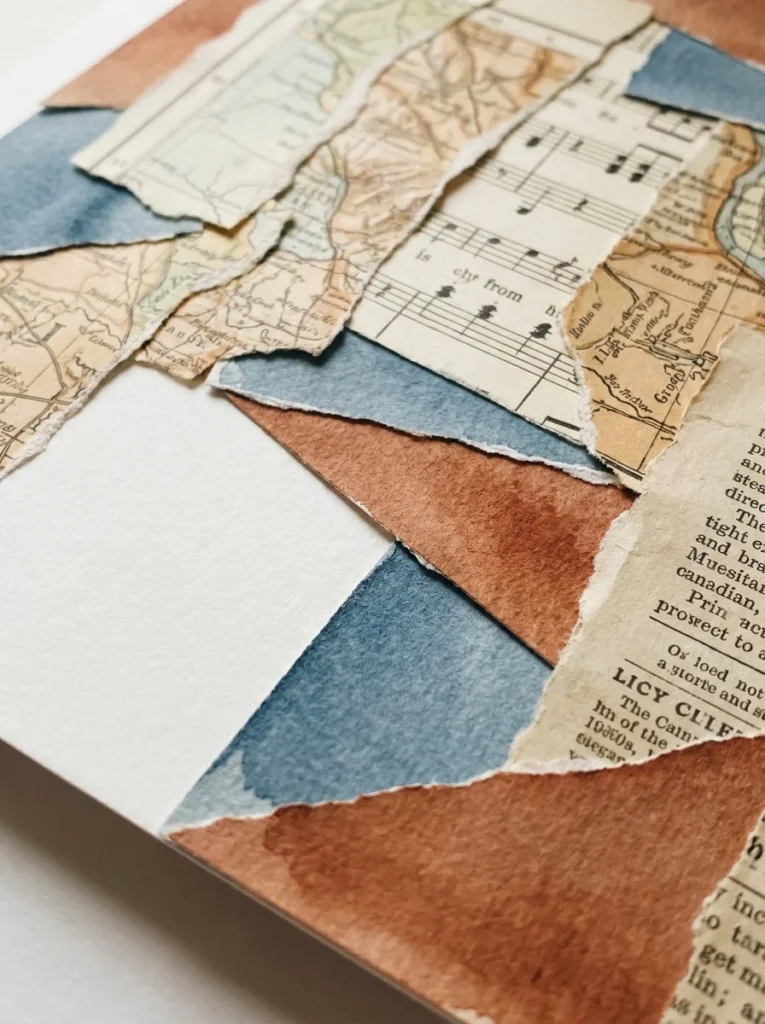
Collage is one of the most expressive paper crafts available. There are no rules, no templates, and no right answers.
The only skill needed is an eye for composition and a willingness to rearrange things before you glue.
Materials that make great collage:
- Old maps, atlases, sheet music, and book pages
- Magazine pages sorted by colour family
- Patterned origami paper
- Tissue paper in translucent layers
- Your own painted paper (even rough experiments work perfectly as collage material)
Building a collage:
Start with a background. Glue down a wash of tone, torn tissue paper, a painted sheet, a printed map. Then layer shapes and images on top.
The key technique: work in layers and step back frequently. Look at the whole composition, not just the part you are currently gluing. Adjust before anything is permanently fixed.
Finishing: Seal finished collages with a diluted PVA glue mix or Mod Podge to protect the surface and bond all layers permanently.
Cost: Nearly nothing. Old books and magazines are free. Glue is cheap.
Collage also works as a journaling practice, create a collage page in a sketchbook for each week, using whatever paper and imagery resonates. Over time, the collection becomes a visual record of your own aesthetic sensibility.
25. Paper Lanterns
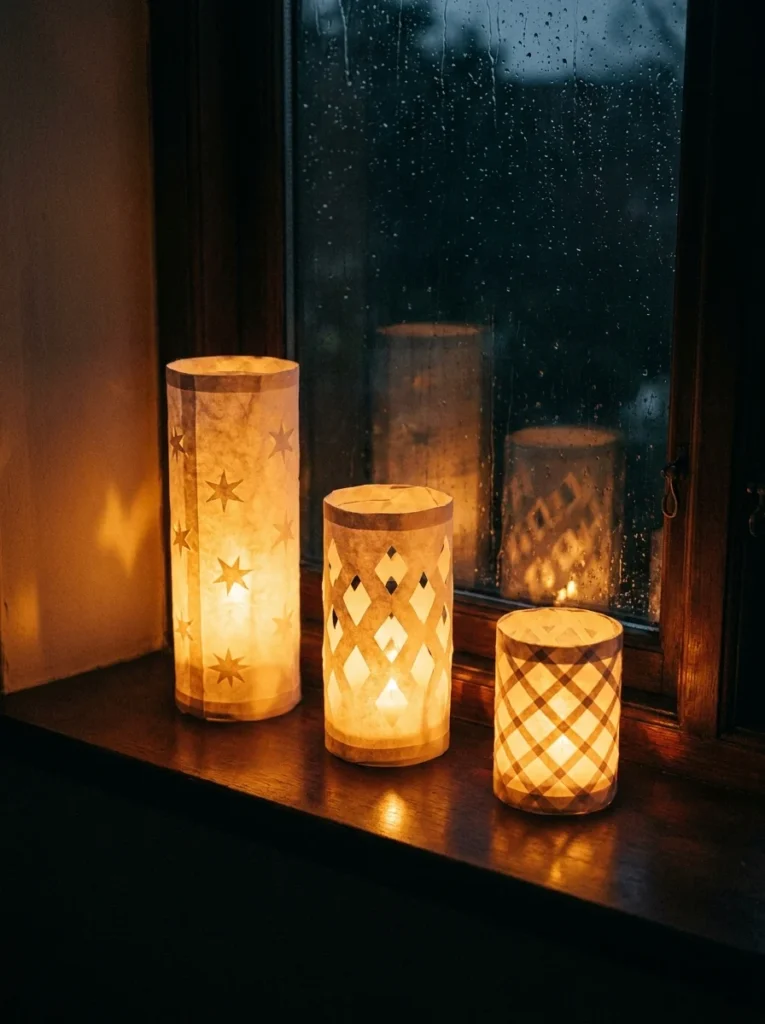
Paper lanterns add warm, ambient light to any space. Made from translucent paper, they glow beautifully when lit from inside.
Simple rolled lantern:
- Score vertical lines across a piece of paper at 1 cm intervals
- Fold along each score line, alternating the fold direction
- Roll the accordion-folded paper into a cylinder and glue the edges together
- Cut a circle of card for the base and glue the cylinder to it
- Add a handle from folded paper or wire
For the light source, use battery-operated LED tea lights only, never real candles inside a paper lantern.
Decorating lanterns:
- Cut geometric shapes from the paper before folding so the light shines through
- Use hole punches to create dot patterns
- Stamp patterns onto the paper before construction
Paper choices:
- Tissue paper for maximum translucency
- Rice paper for a refined, Japanese aesthetic
- Wax paper for a slightly frosted, diffused glow
Cost: $2–5 per lantern depending on paper choice.
Hang a cluster of lanterns at different heights in a corner of a room, or line them along a windowsill. The effect is extraordinary for such a simple project.
26. Paper Embossing
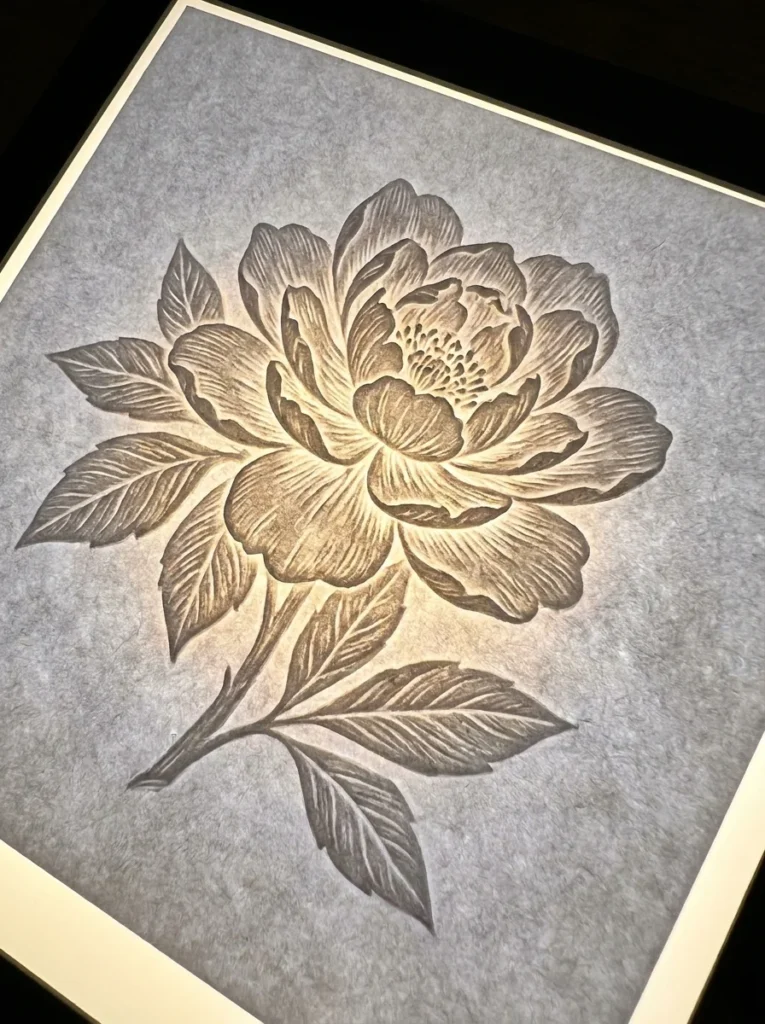
Paper embossing creates a raised or recessed design pressed into the paper surface. It is subtle, tactile, and immediately elevates any handmade card or stationery piece.
Two beginner methods:
Dry embossing with a stencil:
- Tape a brass stencil or plastic embossing stencil to your paper
- Place on a light box or tape to a window
- Rub over the stencil firmly with an embossing stylus
- The paper is pushed into the stencil’s openings, creating a raised design
Embossing powder (heat embossing):
- Stamp a design in slow-drying ink
- Pour embossing powder over the wet ink
- Tap off the excess
- Use a heat gun to melt the powder, it sets into a glossy, raised design
Starter kit cost: Embossing stencils start at $2–4. A basic stylus costs around $3. Heat embossing starter kits are available for $10–15.
Best uses:
- Wedding and event invitations
- Gift tags and note cards
- Journaling inserts
- Personalised bookmarks
Embossed designs look particularly beautiful on vellum, the translucency makes the raised pattern visible from both sides, almost like stained glass.
27. Junk Journals
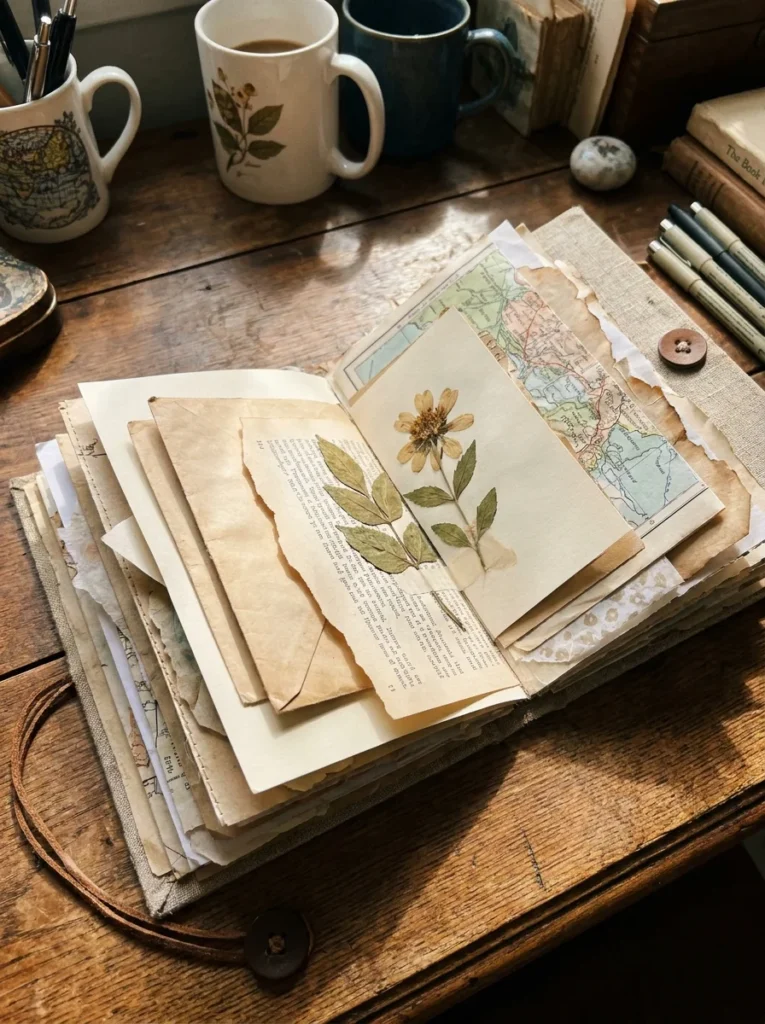
A junk journal is a handmade book assembled from mixed, recycled, and found paper, no two pages alike.
It is equal parts craft project, art journal, and memory keeper.
Materials to collect:
- Old envelopes (especially with postmarks or patterned linings)
- Grocery bags, kraft paper bags
- Wrapping paper off-cuts
- Newspaper pages and magazine pages
- Old book pages and sheet music
- Paper bags from shops
Binding options:
The simplest approach: fold paper sheets together in groups of 4–6 pages (called signatures). Sew through the fold with a needle and linen thread. Repeat with multiple signatures, then stitch them together at the spine.
For a beginner, just punch three holes along the spine and tie the sections together with ribbon or twine.
Cover materials:
- Chipboard covered in kraft paper or fabric
- A hardcover book reused as the cover
- Card stock reinforced with layers of decoupage
Cost: Essentially free. Almost every material is recycled or collected.
The beauty of junk journals is that nothing has to match. The more eclectic the paper combination, the more character the journal has. Many makers deliberately seek out old, aged papers for the nostalgic quality they bring to the finished piece.
28. Paper Quill Typography
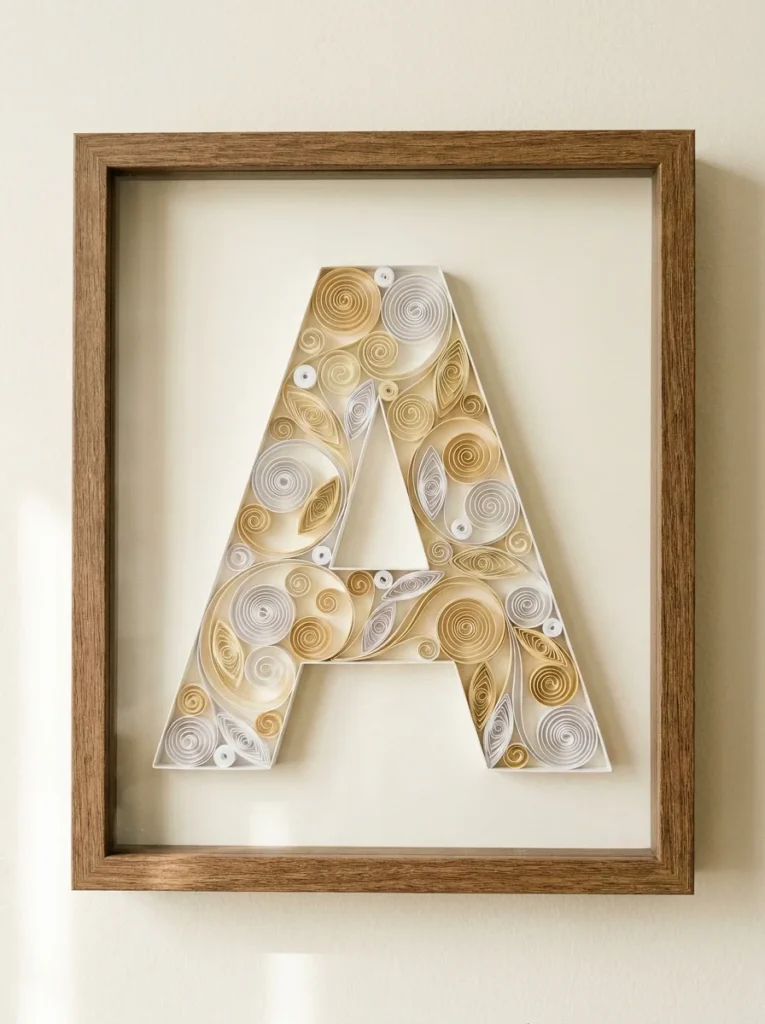
Quilled typography takes the quilling technique, rolling and shaping paper strips, and uses it to construct letters, words, or short phrases as wall art.
A name, a date, a single initial, each becomes a dimensional, sculptural piece.
How to approach a quilled letter:
- Draw or print your letter in a bold, thick font at the size you want to work in
- Place the template under a piece of glass or wax paper to use as a guide
- Build the outline of the letter first using a folded strip of paper as a border
- Fill the interior with different quilling shapes — scrolls, coils, teardrops
The letter holds its shape once the outline is in place. Fill the interior densely for a rich, textural result.
Scale considerations:
Small letters (5–8 cm) take 1–2 hours. Larger letters (15–20 cm) can take 4–6 hours.
Start with one initial and frame it as a standalone piece. Later, spell out a full word using one letter per panel.
Materials needed:
- Quilling paper strips ($4–6 per pack)
- Quilling tool or toothpick
- White glue and a toothpick for applying glue precisely
- Shadow box frame
Quilled typography is one of the most impressive finished results in paper craft — and one of the most requested commissions if you decide to sell your work.