

Clay is having a major moment — and honestly, it deserves it. Whether you’re working with air-dry clay or polymer clay, the things you can make for your room are genuinely adorable, affordable, and 100% yours. You don’t need to be an artist. You don’t need expensive tools. All you need is a pack of clay, your hands, and a little patience. From tiny trinket dishes to boho wall art, these 23 ideas will give your space that cozy, handcrafted charm that no store-bought decor can match. Ready to get your hands dirty?
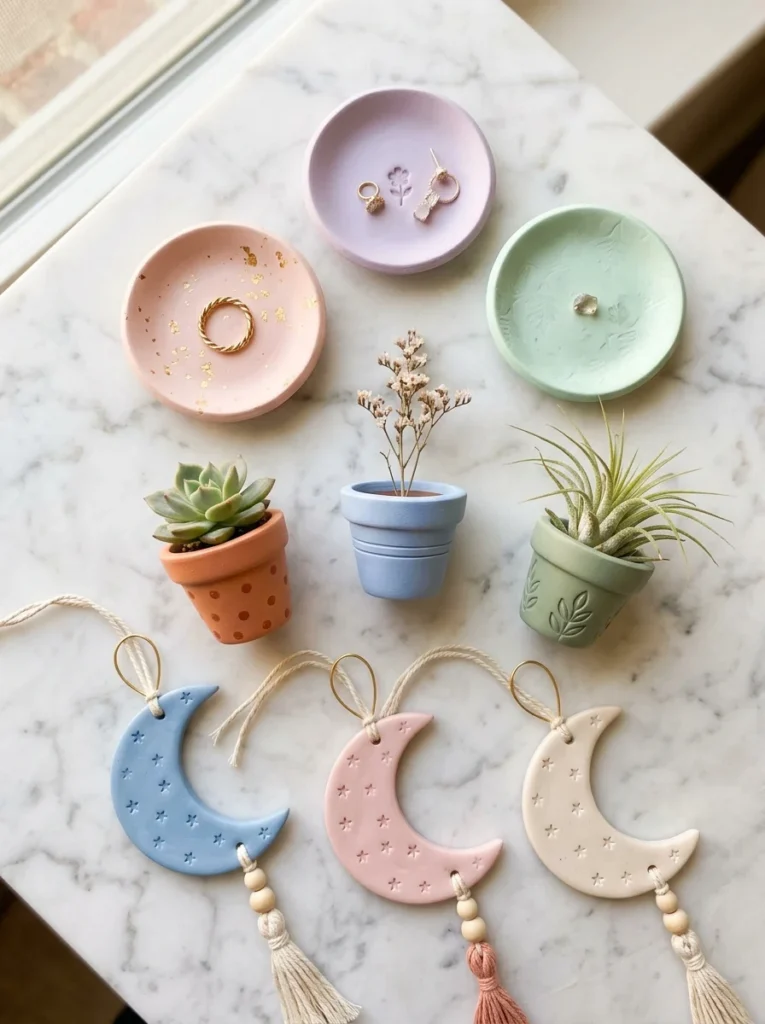
1. Pastel Ring Dish with a Scalloped Edge
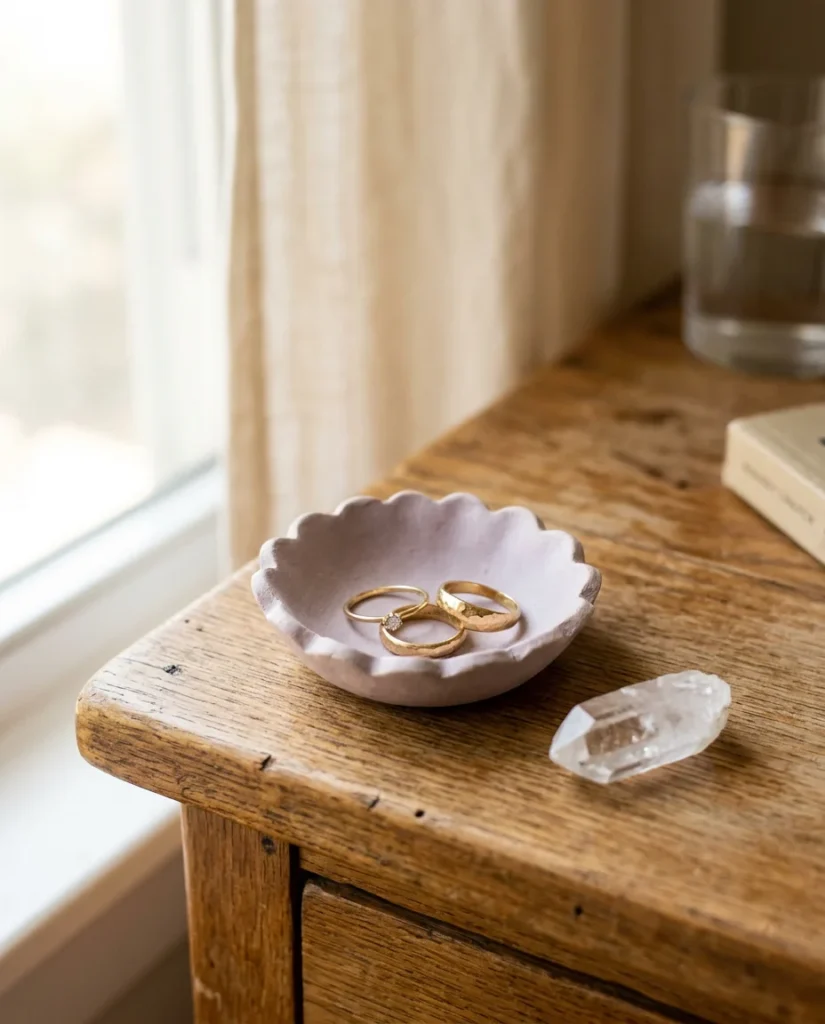
A ring dish is one of the easiest clay projects for beginners, and one of the most useful.
Roll out your clay to about half a centimeter thick. Press a small bowl or cup into the center to create a shallow dish shape. Then use your fingers or a butter knife to pinch scalloped edges all the way around.
Air-dry clay works perfectly here. Let it dry for 24 hours, then paint with pastel acrylic paint.
A soft lavender, dusty rose, or sage green color looks stunning on a nightstand. You can add a thin coat of Mod Podge once the paint dries to give it a slightly glossy finish.
The whole project costs under $5 if you already have paint at home.
You can make a set of three in different sizes — they look beautiful stacked or grouped together on a vanity tray.
This is also a great gift idea. A little ring dish with someone’s initial painted on it? Incredibly thoughtful and personal.
2. Mini Mushroom Sculptures for a Shelf
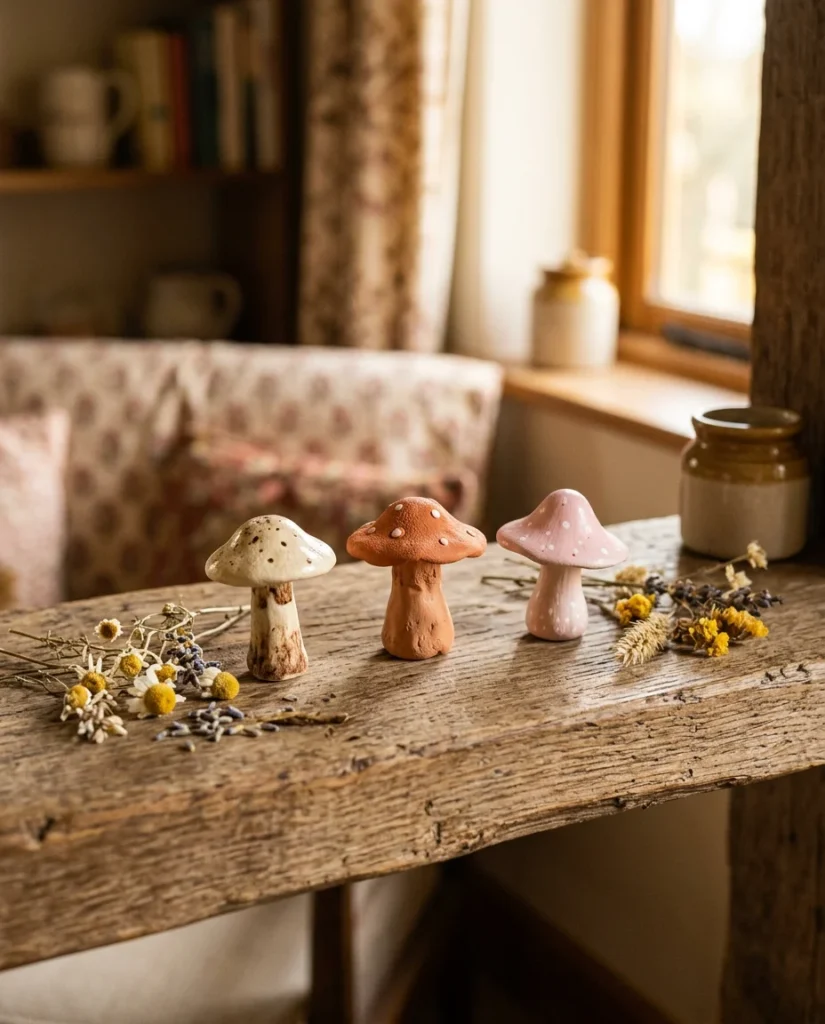
Mushroom decor is everywhere right now, and making your own tiny clay mushrooms is so satisfying.
To make a basic mushroom, roll a small oval of clay for the cap and a short cylinder for the stem. Press them together gently and shape the cap into a dome. Add tiny white polka dots with a toothpick or the end of a pen.
Make them in a range of sizes, a tall skinny one, a wide chunky one, a tiny baby mushroom. They look adorable grouped together on a bookshelf or windowsill.
Paint them in earthy tones: terracotta, cream, forest green, burnt orange.
Air-dry clay is ideal for this project. Once painted, seal with matte varnish so the colors stay fresh.
You can make a whole little mushroom forest for under $10 total. Buy a bag of air-dry clay from a dollar store or craft store and grab some cheap acrylic paint. That’s really all you need.
These also look great displayed in a small wooden tray with dried moss or pebbles around the base for a whimsical, nature-inspired vibe.
3. Clay Moon Phase Wall Hanging
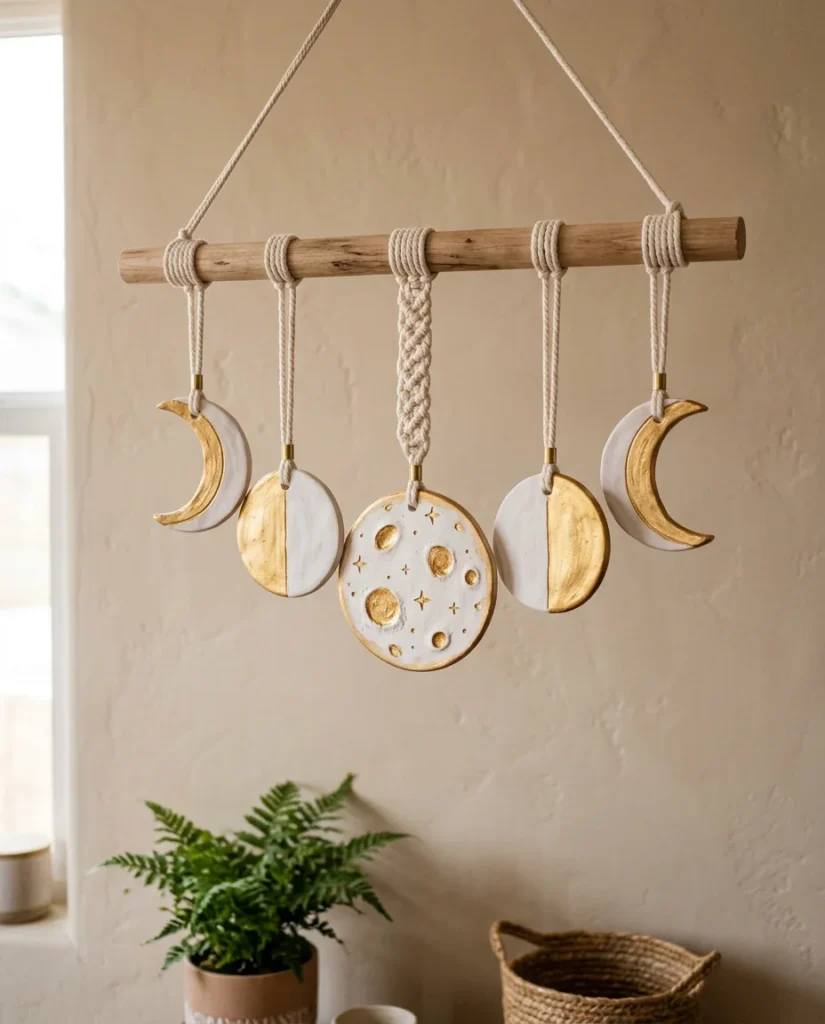
Moon phase wall art looks incredibly high-end, but it’s genuinely simple to make.
Roll out your clay and cut out five shapes: a full circle, two half circles, and two thin crescent shapes. These represent the phases of the moon. Let them dry completely.
Sand the edges lightly with fine sandpaper once dry for a smooth, clean look. Then paint them in white, soft gray, or a mix of white and gold.
Use gold metallic acrylic for the full moon, it catches the light beautifully.
Thread them onto a wooden dowel using twine or thin macramé cord, spacing them evenly. Hang the dowel from a wall hook or a piece of driftwood.
This whole project can cost under $8 if you shop smart. Wooden dowels are cheap at any hardware or craft store. Air-dry clay is affordable in bulk.
The finished piece looks like something you’d pay $35 for on Etsy.
Hang it above a bed, above a desk, or in a reading corner. It brings a calm, dreamy energy to any room.
4. Personalized Initial Keychain
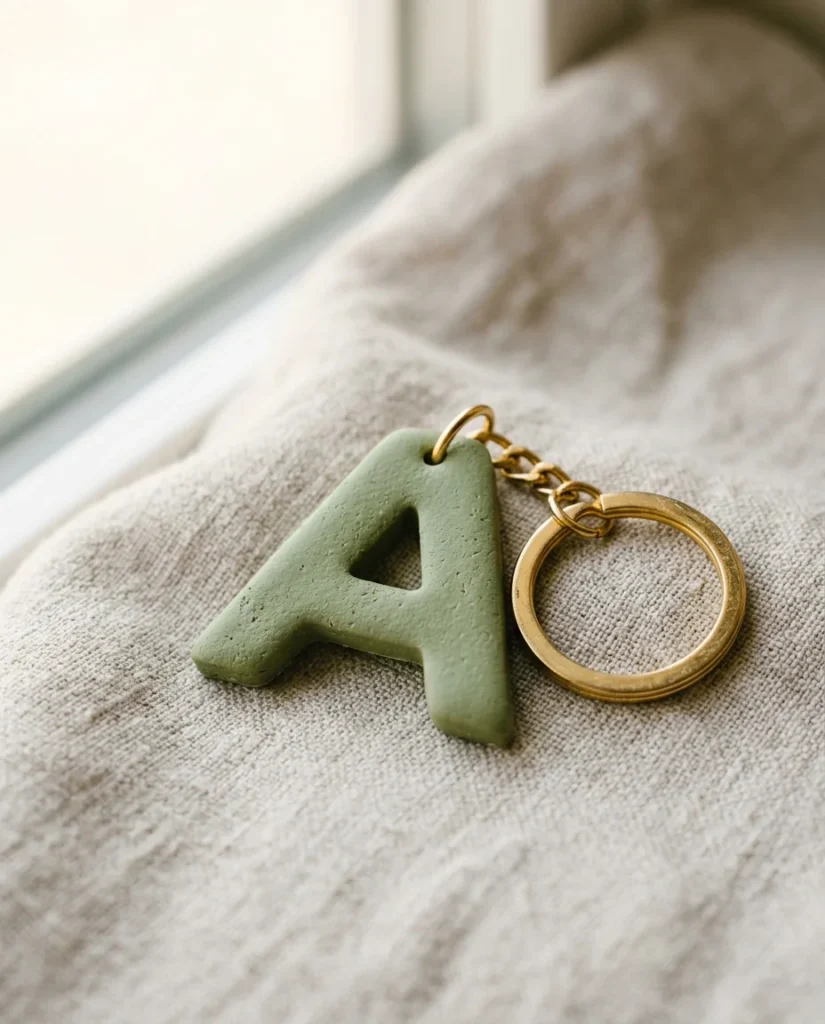
A clay initial keychain is quick, personal, and makes a great gift for under $2.
Polymer clay is best for this project because it’s stronger after baking. Roll out a small amount and use a letter-shaped cookie cutter or carve the letter freehand with a toothpick. Make a small hole at the top before baking.
Bake according to your clay brand’s instructions, usually around 130°C for 15–20 minutes.
Once cooled, paint with acrylic paint. Pastel shades look so cute on small pieces. Try terracotta, dusty blue, soft pink, or sage green.
Seal with a clear varnish and attach a keyring through the hole.
You can make these for all your friends using a single pack of polymer clay that costs about $5–$8. One pack gives you enough for 15+ keychains easily.
Mix and match colors for a fun set, make a whole alphabet if you want to get creative.
These also work beautifully as bag charms, zipper pulls, or even as gift tags on presents. Small, but so charming.
5. Textured Abstract Wall Tiles
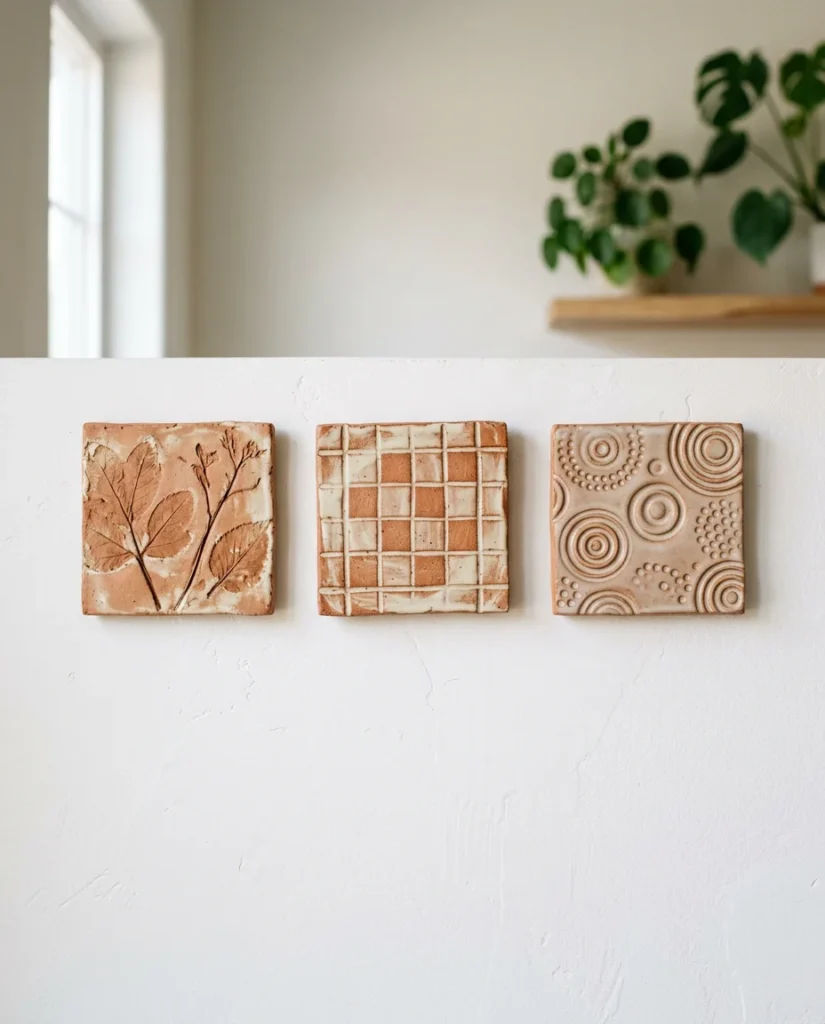
Textured clay wall tiles are one of those projects that look incredibly artistic but are actually beginner-friendly.
Roll out your clay into a square or rectangle. Then press objects into the surface to create texture — a fork, a piece of lace, a leaf, a crumpled piece of aluminum foil. Each one gives a completely different pattern.
Make a small hole at the top before drying so you can hang them.
Terracotta-colored paint looks stunning on textured tiles. Or go for a washed white effect, paint white, then wipe back to reveal the texture underneath.
Once dry and painted, arrange three or five tiles in a grid pattern on your wall. Use small nails or adhesive strips to hang them.
This project costs about $5–$10 for a full set of six tiles.
You can also paint them in matching colors but with different textures for a cohesive, gallery-wall feel. Mix circle textures with leaf textures with grid textures.
The finished result looks like high-end artisan wall decor. Your guests will absolutely ask where you bought them.
6. Tiny Cactus Planters
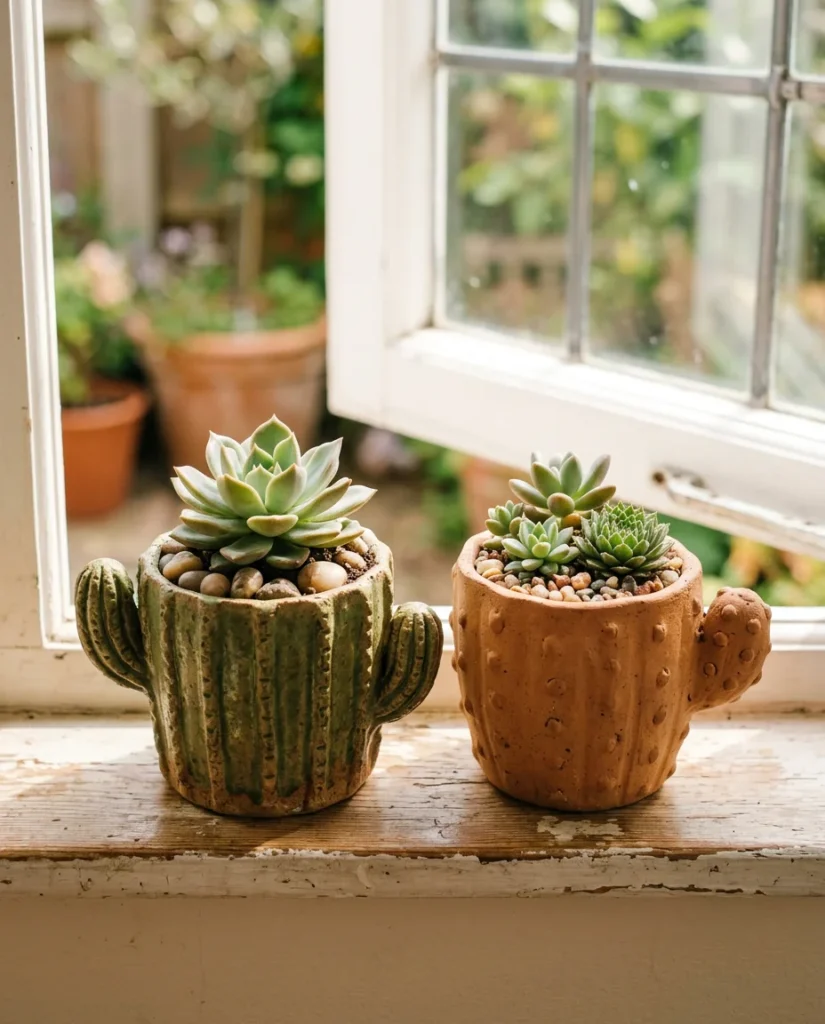
Clay cactus planters are so cute they almost hurt.
Start with a cylinder of air-dry clay for the main body. Pinch the top slightly and add two short arm shapes on the sides, just like a cartoon cactus. Hollow out the top center carefully using a small spoon or your thumb to create a planting hole.
Let it dry for 48 hours before adding soil.
Paint it in sage green or light terracotta. Add tiny ridged lines down the sides using a toothpick to mimic real cactus texture.
Plant a small succulent or air plant inside. These plants barely need water, so they’re perfect for this kind of handmade pot.
The planter itself costs about $1–$2 to make if you buy clay in bulk. Add a small succulent for $3–$5 from a garden center or grocery store.
Make a set of three, different heights and arm configurations, and group them on a windowsill or bookshelf. They look adorable together.
You can also paint the outside with tiny colorful flowers for an extra whimsical touch.
7. Heart-Shaped Candle Holder
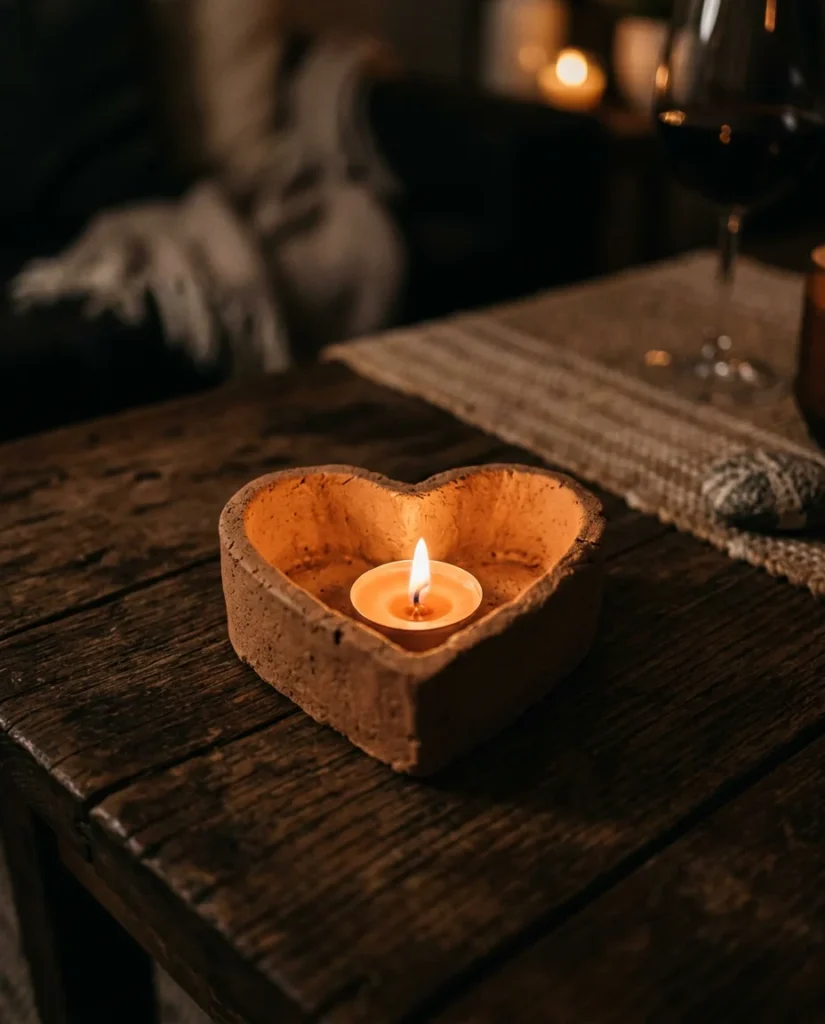
There’s something so cozy about a handmade candle holder on your desk or dresser.
Make a simple heart shape out of clay, flatten it slightly, then press your thumb in the center to create a small hollow just big enough for a tea light candle. Smooth the edges with your fingertip dipped in a tiny bit of water.
Make the walls thick enough, at least 1 cm, so the candle heat doesn’t crack the clay.
Let it dry fully, at least 48 hours for air-dry clay. Do not rush this step.
Paint in a matte terracotta, blush pink, or deep burgundy. Leave some raw clay texture showing for a rustic look.
Once painted and sealed, pop a tea light inside. The warm glow through the clay looks incredibly atmospheric.
Cost: under $3 total.
Make several and give them as gifts. Wrap in tissue paper and a little ribbon — they look store-bought but are completely homemade.
You can also experiment with star shapes, moon shapes, or simple round holders. Any shallow hollow works for a tea light.
8. Boho Bead Curtain with Clay Pieces
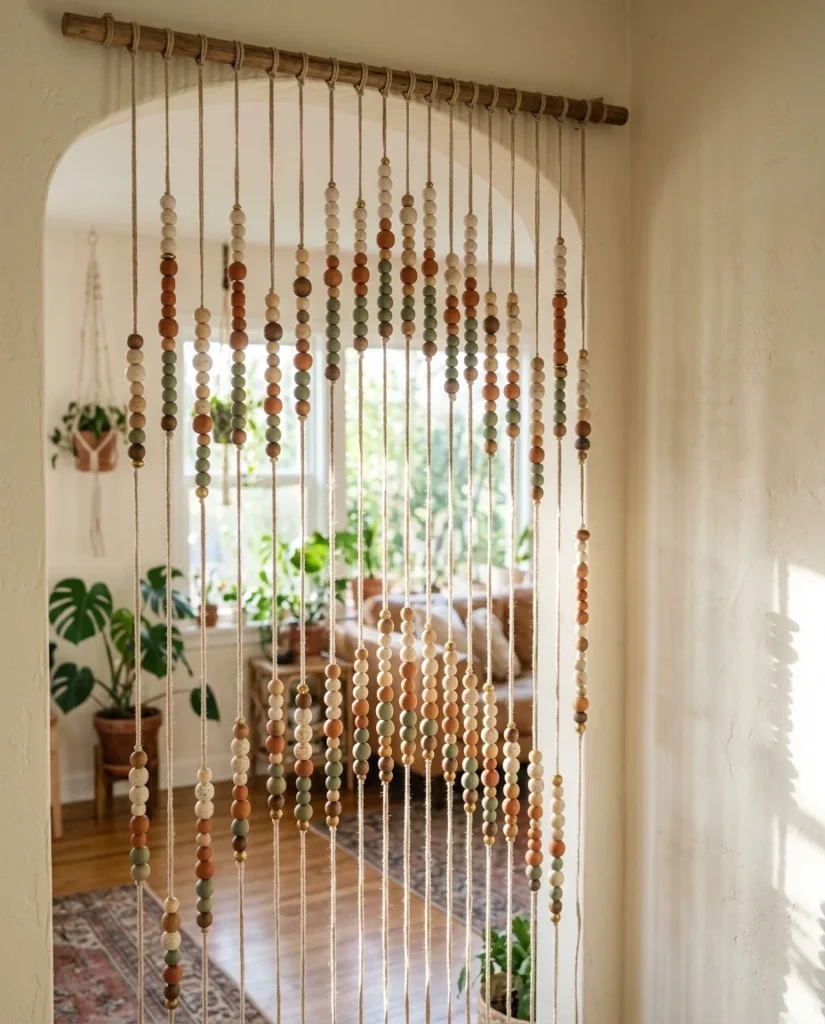
A clay bead curtain is a statement piece that completely transforms a doorway or window.
Make clay beads by rolling small balls of clay, then poking a hole through the center with a skewer or thick needle before drying. Make lots, you’ll need 30 to 50 per strand depending on length.
Mix shapes: round beads, flat disc beads, tiny tube beads. Variety makes the curtain more interesting.
Once dry, paint in a cohesive palette, think earthy tones like cream, terracotta, rust, and sage green. You don’t have to paint every bead. Leave some raw clay for a natural look.
Thread onto thick linen cord or jute twine, alternating clay beads with wooden beads for weight and movement.
Attach to a dowel or curtain rod and hang.
Total cost: around $15–$20 for a full curtain, depending on how many strands you make.
This project takes more time than others, but it’s very meditative to make. Put on a podcast and roll beads for an afternoon.
The finished curtain looks amazing in a bedroom doorway or window frame.
9. Flat Leaf Dish for Your Desk
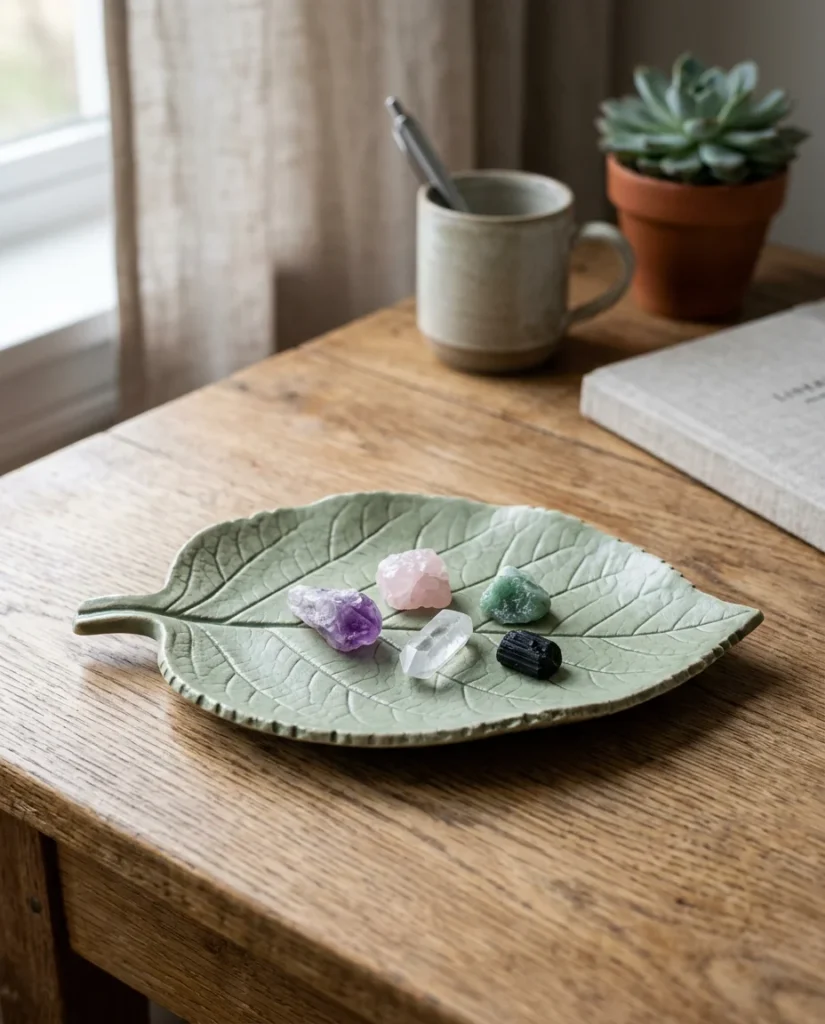
A leaf-shaped clay dish is beautiful, functional, and takes about 20 minutes to make.
Pick up a real leaf from your garden, the bigger and more textured, the better. Roll out your clay flat and press the leaf firmly onto the surface. Then cut around the leaf’s outline with a knife or clay tool.
Peel the leaf away. The clay will have a perfect, detailed vein impression on the surface.
Curl the edges up slightly before drying to give it that organic, realistic shape.
Once dry, paint in sage green, olive, or a gradient from cream to dusty green. A tiny wash of gold paint over the veins looks stunning.
Use it on your desk to hold paper clips, earrings, crystals, or a USB drive.
Cost: basically just the clay, so under $3.
You can make a whole set using different leaf types — oak, maple, monstera. Each one has a unique shape and texture.
These also work as soap dishes in a bathroom, or as a small snack dish. They’re sturdy, pretty, and completely unique.
10. Woven Texture Coasters
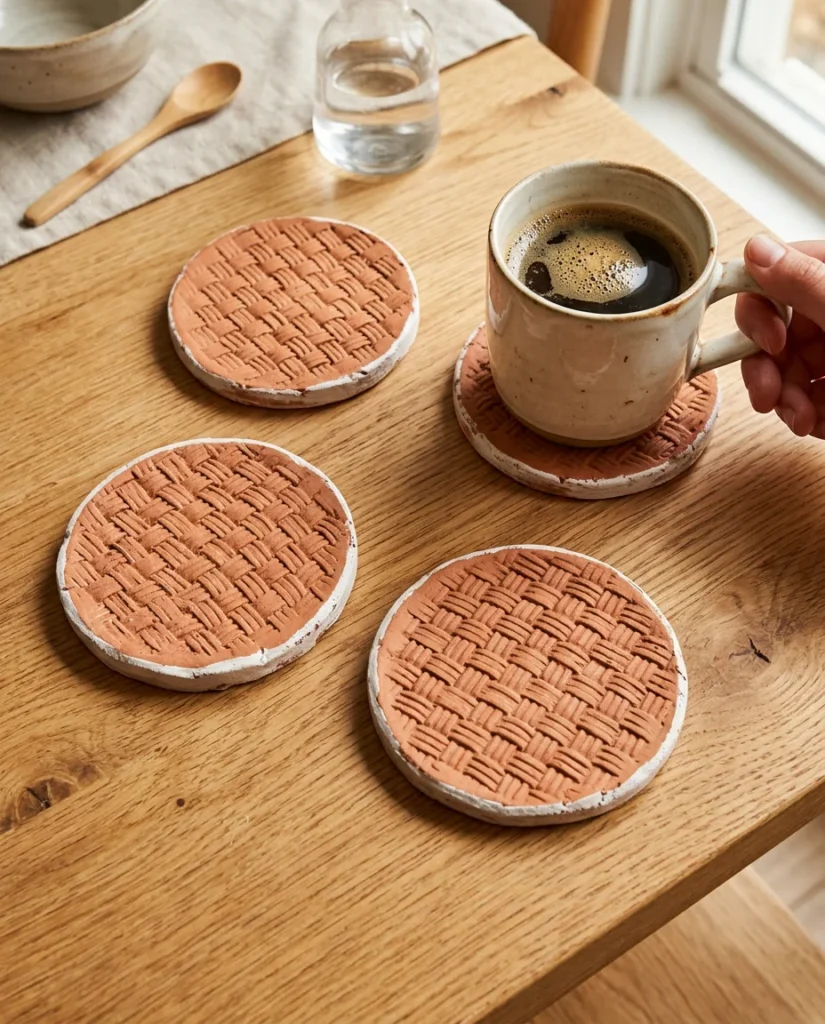
Clay coasters are one of the most practical things you can make — and the woven texture version looks especially polished.
Roll out clay to about half a centimeter thick. Use a small piece of woven fabric, burlap, or basket material and press it firmly into the clay surface. Lift it away to reveal a beautiful woven texture.
Cut into circles using a round cookie cutter or the rim of a drinking glass.
Smooth the edges by rolling them gently between your fingers.
Let dry, then sand lightly. Paint in terracotta, beige, or slate gray. Add a white or cream color wash for depth.
Seal with at least two coats of waterproof Mod Podge or varnish on the top surface so they can actually hold a cup without getting damaged.
Glue small felt circles to the bottom to protect surfaces.
Cost: about $5–$8 for a set of four coasters.
These make beautiful gifts, wrap in a set of four with a small card. Coasters are something everyone uses.
You can also do leaf texture, geometric stamped patterns, or floral impressions using old jewelry.
11. Hanging Star Ornaments
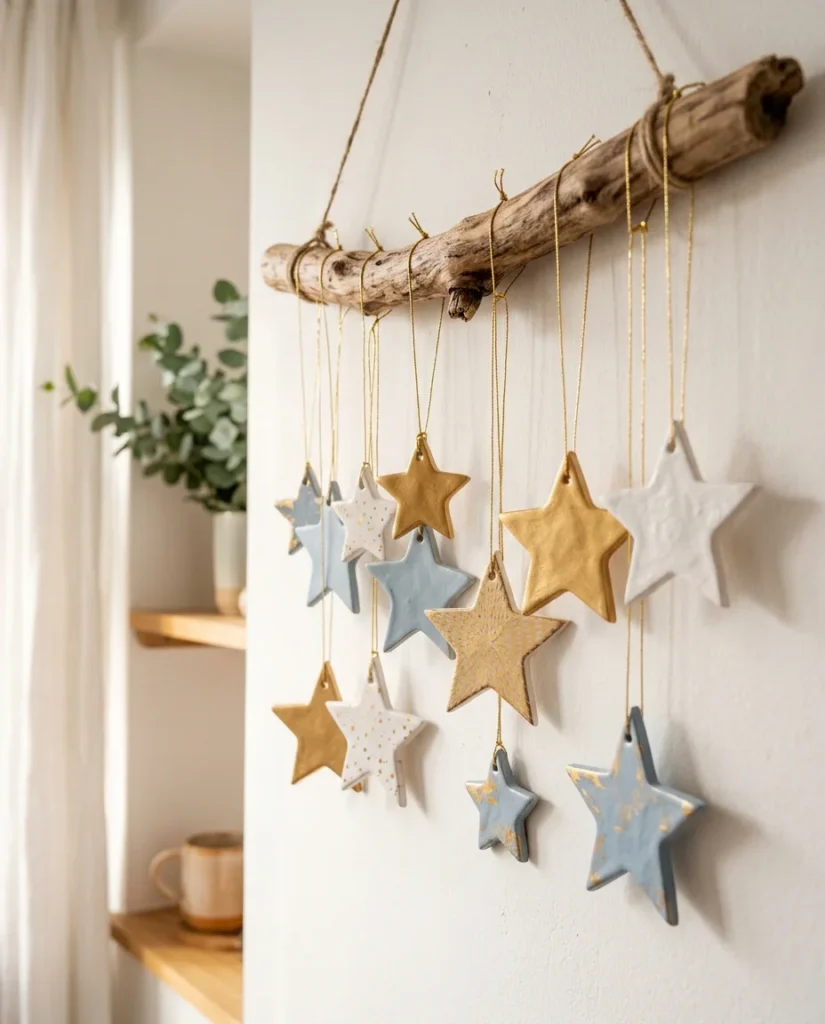
Hanging clay stars are incredibly simple and look like something from a high-end home store.
Use a star-shaped cookie cutter on rolled-out clay. Make a small hole at one point of the star before drying.
Make stars in three sizes, large, medium, and small. A cluster of different sizes looks much more interesting than identical shapes.
Once dry, paint in your choice of colors. White with gold edges is a classic. Midnight blue with silver is moody and beautiful. Soft pink for a sweet, feminine vibe.
Thread thin gold or silver cord through the hole and hang from a wall-mounted branch, a curtain rod, or directly from a ceiling hook.
You can hang a single large star above a headboard, or create a cluster of 10–15 stars at varying lengths for a dramatic wall installation.
Cost: under $5 for a full set.
These are perfect for seasonal decor but look great year-round in a boho or minimalist room.
Add tiny stamped patterns or carved lines to the surface before drying for extra texture and detail.
12. Sculpted Flower Vase Topper

You can upgrade a plain vase you already own by adding clay sculpted flowers to the outside.
Use polymer clay for this, it adheres better to surfaces and is stronger once baked.
Sculpt small flat flowers: roll tiny balls, press them flat into petal shapes, arrange five or six around a center dot. Make several flowers of different sizes.
Press them gently onto the outside of a heat-safe vase before baking. Bake the whole vase-and-clay piece together in the oven if the vase is ceramic or glass.
Paint the flowers the same color as the vase for a tonal look, or contrast them in white on a terracotta vase.
Cost: one pack of polymer clay ($5–$8) transforms a dollar-store vase into something beautiful.
You can also use air-dry clay for this project, just glue the dried flowers onto the vase with strong craft glue like E6000.
This works on candle holders, ceramic mugs, or even plant pots. Adding dimensional clay details gives any plain object an artisan upgrade.
13. Abstract Face Wall Plaque

Abstract clay face plaques are all over interior design right now, and making your own is surprisingly achievable.
Start with an oval slab of clay about 1 cm thick. Sculpt simple features: a nose made from a small flattened triangle, closed eyes as two curved lines drawn with a toothpick, soft lips.
Keep the features minimal, the less detail, the more artistic it looks. Don’t try to make it realistic.
Smooth the face surface with your finger dipped in water. Make a small hole at the top for hanging.
Let dry, then leave the clay its natural color, air-dry clay in its raw terracotta or white shade looks beautiful, or paint in a single flat color.
Mount on the wall beside a trailing plant or as part of a gallery wall arrangement.
Cost: under $4.
You can also add texture around the edge, press a fork lightly around the border for a decorative rim effect.
Make several faces in different moods: serene, smiling, side profile. A collection of three face plaques looks like a proper art installation.
14. Geometric Catchall Tray
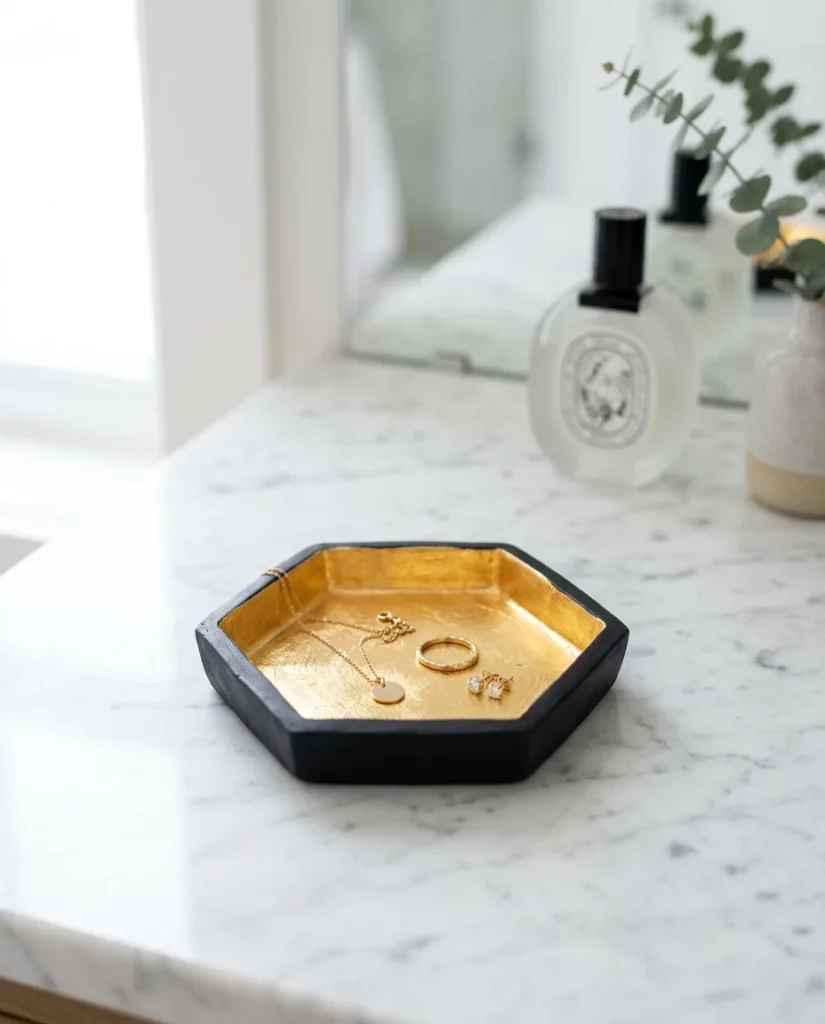
A geometric clay tray is functional, stylish, and incredibly easy to shape.
Roll out clay flat. Then fold up the edges to create walls, triangle, hexagon, or square shapes all look great. Press the corner folds firmly to hold, and smooth them with wet fingers.
Hexagon shapes feel especially luxe, trace a hexagon template from paper and cut around it before folding.
Let dry completely. Then paint. Black inside with gold outside looks sleek. All-white is clean and minimal. Rose gold is glamorous.
Use it on a vanity to hold rings and earrings. On a desk for paperclips and small items. On a bathroom counter for a soap bar.
Cost: under $3.
These make amazing gifts for practically anyone. Add someone’s initial painted in gold inside the tray for a personalized touch.
You can also marble the clay before shaping, twist two colors of clay together and roll out for a natural marbled effect. No painting required.
15. Painted Pebble-Style Clay Pieces for Shelf Styling
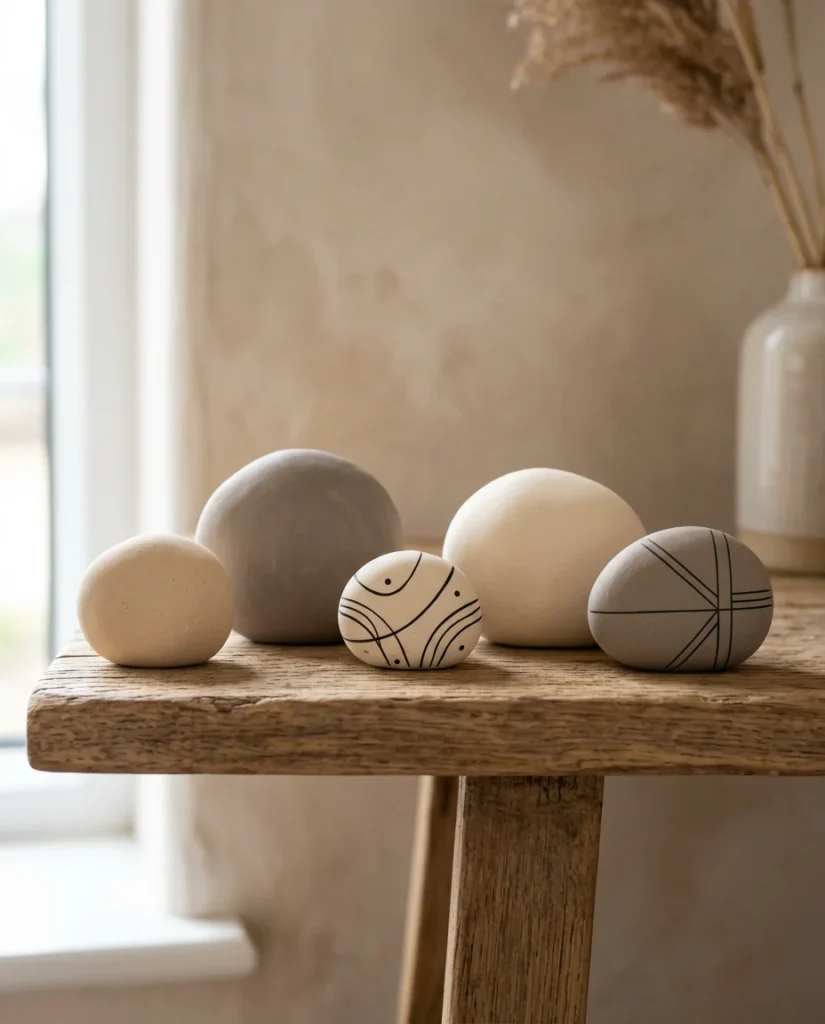
These smooth, pebble-shaped clay pieces are one of the easiest projects in this whole list, and they photograph beautifully.
Roll clay into smooth oval and rounded shapes of different sizes. Don’t make them identical slight variation is the whole point.
Let them dry completely, then sand to a very smooth finish.
Paint in a limited neutral palette: off-white, warm cream, light stone gray. Use a single flat color per pebble.
Once painted, you can add simple line art with a thin black marker or paint pen: a single leaf outline, a tiny moon, a simple wave. Keep it minimal.
Arrange five to seven pebbles on a shelf or window ledge alongside a candle and a small plant.
Cost: under $5 for a full collection.
These are also great for labeling. Paint herb pot markers on them: “basil,” “mint,” “rosemary.” Or write room names for a cute organizational system.
Grouped together, they look like a curated styling prop from a professional interior photoshoot. Alone, they look like a thoughtful little accent.
16. Clay Earring Holder Stand
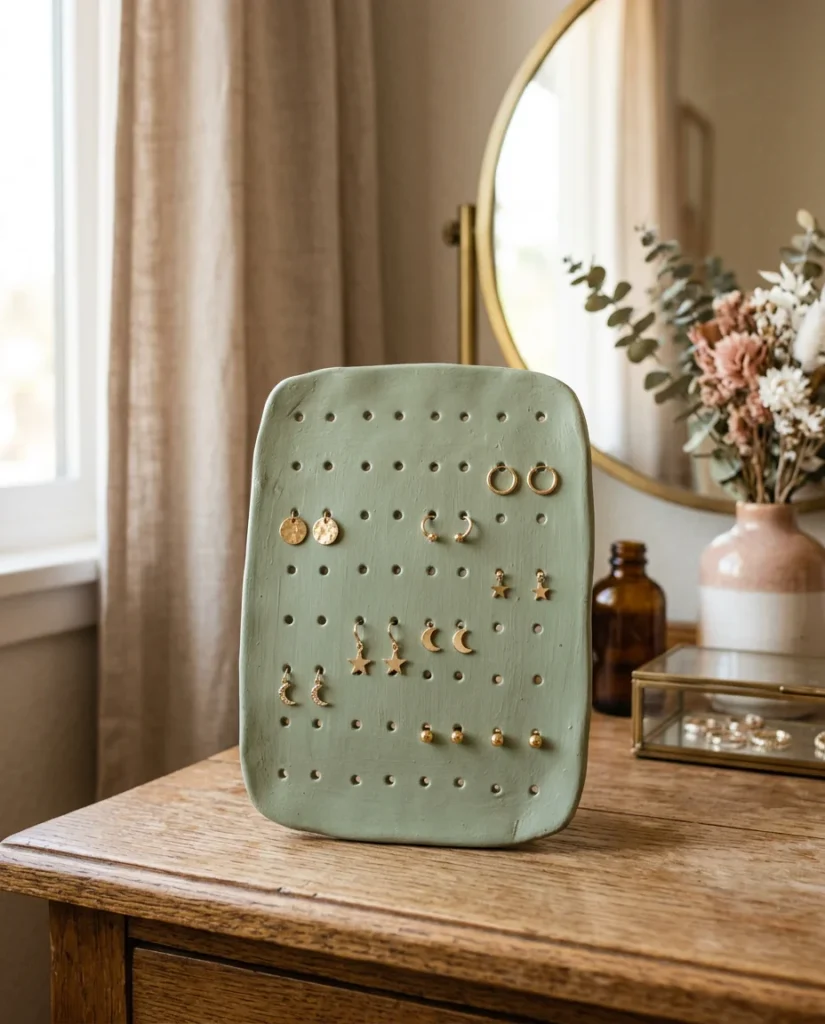
A clay earring holder keeps your jewelry organized and looks gorgeous on a vanity.
Roll out clay into a rectangle about 5mm thick. Use a toothpick or straw to punch small holes in a grid pattern across the surface, these are where your earring hooks will hang.
Make the holes slightly larger than your earring wires so they slide in easily.
Add a small flat base at the bottom or two small feet so it stands upright. You can also add a hole at the top to hang it on the wall.
Let dry, sand lightly, and paint in your favorite color. Sage green, blush pink, and white are all popular choices for a vanity.
Once dried and sealed, hang earrings through the holes.
Cost: under $4 and holds 15–20 pairs of earrings.
You can also carve a simple pattern or your initial into the front surface before drying for decoration.
This project solves a real everyday problem while adding something pretty to your space. That combination is rare in DIY, and it’s why this one is worth making. If you enjoy making clay jewelry pieces, you might also want to learn how to make clay earrings that look stylish and handmade.
17. Pressed Floral Clay Frame
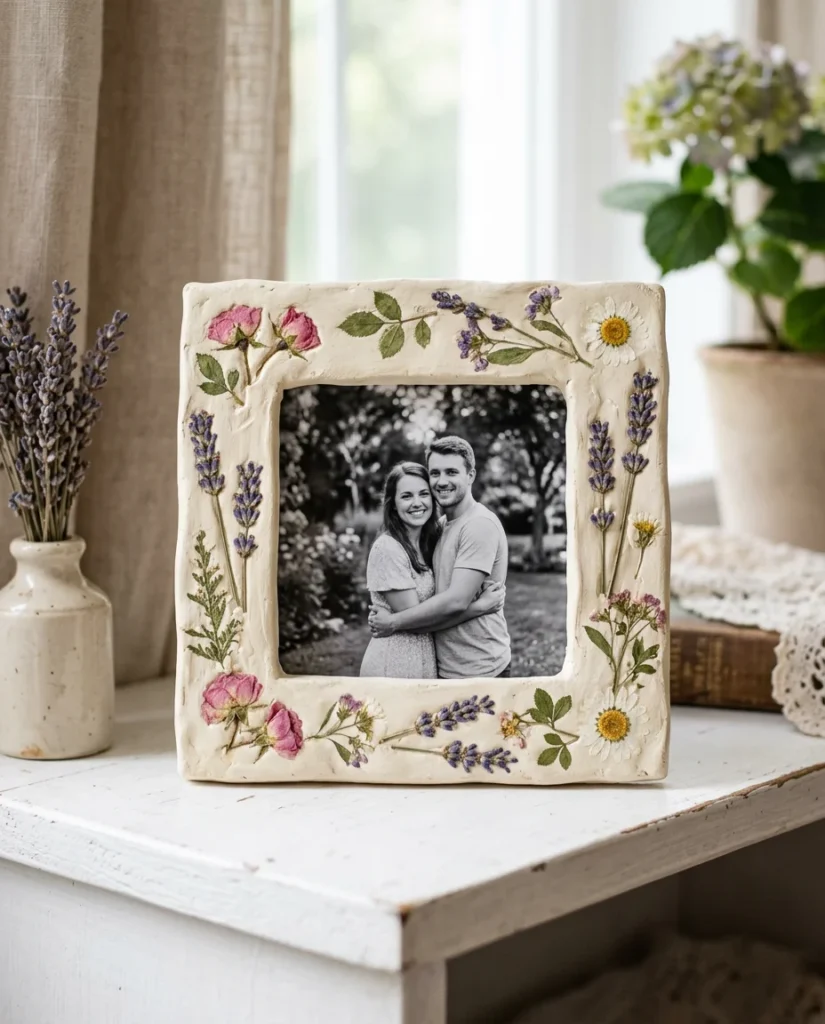
Embedding real flowers into clay creates something incredibly delicate and beautiful.
Collect small flat flowers: pressed pansies, lavender sprigs, tiny daisies. Press them for a few days between heavy books if they’re not already flat.
Roll out clay and cut a frame shape, a rectangle with a rectangular hole in the center. Gently press the dried flowers into the clay border. They’ll leave an impression even if they fall off during drying.
If the flowers stay in the clay, seal gently with Mod Podge after drying to preserve them.
Paint around the flowers with white or cream paint for a porcelain-like effect.
Insert a small photo or print behind the frame opening.
Cost: under $5.
This is one of the most giftable clay projects in the whole list. A frame with pressed flowers and a meaningful photo inside is a genuinely emotional gift.
You can also skip the photo and just hang the frame as a decorative piece, the flowers alone are enough.
18. Ombre Gradient Pinch Pot

Pinch pots are the most traditional beginner clay project, and they’re so satisfying to make.
Take a ball of clay and push your thumb into the center. Slowly pinch the walls upward and outward, rotating as you go. That’s it. That’s a pinch pot.
The irregular texture from your fingers is the beauty of it, don’t try to smooth it too much.
For the ombre effect: mix white paint and gradually add more color as you paint upward from the base. Start with pure white, add a drop of pink, then another drop, working up to full pigment at the rim.
Use a soft brush and blend each layer while still wet.
Fill with a tea light candle, a small succulent, or just leave empty as a decorative piece.
Cost: under $3.
Make a matching set in different sizes, a tall narrow one, a wide shallow bowl, a tiny thimble-sized one. They look beautiful grouped on a window ledge.
Pinch pots are also great for holding incense sticks, cotton swabs, or hair ties on your vanity.
19. Hanging Tassel Ornament with Clay Bead Top

A clay and tassel wall ornament is quick to make and adds serious boho charm to any wall.
Make a simple flat clay disc, about 4–5 cm across. Carve a simple geometric pattern into the surface using a toothpick. Make a hole at the top and bottom before drying.
Once dry and painted, terracotta, rust, or black all look great, make or purchase a tassel.
DIY tassel: cut 30–40 strands of wool or embroidery thread, fold in half, and tie through the bottom hole of the clay disc.
Thread gold cord through the top hole for hanging.
Hang on the wall as a standalone piece, or cluster three together at different heights for a gallery wall moment.
Cost: under $5 per ornament, especially if you use leftover wool or thread.
You can also add multiple tassels to the bottom of one larger clay piece for a dramatic effect.
These are especially beautiful in warm autumnal tones — rust, amber, cream, burnt orange, for a cozy seasonal look that works year-round.
20. Dinosaur or Animal Shelf Sitters
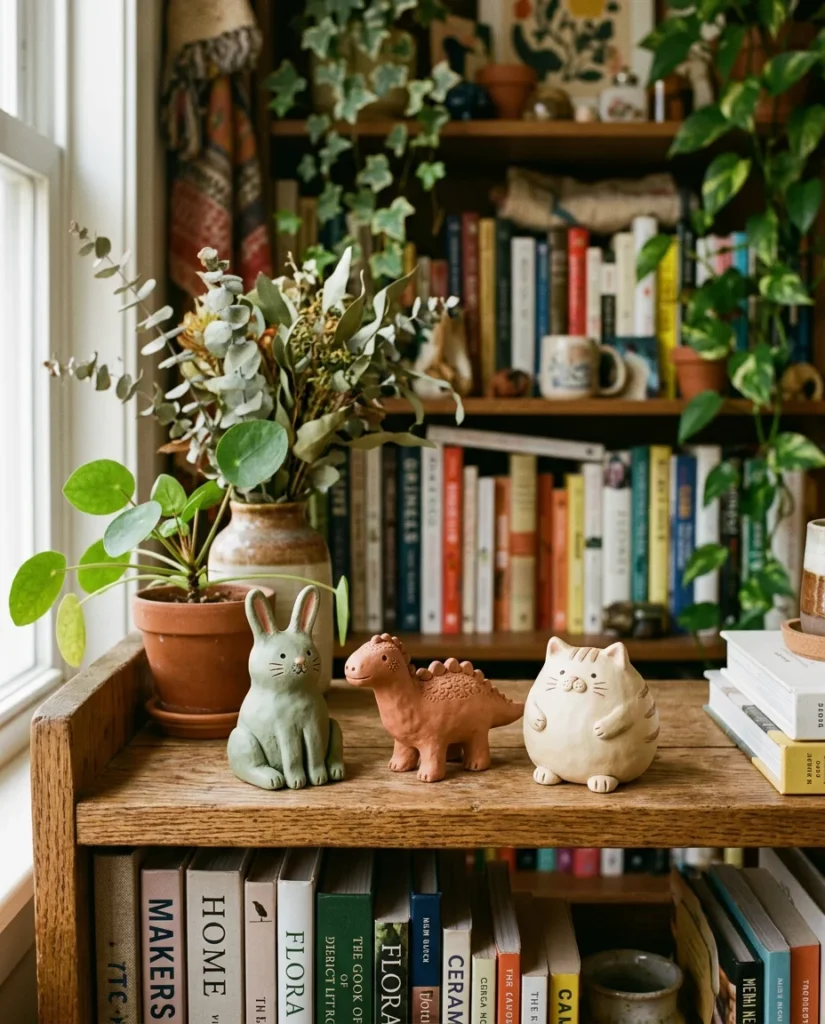
Tiny clay animals are just genuinely fun to make, and they look adorable on a bookshelf or desk.
For a simple sitting cat: roll a ball for the body, a smaller ball for the head, two tiny triangles for ears. For a rabbit: oval body, long ear rectangles, tiny feet. For a dinosaur: larger oval body, small legs, bumpy spine.
Keep the shapes simple and chunky, trying to add too much detail makes it harder, not better.
Let dry, then paint in matte pastel colors. A terracotta T-rex. A sage green bunny. A cream-colored cat with black dot eyes.
Use the tip of a toothpick to add tiny dot eyes, that single detail brings the whole face to life.
Seal with matte varnish.
Cost: about $1–$2 per animal with budget clay.
Line them up on a shelf among your books and plants. They make the space feel playful and personal without being childish.
You can also make seasonal animals, tiny Halloween bats, little Christmas reindeer, Easter chicks, and swap them out throughout the year.
21. Marbled Clay Bookends
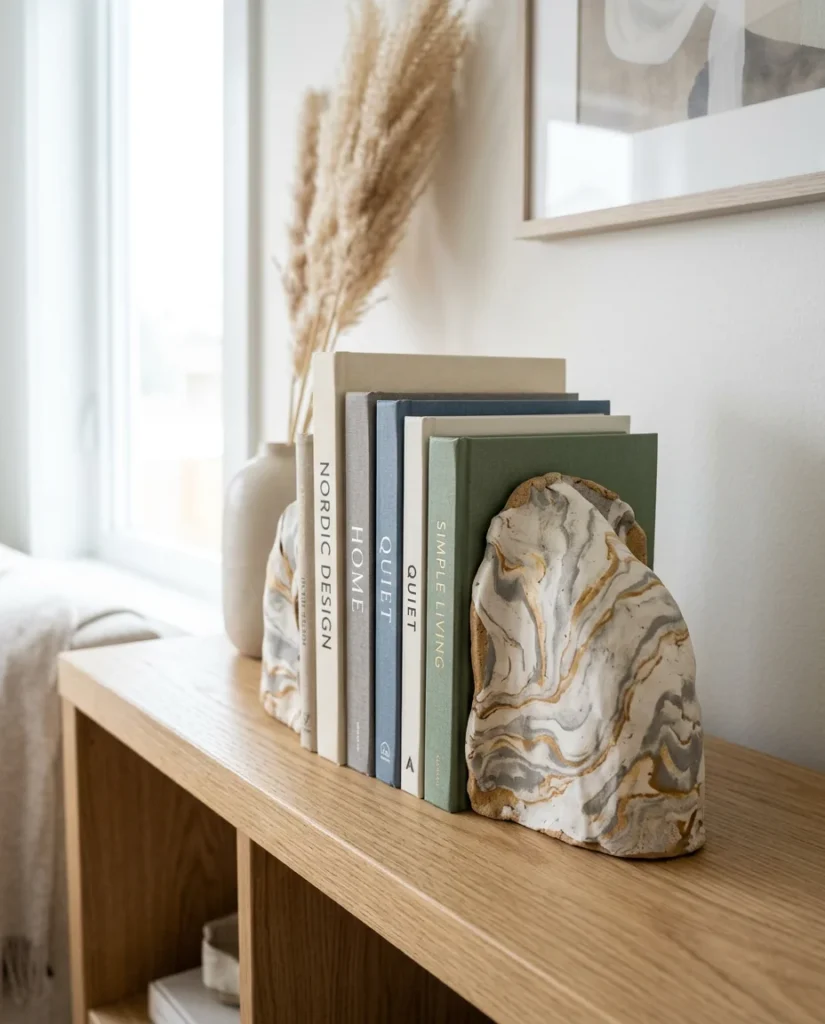
Marbled clay bookends look incredibly expensive but cost almost nothing to make.
Twist together two or three colors of clay white, gray, and a tiny bit of gold or black, without fully mixing them. Stop before the colors fully blend; you want that streaky, marbled look.
Roll into two matching thick square or triangular blocks.
Press them firmly onto a flat surface to create a stable base. They need to be heavy enough to actually hold books, make them solid, not hollow.
Let dry completely, this can take 48–72 hours for thick pieces. Or bake in the oven if using polymer clay.
Leave the natural marbled color with no paint. Just seal with a gloss or satin varnish.
The natural clay colors are beautiful: raw white and gray marbled together looks just like real marble.
Cost: one pack of white and one pack of gray clay, plus gold paint for veins, around $8–$12 total.
These work as actual functional bookends for lightweight paperbacks. They’re also beautiful as decorative objects even without books.
22. Floating Shelf Display Bowl
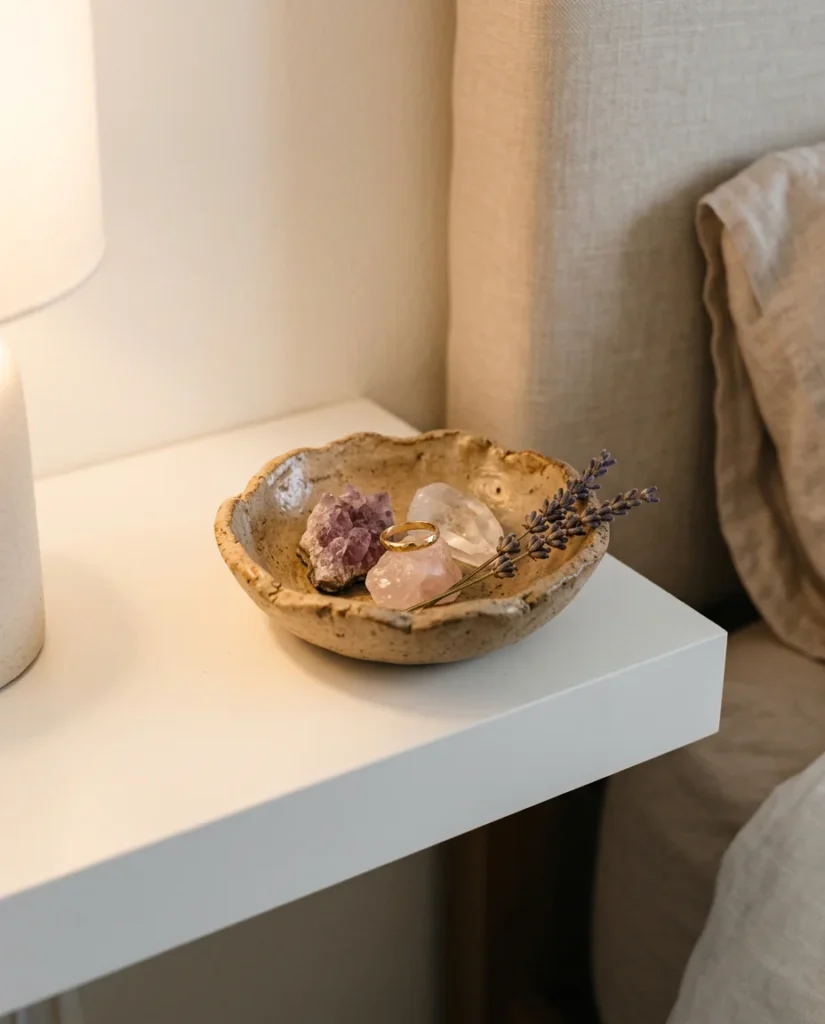
A display bowl doesn’t need to be functional, it just needs to look good and hold a few pretty things.
For an organic bowl shape: flatten a ball of clay, then gently push up the edges with your fingers. Don’t try to make them perfectly even. Uneven, organic edges are what makes it beautiful.
The slightly wonky shape is the aesthetic, embrace it rather than fight it.
Let dry on a flat surface so the base stays level.
Once dry, paint inside and out in a single color, matte black, terracotta, dusty pink, or raw clay white.
Fill with whatever you’d like to display: crystals, dried flowers, a few earrings, a pretty pebble from a beach trip.
Cost: under $3.
Place on a floating shelf, a bedside table, or a bathroom counter. It creates a little styled vignette that makes the whole space feel more considered.
Make two or three in different sizes and nest them slightly inside each other for a layered display effect.
23. Stamped Clay Gift Tags for Room Labels or Wrapping
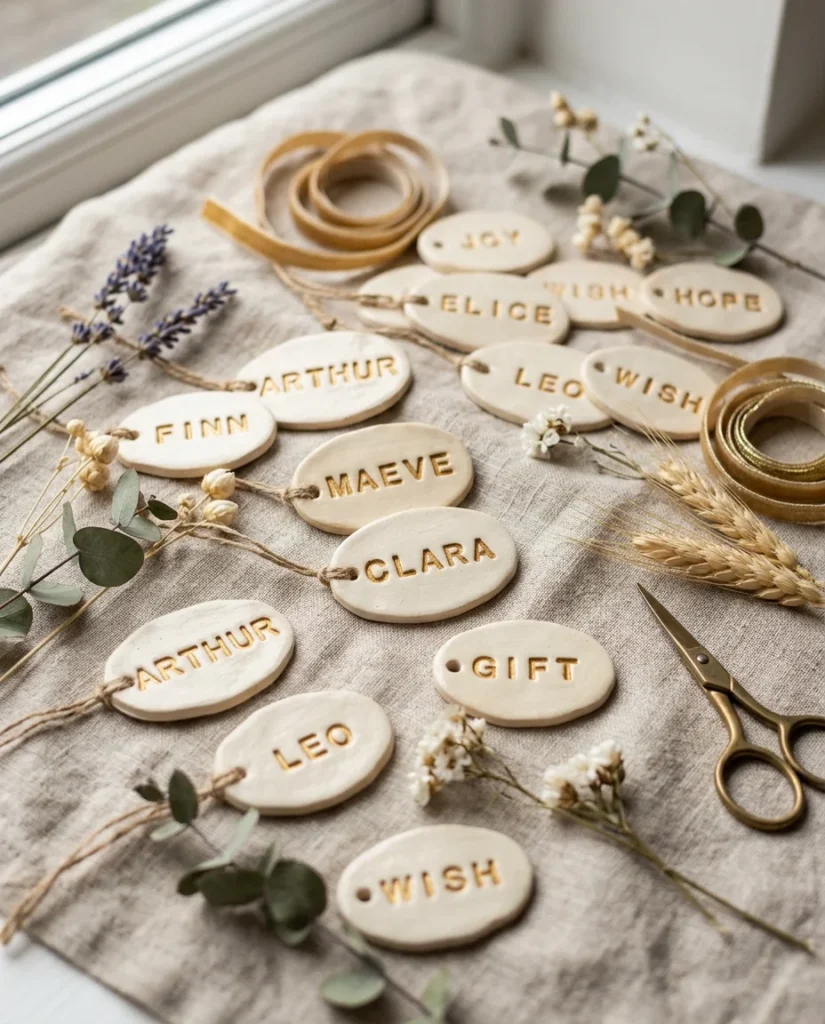
Clay gift tags are reusable, beautiful, and take about ten minutes to make a full set.
Roll clay flat and cut small oval or rectangular tag shapes. Before they dry, press alphabet stamps into the surface to spell names, words, or short phrases. Make a hole at one end.
Letter stamps are available at any craft store for under $5 and work perfectly on soft clay.
Once dry, paint over the whole tag in one color, usually cream or white. Then use a fine paintbrush to paint gold, black, or a contrasting color just into the stamped letter grooves.
Wipe the surface gently with a damp cloth to clean up and the letters pop clearly.
Thread with ribbon or twine.
Use them as: gift tags for presents, plant pot labels, room labels on shelves, labels on glass jars in a kitchen or office.
Cost: under $5 for a set of 10+.
These are so satisfying to make and endlessly useful around the house. They’re also some of the most giftable clay projects, attach one to a plant or bottle as a personalized tag and the whole gift feels elevated instantly. For more handmade gift inspiration, check out these creative easy DIY gifts for thoughtful handmade surprises.
Wrapping Up
Making your own clay decor is one of the most rewarding things you can do for your space. Everything you’ve seen in this list is genuinely achievable, even if you’ve never touched clay before. The projects range from tiny ten-minute keychains to more involved wall hangings, but not one of them requires special skills or expensive materials. A bag of air-dry clay, a few acrylic paints, and an afternoon is all it takes to start filling your room with things that are genuinely yours. Start with one project. Make the ring dish. Make the mushrooms. Make the moon. Then watch how addictive it gets, and how much more personal your space starts to feel. If you want to explore more ideas like these, take a look at these creative DIY clay crafts you can make this weekend.