

Paper crafts are one of the most accessible ways to decorate your home without spending a lot of money. With just a few sheets of paper, some scissors, and a little patience, you can make pieces that look genuinely thoughtful and put-together. Whether you live in a tiny apartment or a spacious house, paper decor fits every space and every style. This list covers 30 real, doable ideas, from beginner-friendly folds to slightly more involved projects that are still completely within reach. Each one can be made with materials you likely already have or can pick up for a dollar or two. No special skills required. Just a good idea, a little time, and the willingness to make something with your hands.
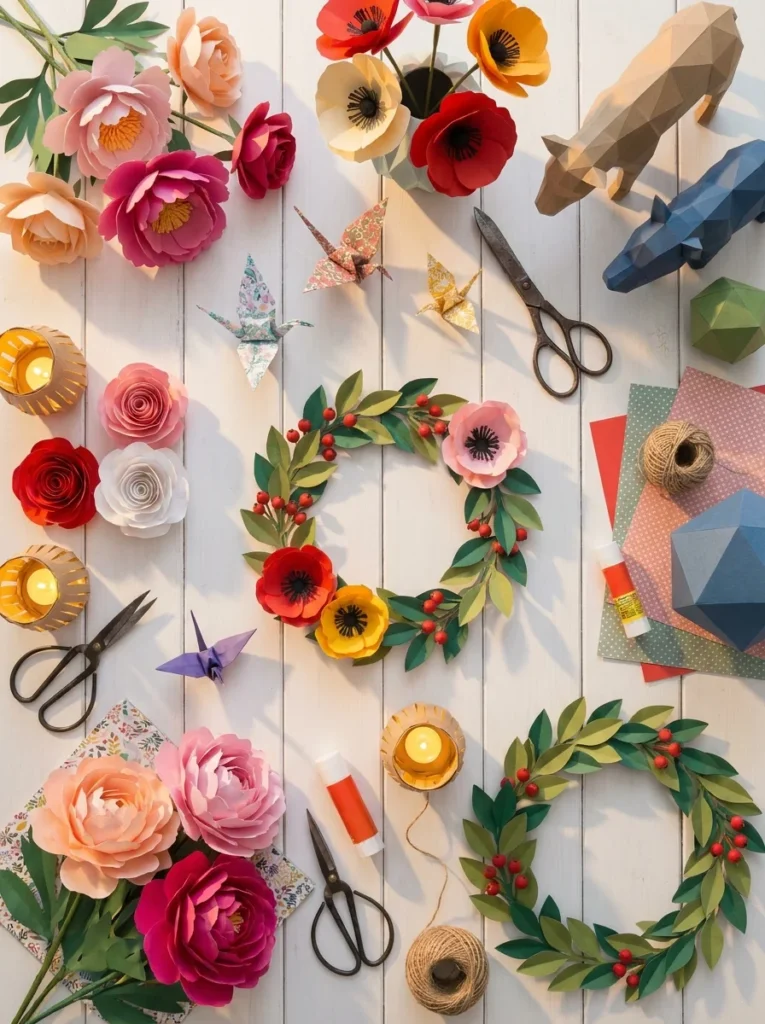
1. Paper Flower Wall Art

Paper flowers are a classic for good reason, they look gorgeous and cost almost nothing to make.
Start with colored or patterned cardstock. Cut petals in different sizes and layer them from large to small. Use a pencil to curl the edges slightly for a realistic, rounded look.
Tissue paper works beautifully for a softer, more delicate flower. Accordion-fold a few sheets together and pinch the center. Fan it out and fluff the layers.
Arrange your finished flowers directly on a wall using removable adhesive strips. Group them in a loose cluster for a statement piece above a bed or sofa. Mix sizes and colors to keep it interesting.
A pack of cardstock costs about $5 and can make dozens of flowers. Use pages from old magazines or kraft paper for a free option.
This project takes roughly 30 minutes once you get the hang of the basic shape. Make a few extras to scatter on shelves or float in a simple vase.
2. Origami Crane Mobile
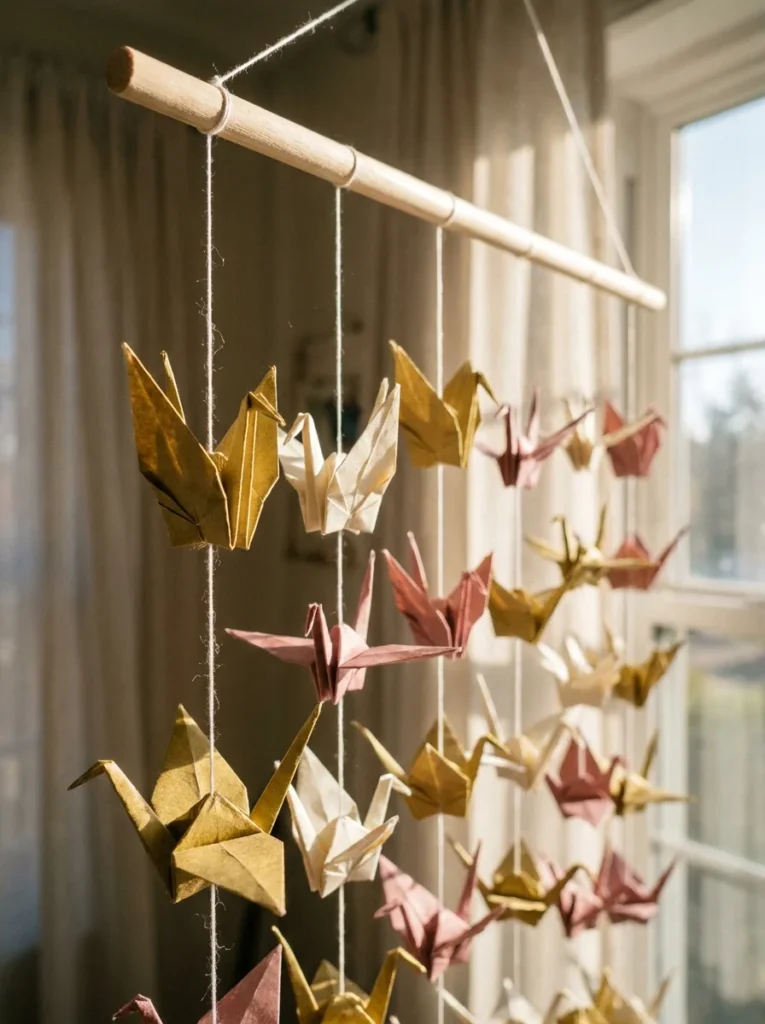
A mobile made of origami cranes adds movement and softness to any room.
You don’t need to be an origami expert. Basic crane instructions are free on YouTube and take about 10 minutes to learn. Once you know the fold, each crane takes about 5 minutes.
Make 20 to 30 cranes in coordinating colors or a gradient from light to dark. Thread a needle with clear fishing line or thin twine and string each crane through its back.
Tie the lines at different lengths to a wooden dowel or a stick you picked up outside. Hang the whole thing from the ceiling with a small hook.
The visual effect is stunning and very calming, especially in a bedroom or reading nook.
Paper squares for origami cost next to nothing. A pack of 100 sheets is usually around $3. You can also use pages from old books, maps, or sheet music for a unique, personal look.
Hang it near a window and let it move gently with the air from a fan or open window.
3. Paper Lanterns for Ambient Lighting
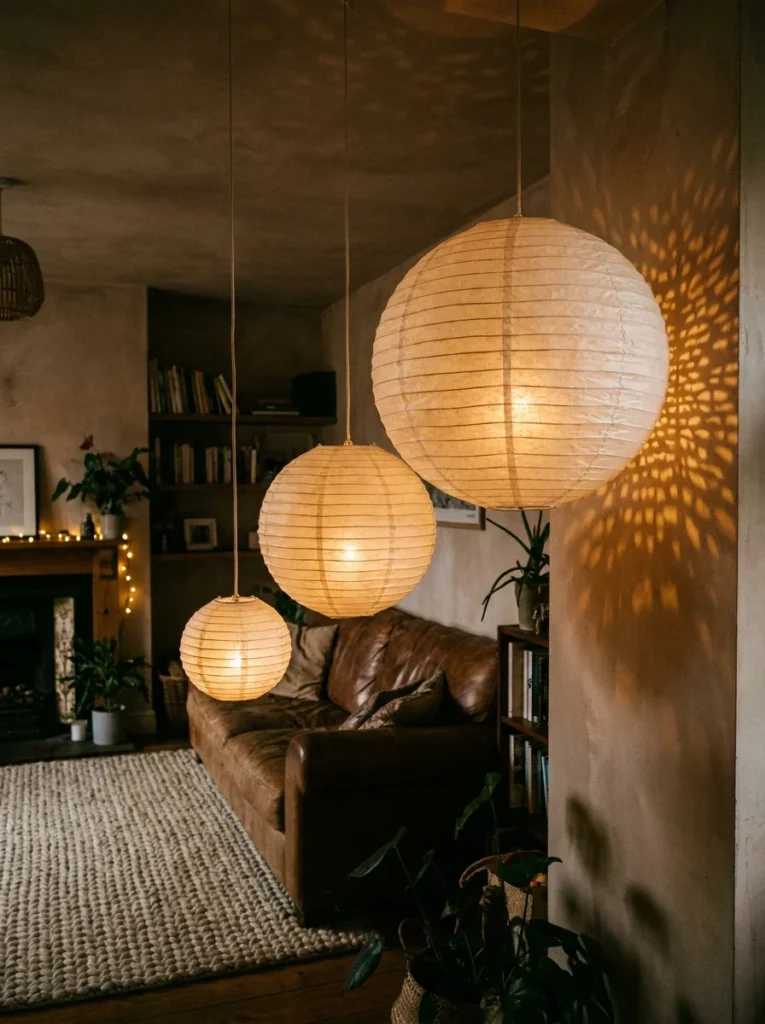
Paper lanterns create soft, warm light that changes the mood of a room instantly.
You can buy plain round paper lanterns for about $1 to $2 each at craft stores or online. Drop an LED tea light inside and hang them at different heights from the ceiling.
Want to make your own? Roll a sheet of heavyweight paper into a cylinder, cut vertical slits around the sides (leaving borders at top and bottom), and gently push the top and bottom together so it bows outward. Secure with tape or a brad.
Never use real candles inside paper lanterns. LED tea lights are safe, cheap, and look just as good.
Try making a cluster of three or five lanterns in different sizes above a dining table or in a bedroom corner. White paper gives a clean, airy feel. Brown kraft paper feels warm and rustic.
For a custom look, punch small holes in a pattern, stars, dots, or geometric shapes, before folding. The light shines through the holes and casts beautiful patterns on nearby walls.
This is one of the easiest and most effective paper decor projects you can do in an afternoon.
4. Geometric Paper Wall Sculptures
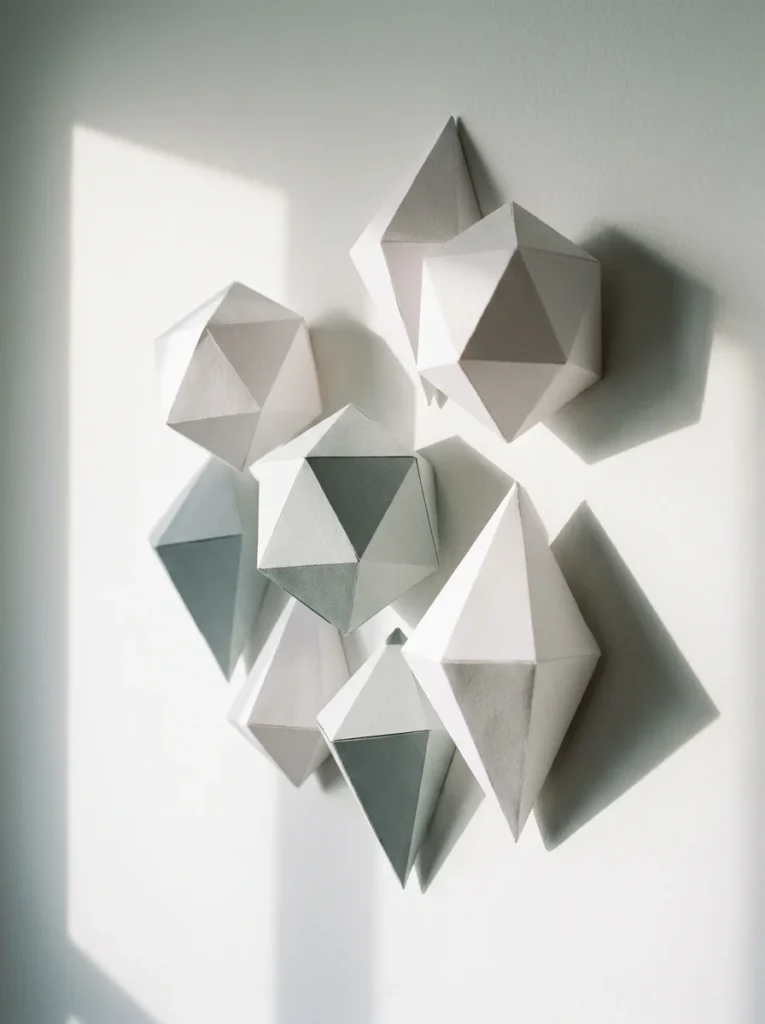
Geometric paper sculptures give a room a modern, architectural feel without costing much at all.
These are made by scoring and folding cardstock into 3D shapes, diamonds, prisms, icosahedrons (that spiky ball shape). You can find free printable templates online. Print, cut, score along the fold lines, and glue together.
White or gray cardstock gives a clean, sculptural look. Metallic or matte black cardstock makes the shapes feel more dramatic.
Mount them directly on the wall using hot glue and a small piece of foam tape, or hang them with thread from a ceiling mount. A cluster of three to five shapes in different sizes looks like a proper installation.
This is the kind of decor that gets compliments. People often assume it was bought somewhere expensive.
A sheet of 8.5 x 11 cardstock costs a few cents. Print the templates on plain copy paper first to test the fold, then trace onto nicer paper.
The trickiest part is getting the glue tabs to line up neatly. Work slowly and use a bone folder or the back of a spoon to get crisp edges.
5. Paper Wreath for the Front Door
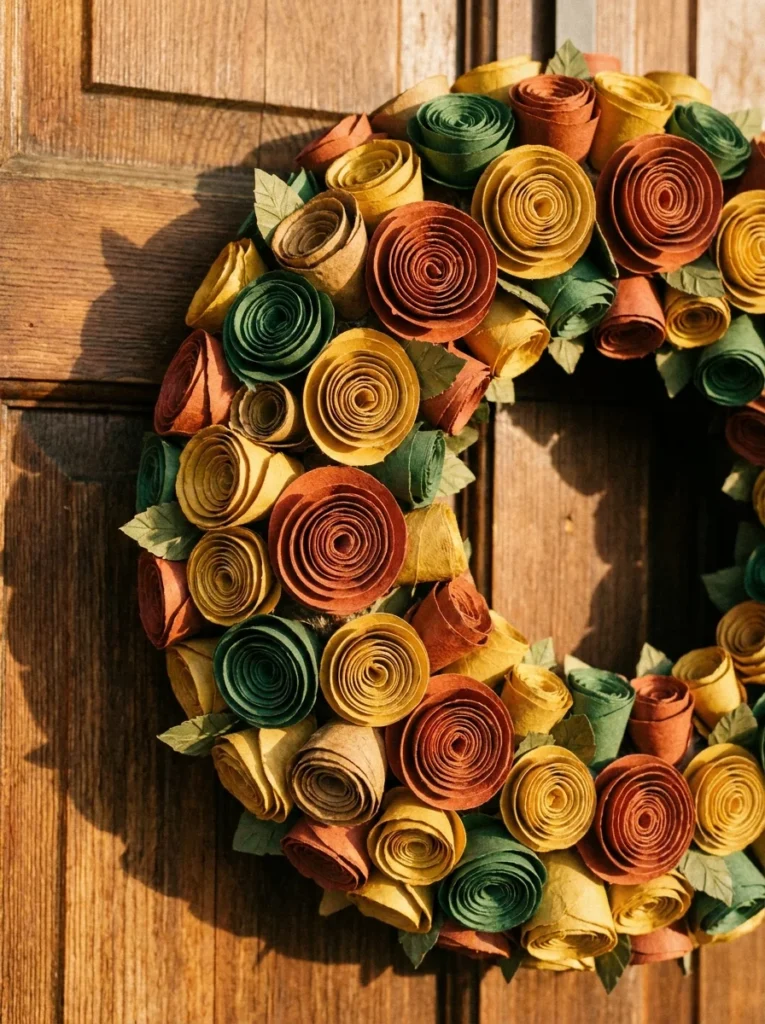
A paper wreath is just as charming as a fresh flower wreath, and it lasts much longer.
Start with a plain foam or cardboard wreath base from a dollar store. Then make your paper elements: rolled cones, small flowers, rosettes, or folded leaves.
Rolled cones are simple. Cut a circle, cut a slit to the center, and roll it into a cone shape. Secure with a dot of hot glue. Make 30 to 40 in varying sizes and hot-glue them to the wreath base, filling it in completely.
Mix textures by using cardstock, tissue paper, and kraft paper together. You can also include faux greenery sprigs from the dollar store for a little depth.
For color themes: all-white for a clean modern look, warm earth tones for fall, pastels for spring, or red and white for the holidays.
A wreath like this costs about $5 in total and takes about two hours to make. The result looks like something from a boutique home goods store.
Spray it lightly with a clear matte sealant if it will hang outdoors in a covered area.
6. Paper Pinwheels for a Festive Wall Display
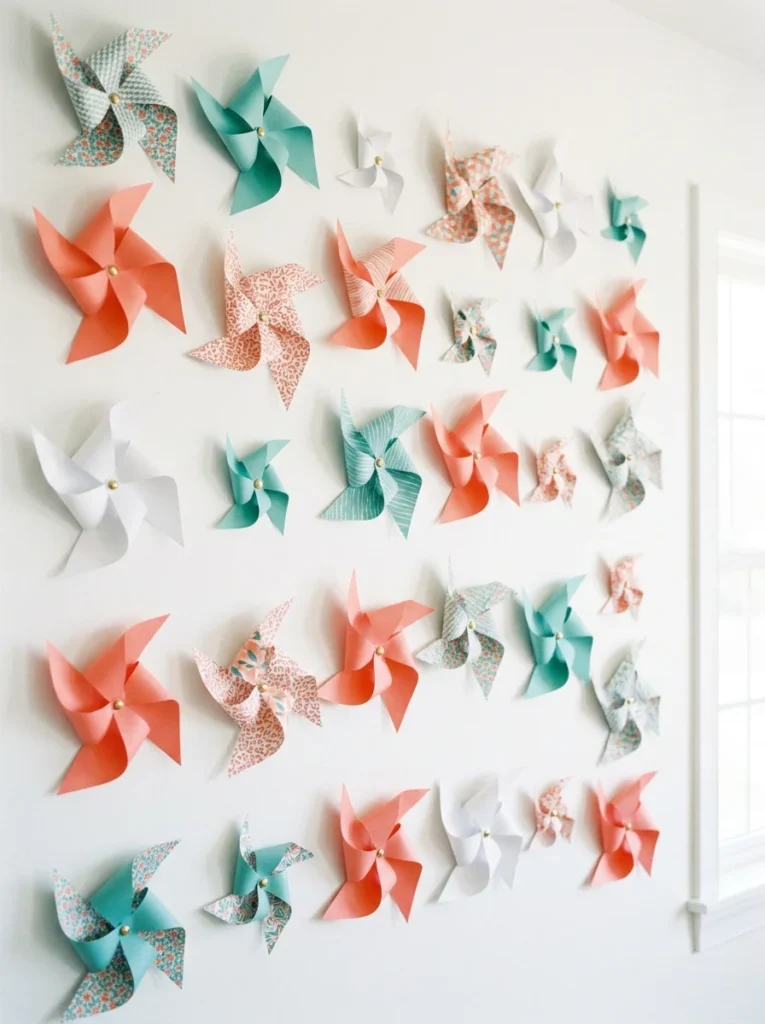
Paper pinwheels are quick to make and create a playful, graphic wall display.
Fold a rectangular sheet of paper in an accordion style. Fold the accordion in half and glue the two halves together at one end to form a half-circle fan. Make two and join them into a full circle with a brad or button at the center.
Patterned scrapbook paper makes the most visually interesting pinwheels. Mix patterns with solids for variety.
Make a range of sizes, from small (5 inches) to large (12 inches). Arrange them on a wall in a loose grid or in an overlapping cluster.
This display works especially well in kids’ rooms, playrooms, or above a party table. But it also looks sophisticated in muted colors on a gallery wall.
Each pinwheel costs practically nothing. A pack of patterned scrapbook paper usually runs about $4 for 50 sheets.
Use removable adhesive strips to mount them, no holes in the wall and easy to rearrange. You can take them down and redo the whole display in new colors without any damage.
7. Paper Leaf Garland
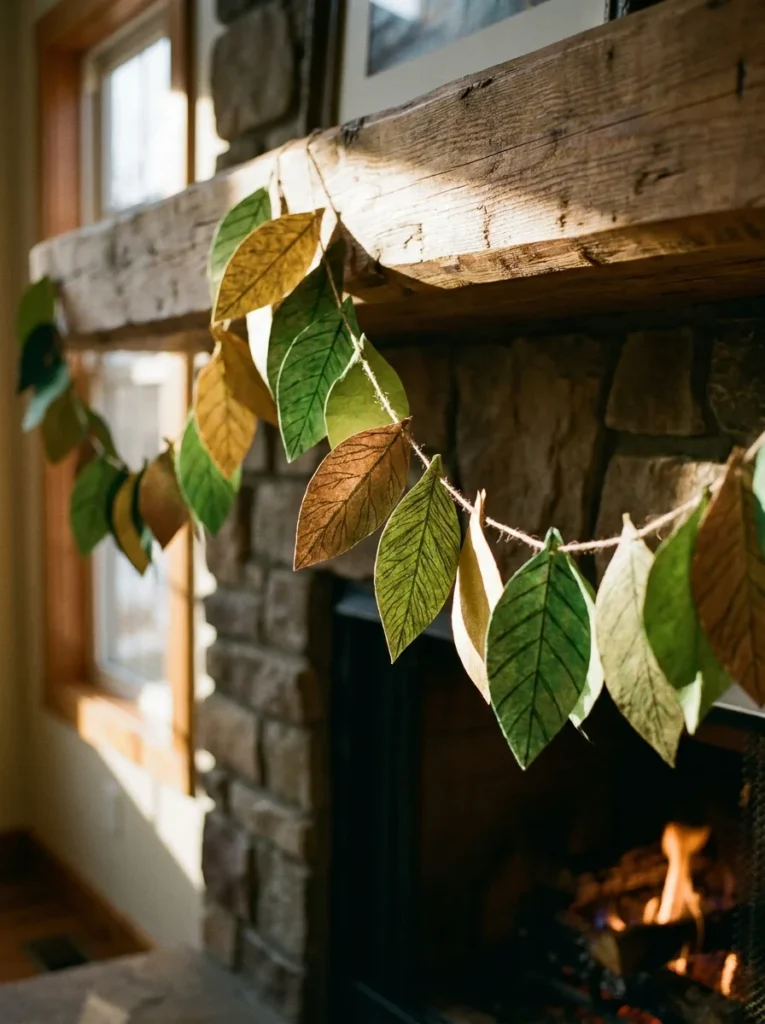
A paper leaf garland brings a natural, organic feel to any space without the wilting.
Trace leaf shapes onto green, gold, copper, or red paper. Cut them out and use a pen to draw veins down the center and out to the edges. Fold each leaf gently down the center vein for dimension.
Punch a small hole at the base of each leaf and thread them onto twine or string. Space them a few inches apart.
Drape the finished garland across a mantel, along a bookshelf, down a staircase railing, or above a window. It looks beautiful layered with real greenery too.
For a quicker version, use a leaf hole punch to cut dozens of small leaves at once. String them in tight clusters for a more lush look.
Seasonal swaps are easy, use orange and red paper in fall, soft green in spring, silver and white in winter.
A garland 6 feet long costs under $2 in materials. It takes about an hour while watching TV.
This is a great project to do with kids, they can cut and color the leaves while you do the threading.
8. Paper Honeycomb Balls
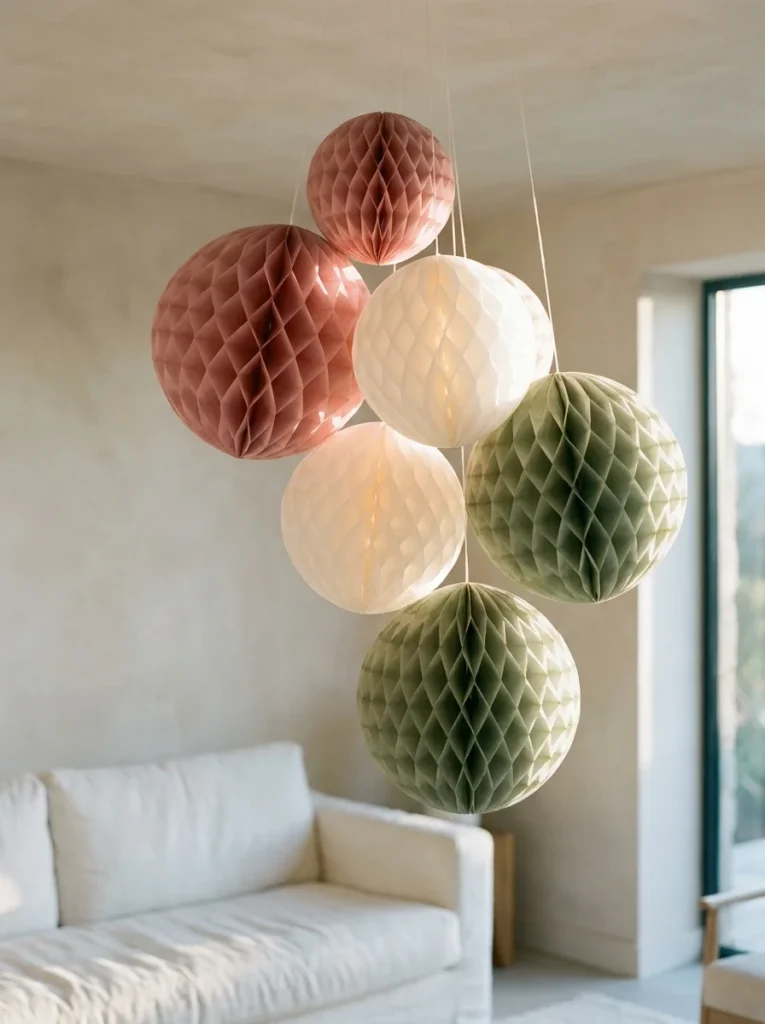
Paper honeycomb balls look intricate and expensive, but you can buy them or make them with strips of tissue paper and a little patience.
To make them: Cut tissue paper into identical rectangles. Stack 20 to 30 sheets and glue alternating stripes of glue in a pattern that offsets each sheet. When you fan the stack open, the glued strips create a honeycomb structure that expands into a sphere.
This technique takes practice, but there are also extremely affordable pre-made honeycomb balls available at party supply stores for about $1 to $3 each.
Hang them at different heights using clear monofilament for a floating effect. A cluster of five to seven balls in coordinating colors looks like a professional installation.
Use them above dining tables, in bedroom corners, or in hallways. They work beautifully for everyday decor, not just parties.
For a custom look, use tissue paper in a specific color palette. Blush, cream, and terracotta make a beautiful combination for a living room.
These are lightweight and don’t require any wall drilling. They hang from a simple ceiling hook and look polished without much effort.
9. Paper Rosette Backdrop
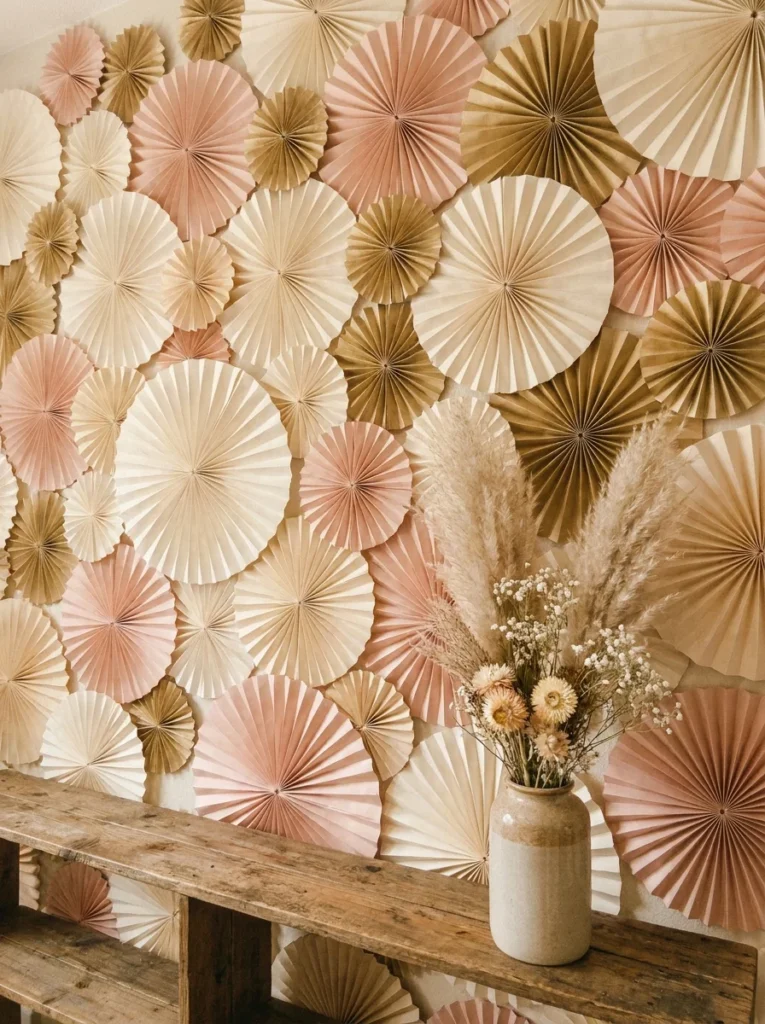
A rosette backdrop makes a powerful statement and costs a fraction of what a fabric or wallpaper feature wall would.
Rosettes are made from strips of paper folded in an accordion style and then curved into a flat circle. Secure the ends together and fluff out the folds to create the rosette shape.
Tissue paper or crepe paper gives the softest, most lush result. Cardstock gives a crisper, more graphic look.
Make dozens in various sizes — small ones around 4 inches, large ones up to 12 inches. Cover an entire wall section or just create a focal point above a sofa or bed.
Attach them with removable adhesive strips for a damage-free display. Overlap the edges so the wall behind doesn’t show through.
Choose two or three colors that match your room. White and gold is timeless. Terracotta and cream is warm and modern. Navy and blush is romantic.
This project is time-intensive, expect a few hours for a full backdrop, but the result is genuinely jaw-dropping. It photographs beautifully and makes an incredible backdrop for photos.
10. Paper Chain Garland
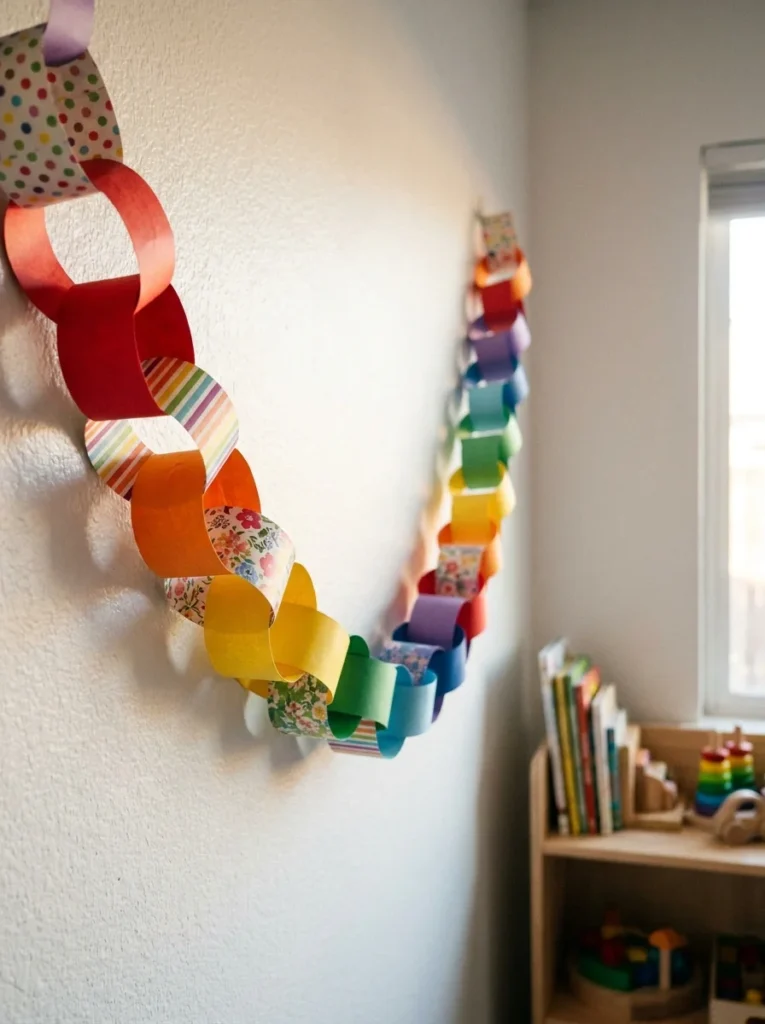
Paper chains are the most beginner-friendly paper craft on this list, and they still look charming when done thoughtfully.
Cut strips of paper about 1 inch wide and 6 inches long. Loop the first strip into a ring and secure with a glue stick. Thread the next strip through the ring before closing it. Repeat.
The key to a beautiful chain is your paper selection. Use patterned scrapbook paper, pages from old books or maps, or color-coordinated cardstock for a more polished result than the typical construction paper version.
Vary the length and loop size for different effects. Wide loops feel bolder. Narrow loops look more delicate.
Drape the finished chain across a mantel, hang it from the ceiling in swags, or spiral it down from a light fixture. It works in kids’ rooms, living rooms, and even dining spaces.
A long garland of 100 links costs almost nothing, maybe $1 to $2 in paper.
To add scent, lightly mist the chain with lavender or citrus essential oil diluted in water. It makes the garland functional as well as decorative.
11. Quilled Paper Art Frames
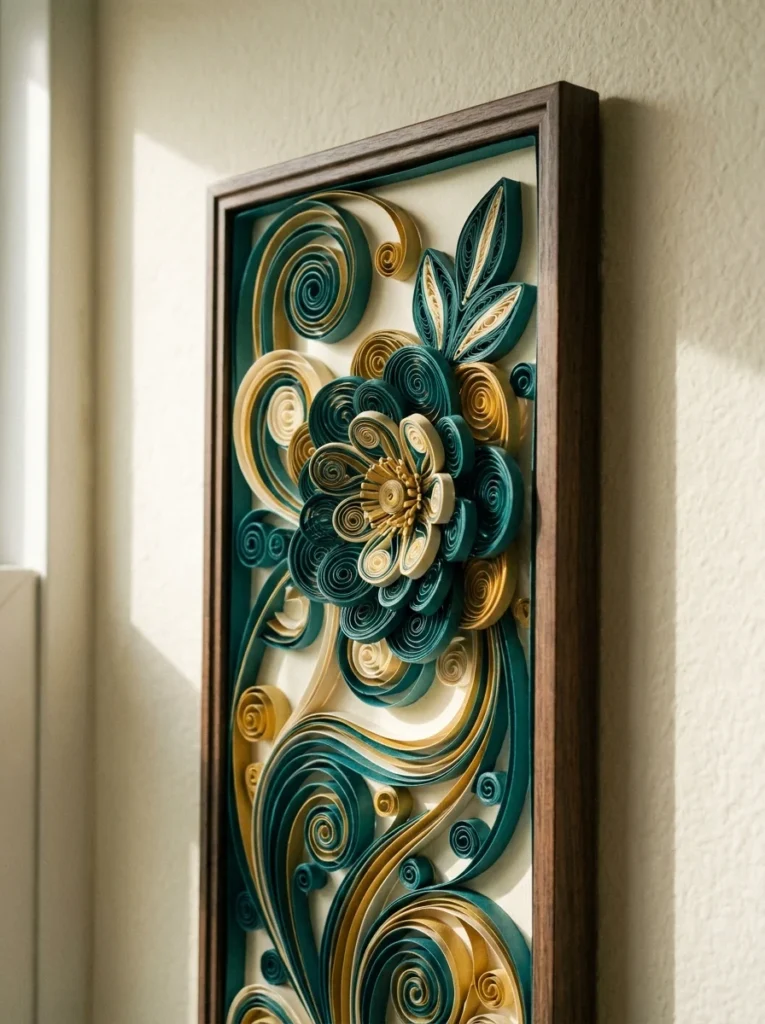
Quilling is the art of rolling thin paper strips into coils and arranging them into shapes and patterns.
It sounds fancier than it is. You just need a quilling tool (or a toothpick), strips of paper, white glue, and a frame.
Roll a strip tightly around the tool. Slide it off and let it relax slightly. Pinch the coil into different shapes, teardrops, marquises, squares. Each shape creates a different part of the design.
Arrange the shapes on paper inside a frame to build flowers, birds, letters, or abstract patterns. Glue each piece down once you’re happy with the layout.
Quilling paper strips are available online for about $3 to $5 per pack. You can also cut your own strips from colored printer paper.
This craft is slow and meditative. It’s a great project for long evenings. Start with a simple flower design and build your skills from there.
The finished piece looks genuinely artisanal. Guests consistently think quilling art is something you bought at a craft fair for much more than it cost.
Frame the finished piece behind glass to protect the delicate paper coils.
12. Paper Butterfly Wall Decor
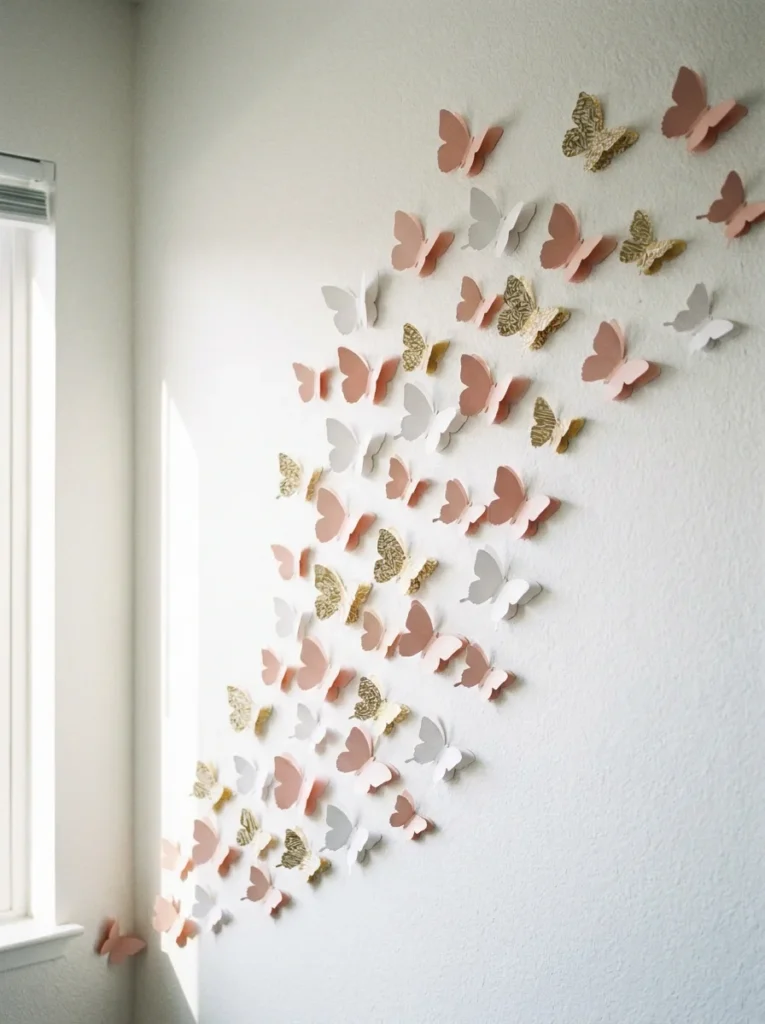
A swarm of paper butterflies on a wall creates a whimsical, three-dimensional effect that looks almost like they’re flying.
Trace a simple butterfly shape onto patterned or colored paper. Cut out and fold lightly down the center body so the wings angle upward slightly. This gives the butterfly a realistic, three-dimensional look.
Mount each one with a small piece of foam tape or a rolled loop of tape so they stand slightly off the wall. The slight gap creates shadows that make them look even more lifelike.
Arrange them in a flowing pattern, as if they’re all flying in the same direction. Start with a loose cluster at the bottom and fan outward and upward. Vary the sizes.
Use patterned scrapbook paper for maximum visual interest. Floral, marble, or geometric patterns look sophisticated on butterfly shapes.
A wall of 40 to 50 butterflies takes about two hours and costs around $3 in materials.
This works beautifully in bedrooms, nurseries, or reading corners. It’s also a meaningful way to fill a large, awkward wall without buying a big piece of art.
13. Paper Accordion Fan Wall Art
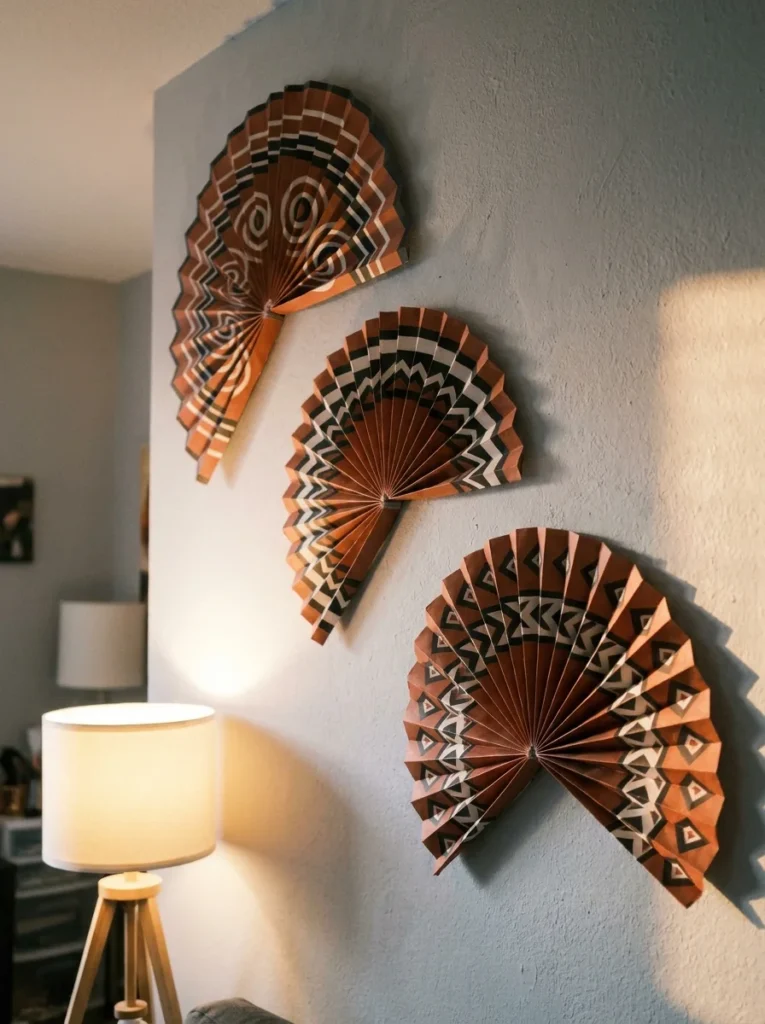
Large accordion fans made from patterned paper make a bold, graphic wall statement.
Accordion-fold a sheet of paper, or multiple sheets taped end-to-end for a larger fan, with folds about half an inch wide. Pinch one end and secure with a rubber band or tape. Fan the other end open into a semicircle.
Mount it flat on the wall with the pinched end down and the open end facing upward.
Make three in the same pattern at different sizes and stagger them on the wall. Or use three different patterns that share a color for a cohesive but layered look.
Wrapping paper, kraft paper, wallpaper samples (often free from home improvement stores), and newspaper all work well for this project.
Each fan takes about 10 to 15 minutes to make. Three fans on a wall takes less than an hour total.
This works well above a fireplace, behind a sofa, or on a dining room wall. It photographs beautifully and has a handcrafted quality that mass-produced art can’t replicate.
14. Paper Roll Vase
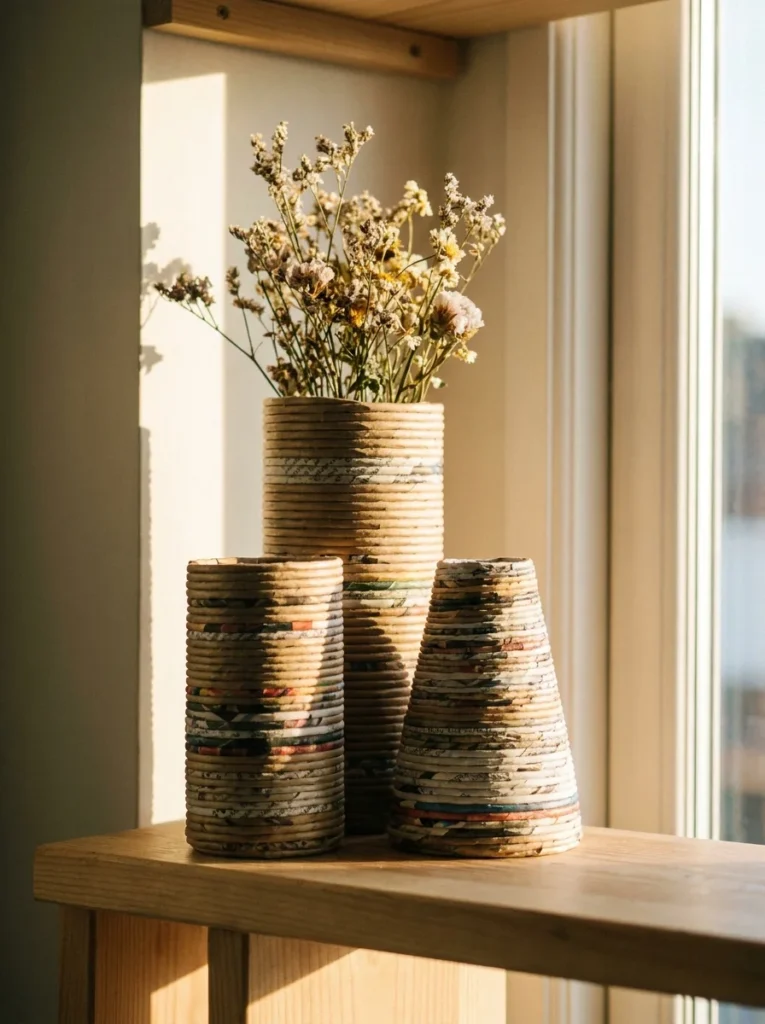
Rolled paper vases are a surprising and tactile way to add texture to a shelf or table.
Roll strips of newspaper or kraft paper into tight tubes. Then coil those tubes around themselves — starting at the base and spiraling upward — to build a vessel shape. Use white glue between each layer to hold the shape.
Work slowly and keep the coils tight and even. Pinch and press the sides as you go to control the width. Taper inward at the top for a classic vase shape, or keep it straight-sided for a cylinder.
Let the finished vase dry completely, this takes several hours. Brush the outside with a layer of Mod Podge or diluted PVA glue to seal and harden it.
It won’t hold water, so use it for dried flowers, pampas grass, or a bundle of branches. A simple white flower from your paper flower project looks beautiful inside one.
This is a completely free project if you use recycled newspaper. The results look artisanal and handcrafted, in the best possible way.
15. Paper Mache Bowl
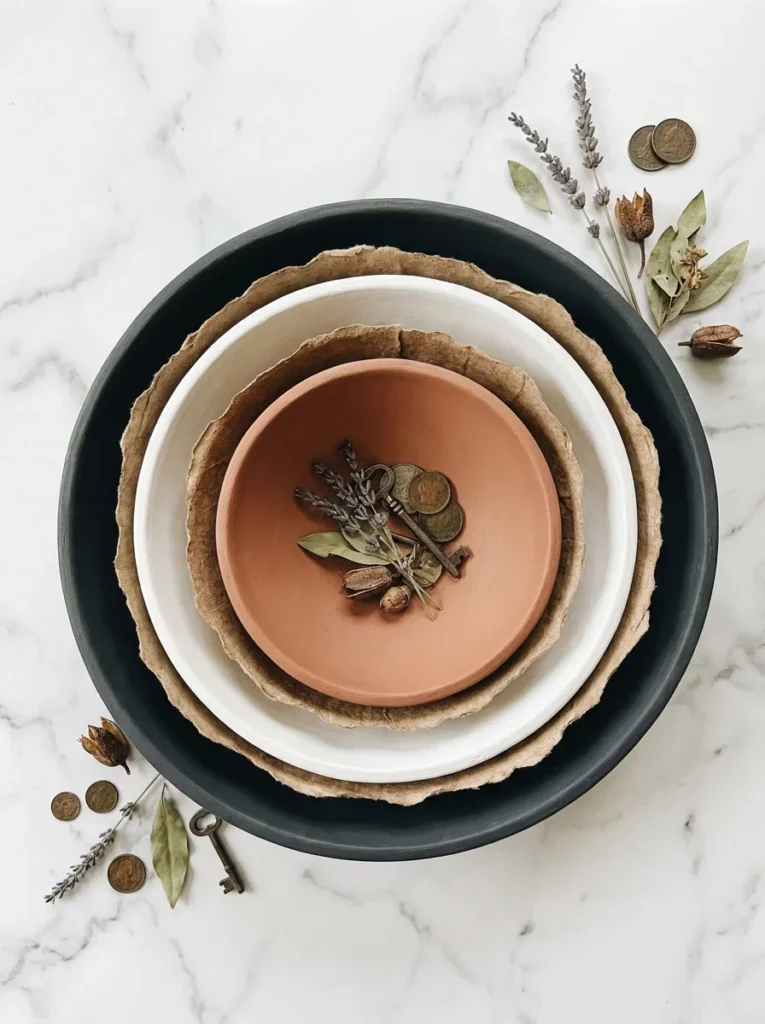
Paper mache bowls are one of the most satisfying paper crafts to make, and they actually get used.
Tear newspaper into strips about 1 inch wide. Mix white glue with a little water to make a thin paste. Coat a balloon or real bowl (covered in plastic wrap) with the paste, then layer strips of paper over it, smoothing each piece flat.
Build up 4 to 5 layers, letting each layer dry before adding the next. Once completely dry, pop the balloon or remove the bowl mold.
Trim the edges neatly with scissors. Sand lightly with fine-grit sandpaper for a smooth surface. Then paint with acrylic paint in any color you like.
Seal the finished bowl with Mod Podge for durability.
Use these bowls on a coffee table for keys and coins, on a nightstand for jewelry, or nested in the kitchen for fruit or snacks.
The whole project costs almost nothing if you use recycled newspaper and already own acrylic paint. Even buying supplies, you’re looking at under $5 total.
This craft takes a few days because of drying time, but the actual hands-on time is minimal.
16. Paper Cut Shadow Box Art
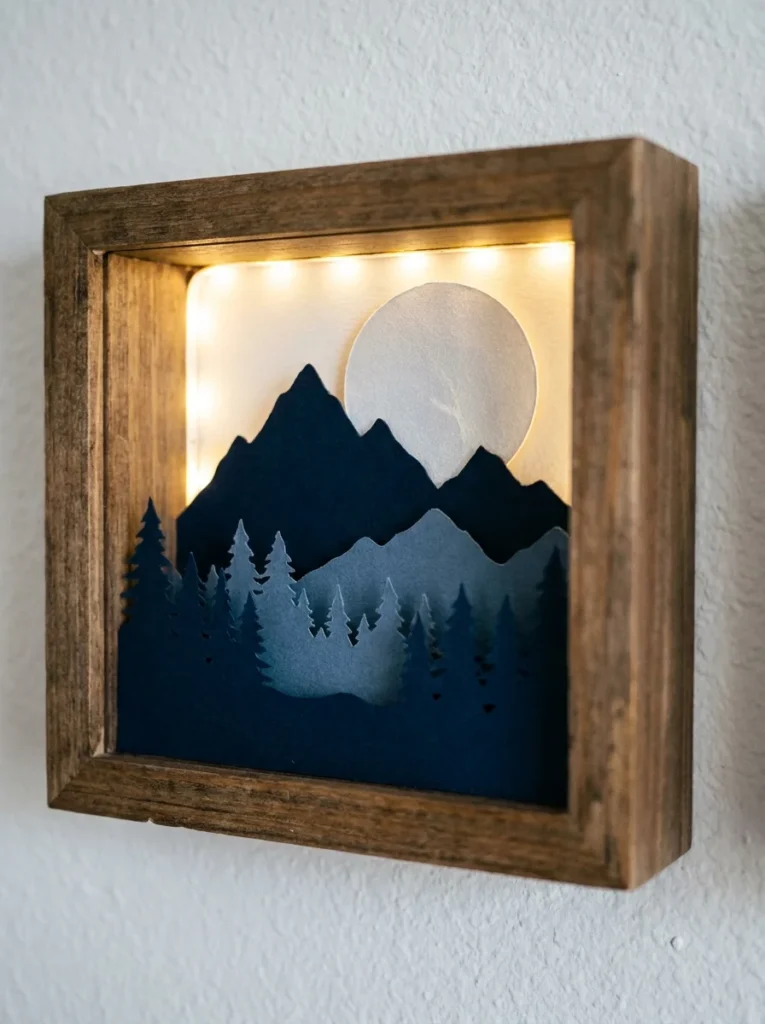
Layered paper cut art inside a shadow box creates a stunning sense of depth and dimension.
Cut different landscape or nature elements from paper, mountains, trees, birds, a moon, each one from a slightly different shade of the same color family.
Stack the layers inside a shadow box frame with small pieces of foam core between each layer to create real depth. Position a small LED strip or fairy lights at the back to cast light through the layers.
The effect is like a tiny diorama , a miniature scene with real shadow and dimension.
Design ideas: forest at dusk, city skyline, rolling hills, ocean waves. Keep to two or three colors in the same family for a cohesive, elegant result.
Shadow box frames are available at craft stores for $5 to $10. The paper cuts can be done with scissors or a craft knife on a cutting mat.
This is a project that rewards patience. Spend time on clean cuts and precise layering. The result is something genuinely gallery-worthy, and the whole thing costs under $15.
17. Newspaper Woven Basket
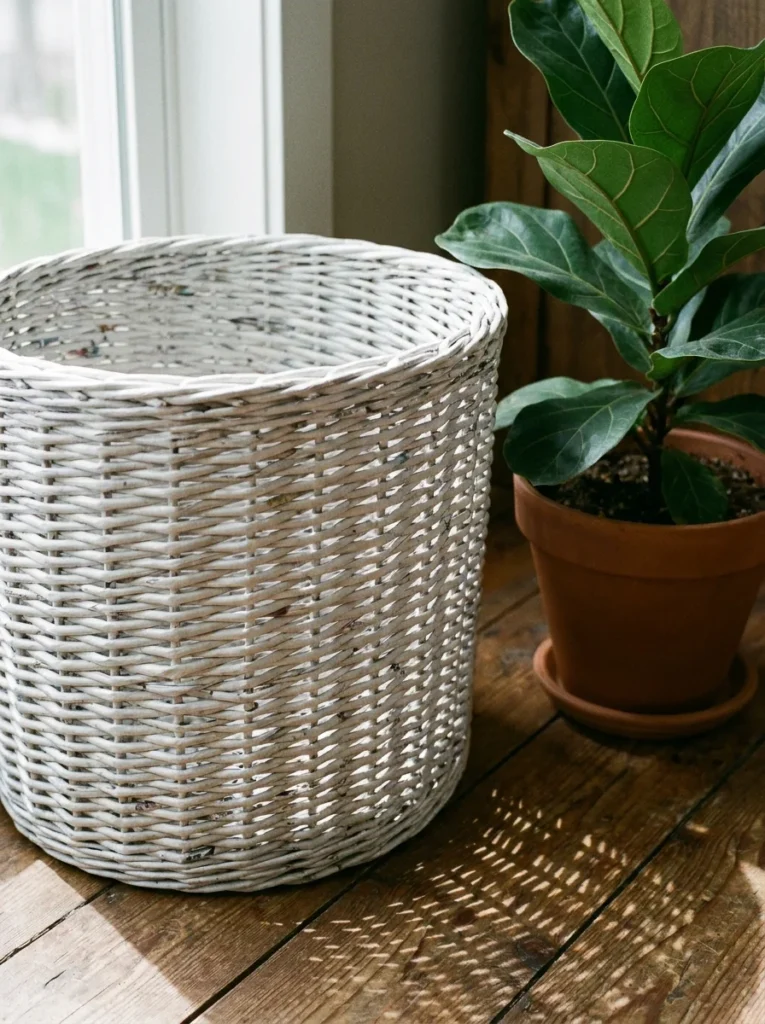
Newspaper baskets are a practical, sculptural decor piece, and they’re made entirely from recycled materials.
Roll sheets of newspaper diagonally from corner to corner into tight tubes. Secure the end with a small piece of tape.
To weave: Create a base by laying tubes in a star or grid pattern. Fold up the ends to form the sides. Weave additional tubes horizontally around the upright tubes, alternating in and out.
Press the weave tight as you go for a firm, solid structure. Fold the top tubes over and tuck them into the weave to finish the rim cleanly.
Once complete, brush the entire basket with white paint or a color of your choice. Two coats gives good coverage. Seal with Mod Podge or matte varnish for durability.
Use the finished basket as a planter sleeve, a magazine holder, a toy bin, or a catch-all on a shelf.
This project takes a few hours and costs nothing if you have old newspapers on hand. The end result looks like something from a high-end home goods store.
18. Paper Bag Luminaries
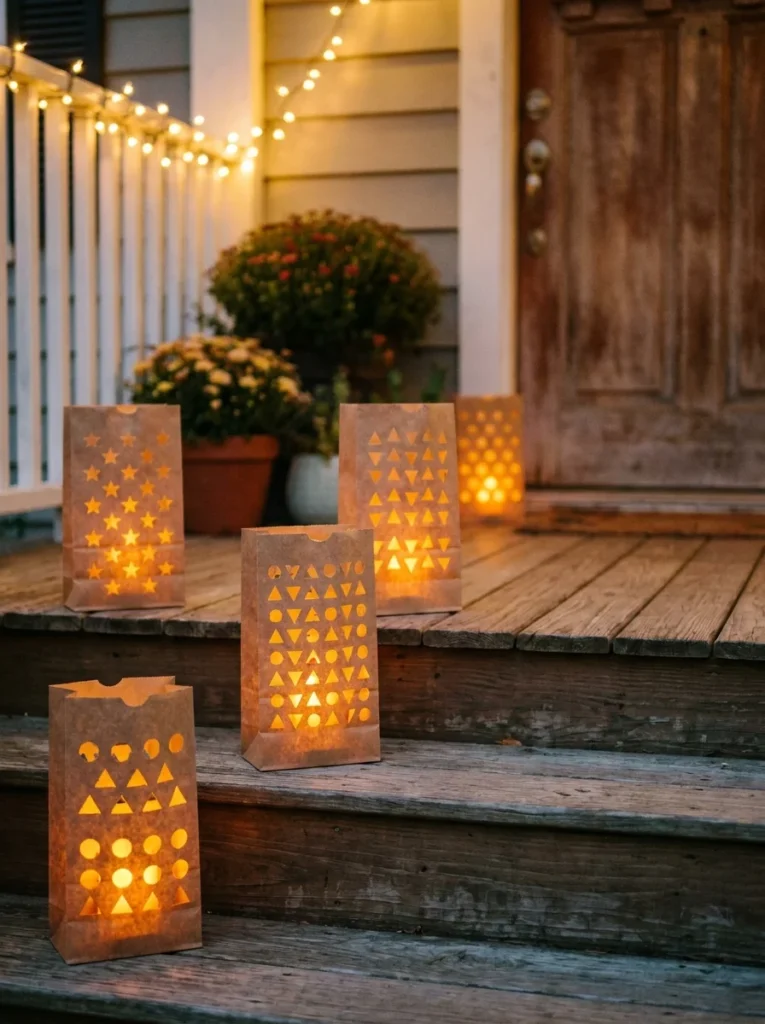
Paper bag luminaries are one of the easiest light-up decor projects you can make.
Take a plain brown paper bag, any size works. Fold down the top edge to create a cuff. Fill the bottom with a small amount of sand, pebbles, or rice to weigh it down.
Cut or hole-punch a pattern into the sides before placing your light source inside. Geometric shapes, stars, hearts, or a simple grid of holes all create beautiful light effects.
Drop an LED tea light inside. The light shines through the cutouts and glows warmly on the surrounding surface.
Line them down a hallway, arrange them on a porch, place them along a windowsill, or use them as table centerpieces.
For a more refined look, use white paper bags instead of brown. Tie a strip of twine around the middle for a simple decorative touch.
A pack of paper bags costs about $3. LED tea lights are available in bulk for about $5 to $6. The whole setup for a set of 10 luminaries comes in well under $10.
This is a genuinely impressive effect for the effort involved.
19. Paper Star Decorations
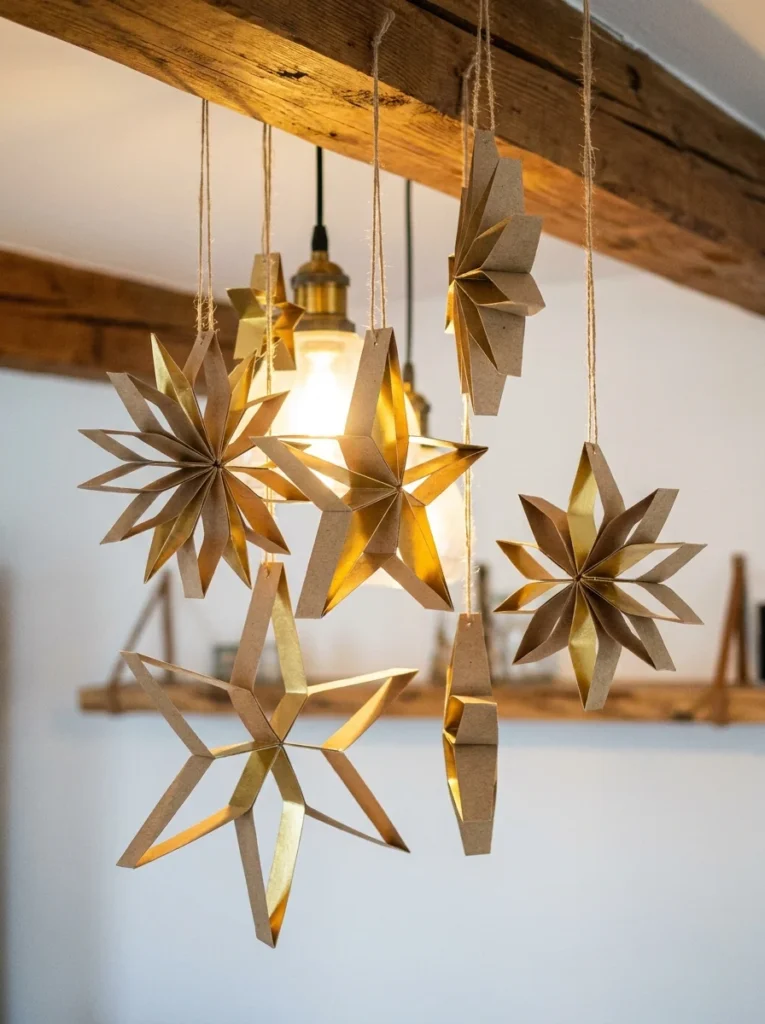
Three-dimensional paper stars look like they belong in a high-design home, and they’re made from strips of paper.
The most common style is the Froebel star (also called a Nordic star), made by weaving four strips of paper together. It looks complex but follows a repeatable, systematic folding sequence that gets faster with practice.
Kraft paper gives a natural, warm look. Metallic or glossy paper gives a festive, graphic feel.
Hang them from thread at varying heights in a window or from a ceiling beam. Group several together for a clustered effect.
For a simpler version, cut star shapes from cardstock, score the center lines, and fold each point slightly upward for a three-dimensional star that lies flat against a wall.
Paper strips can be cut from old magazines, wrapping paper, or cardstock. The material cost is essentially zero.
Make a batch of stars in a single evening. Once you learn the fold, each one takes about 5 minutes.
These work as everyday decor, not just seasonal decoration. Keep them up all year and simply change the color palette with the seasons.
20. Paper Pom Poms
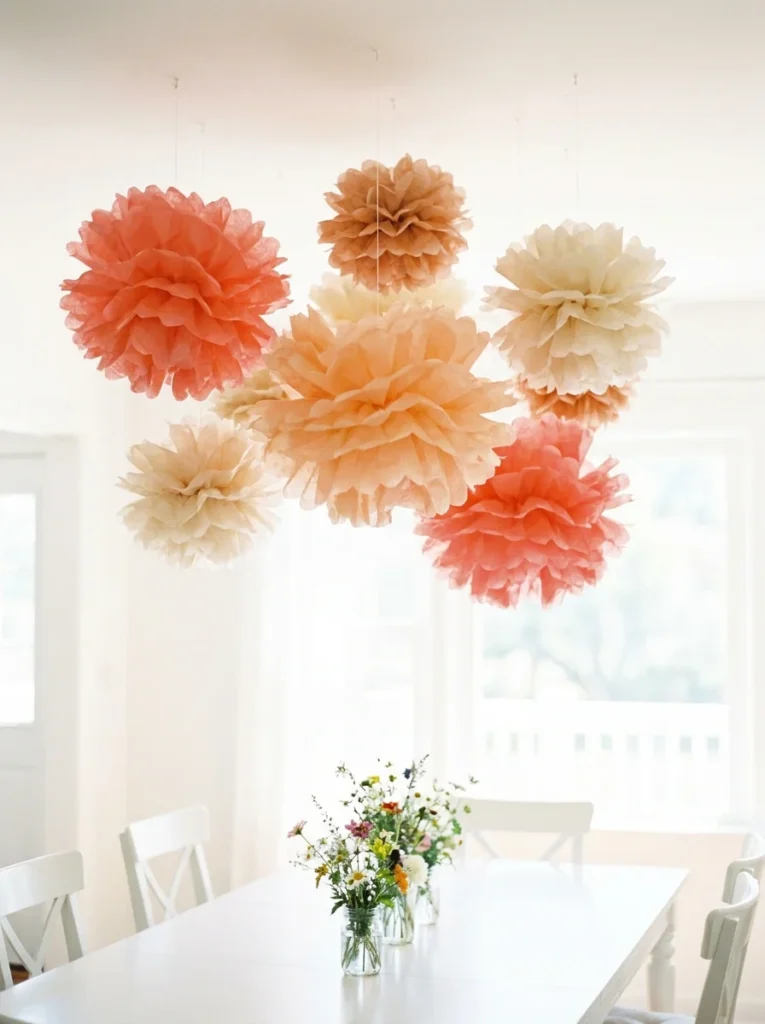
Tissue paper pom poms are quick, big-impact, and cost almost nothing to make.
Stack 8 to 10 sheets of tissue paper. Accordion-fold the entire stack with folds about 1 inch wide. Fold a pipe cleaner or wire around the center and twist to secure. Trim the ends of the paper into a rounded or pointed shape.
Gently pull each layer of tissue paper apart, working from the center outward, fluffing as you go.
The result is a full, lush ball that can range from 6 inches to over 14 inches in diameter depending on the paper size you start with.
Hang from the ceiling with clear thread. A cluster of five or seven poms in a coordinating color palette looks spectacular above a table or in a corner.
A pack of tissue paper costs about $3 and makes several poms. This is one of the most affordable decor projects per visual impact.
These work beautifully for everyday room decor, not just parties. Keep the colors neutral, cream, terracotta, dusty sage, and they’ll look right at home year-round.
21. Paper Cone Wall Pockets
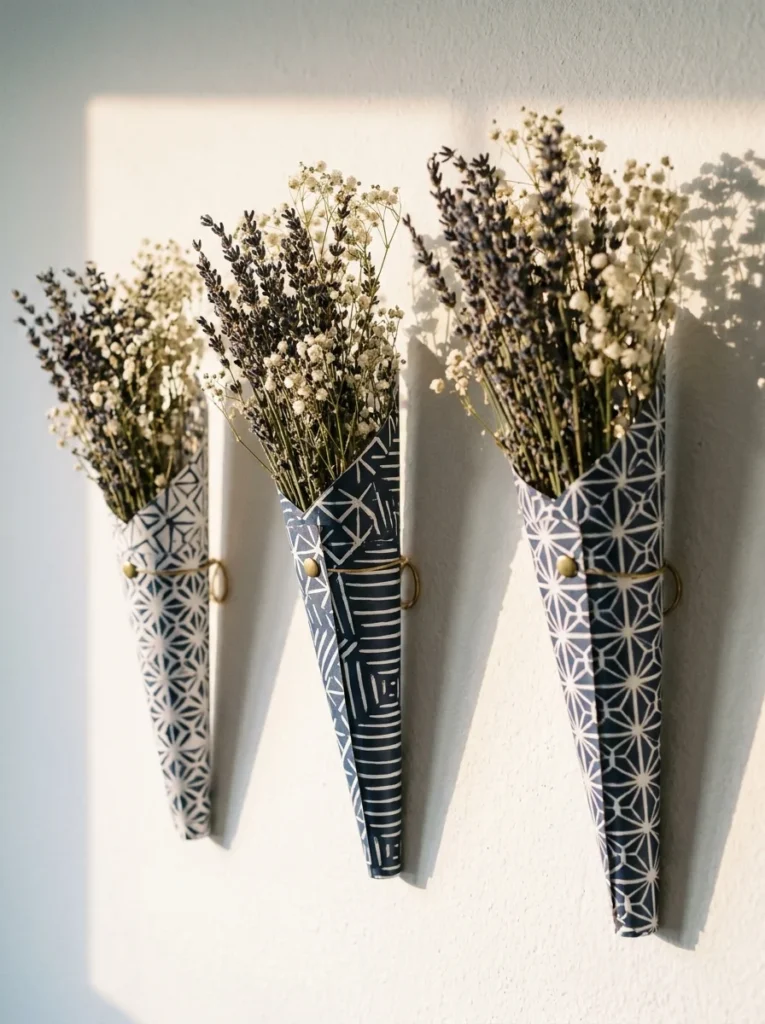
Paper cone wall pockets are a small, charming way to display dried flowers or small branches.
Roll a piece of heavy paper or cardstock into a cone shape. The opening at the top should be wide enough to hold a small bunch of stems. Secure the seam with hot glue.
Punch a hole near the rim on each side and thread a piece of twine, ribbon, or wire through to create a hanger. Mount to the wall with a small nail or hook.
Fill with dried lavender, pampas grass, baby’s breath, or simple paper flowers from earlier in this list.
Three cones in a row, evenly spaced, with coordinating paper and matching dried botanicals look beautiful in a hallway, bathroom, or bedroom.
Use patterned wrapping paper, kraft paper, or pages from old books or atlases for the cone body. The paper choice is where you can add the most personality.
This project costs almost nothing. A bundle of dried lavender from a farmers market runs about $3 to $4 and lasts for months.
Make miniature versions, about 3 inches tall, and use them as place cards or table accents.
22. Cardstock Animal Heads
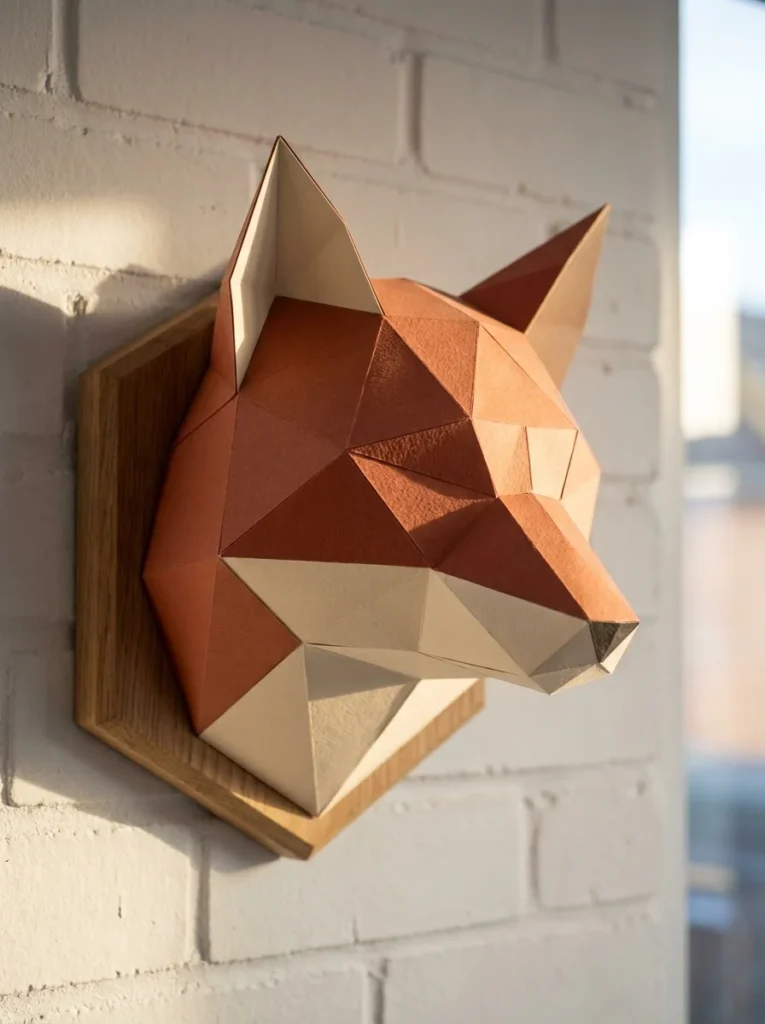
Low-poly geometric animal heads are a modern, sculptural paper craft that makes a strong decor statement.
Free templates for geometric animal heads are widely available online, search for “low poly paper trophy.” Print on cardstock, cut along the outer lines, score along the fold lines, and glue the tabs to assemble the 3D form.
Popular choices: fox, deer, bear, wolf, rabbit. Choose an animal that fits your room’s personality.
Mount the finished head on a piece of painted wood or foam board for stability. Hang like a traditional wall trophy.
White cardstock is the most versatile, it works in almost any room. Use two complementary colors for a graphic, modern effect.
One head takes about 1 to 2 hours to assemble, depending on complexity. The template printing cost is nothing if you already have cardstock.
This is a craft that rewards clean cuts and crisp folds. Use a bone folder or the back of a butter knife to score before folding. Sharp scissors or a craft knife give the cleanest edges.
The finished piece looks like something from a design boutique. It’s the kind of decor that people ask about.
23. Paper Pinecones
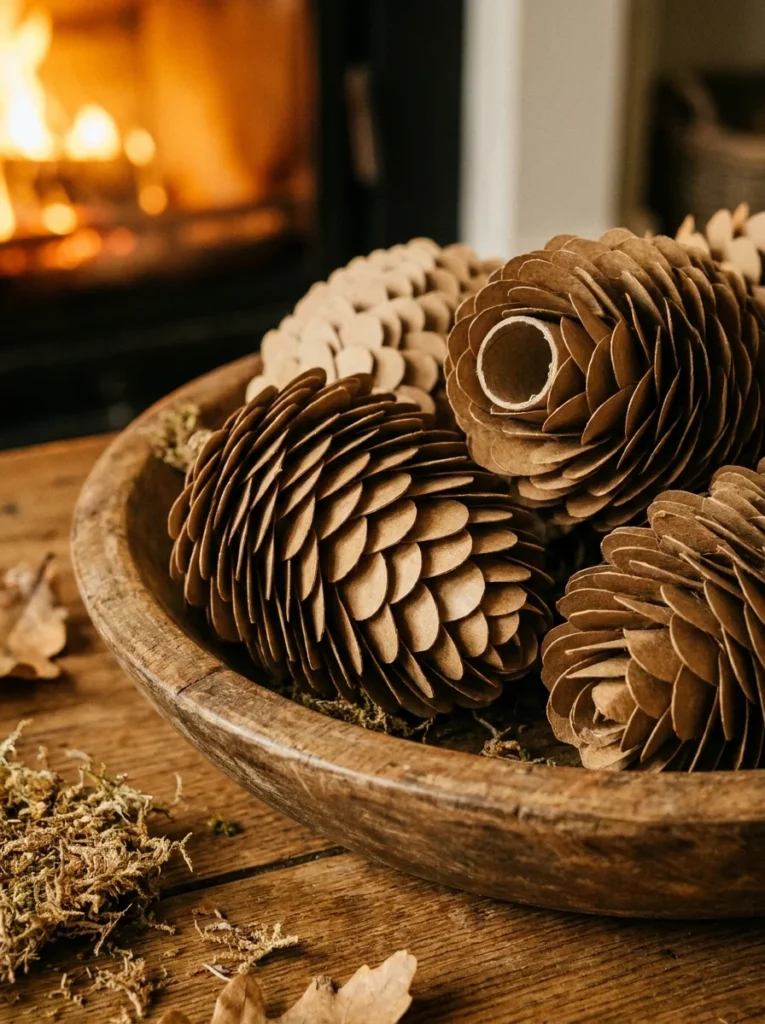
Paper pinecones make beautiful seasonal decor that looks completely realistic from a distance.
Start with a cardboard tube, a toilet roll works perfectly. Cut teardrop or petal shapes from brown kraft paper. Layer them onto the tube starting from the bottom, overlapping each row like fish scales or roof tiles.
Curl the tip of each petal slightly upward by wrapping it around a pencil before attaching. This creates the characteristic texture of a real pinecone.
Build up 6 to 8 rows, making each row’s petals slightly smaller as you work upward. Close the top with a tight cluster of small petals.
Display these in a bowl or basket, use them as table centerpieces, or wire them together into a garland or wreath accent.
For a more polished look, spray paint them gold, copper, or matte white once dry. A light dusting of white spray paint on the tips mimics a frost effect.
This project is completely free if you use recycled materials. A set of five or six pinecones takes about 2 hours and makes a genuinely beautiful seasonal display.
24. Paper Woven Placemats
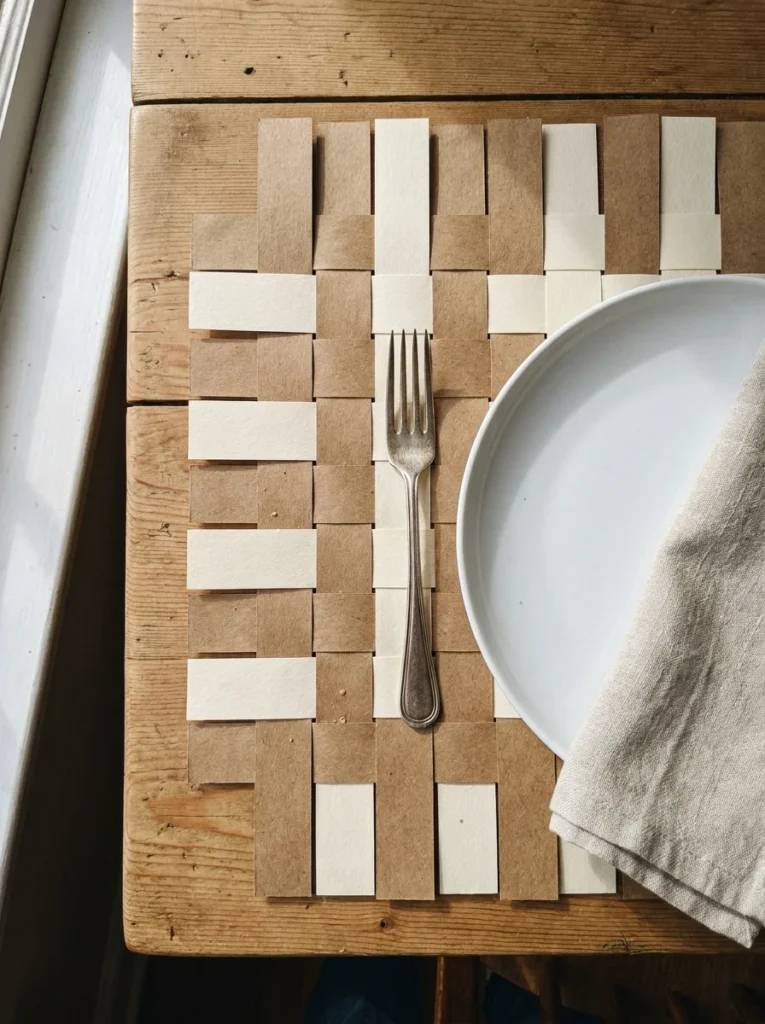
Paper placemats are a practical craft that also adds a handmade touch to your dining table.
Cut strips of cardstock or kraft paper about 1 inch wide. For a standard placemat size, you need strips about 12 inches long for the warp (vertical) and 18 inches for the weft (horizontal).
Tape the warp strips side by side on a cutting mat, securing the tops with masking tape. Weave the weft strips in an alternating over-under pattern, pressing each row tight against the last.
Once all strips are woven, secure the edges with a strip of tape or glue. Trim any uneven ends.
Seal both sides with a few coats of Mod Podge or clear varnish. This makes them wipe-clean and much more durable.
Use craft paper in two tones, natural kraft and white, for example, for a clean, graphic look. Or use colored cardstock for a more playful set.
A set of four placemats costs about $3 to $4 in materials. They’re not dishwasher safe, but they wipe clean easily and last for months with the sealant coating.
This is a great weekend project that produces something genuinely functional.
25. Kraft Paper Scroll Wall Art
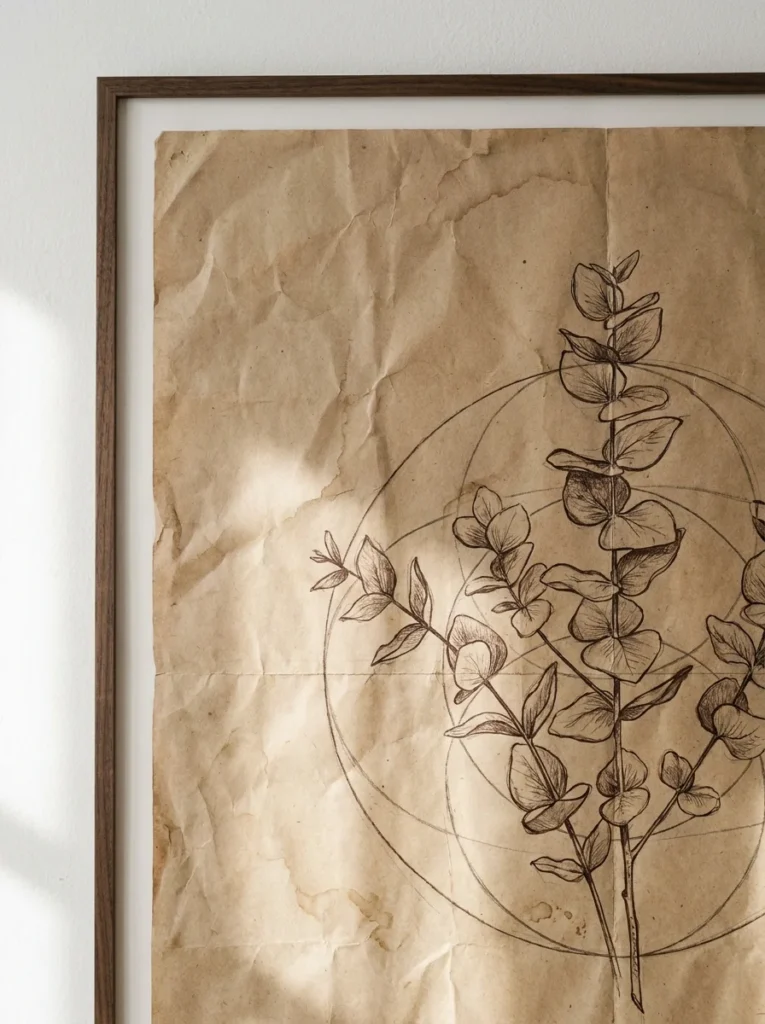
A roll of kraft paper and a black marker is all you need to make custom wall art.
Roll out a large sheet of kraft paper. Use a ruler and pencil to sketch your design lightly first. Then trace over it with a black marker, a fine-tip for detailed work, a broad tip for bold, graphic pieces.
Ideas that look great on kraft paper:
- Botanical illustrations (leaves, stems, flowers)
- Geometric line patterns
- Simple architectural sketches
- Hand-lettered quotes or words
- Abstract line art
You don’t need to be a skilled artist. Repeating geometric patterns look incredible and only require a ruler. Loose, imperfect botanical sketches have a charm that precise, perfect drawings don’t.
Roll the edges around a wooden dowel at top and bottom and hang with twine for a scroll effect. Or frame it for a more polished finish.
A roll of kraft paper costs about $5 to $8 and can produce many pieces. This is genuinely one of the most flexible, low-cost art-making methods available.
Change the piece out seasonally by simply making a new one. The cost per piece is almost nothing.
26. Paper Macramé-Style Wall Hanging

You can recreate the look of macramé using twisted paper twine, a craft supply that costs a fraction of traditional cotton rope.
Paper twine (also called paper raffia or twisted paper cord) is available at craft stores for about $3 to $4 per roll. It knots, braids, and frays just like fiber rope but is much more affordable.
Basic macramé knots to learn: the square knot, the spiral knot, and the half-hitch. These three knots are enough to make a complete wall hanging.
Cut lengths of paper twine and fold them in half over a wooden dowel. Work downward in rows of knots, varying the pattern for texture.
Leave the bottom lengths as loose fringe, or unravel the paper twine by pulling apart the twisted strands for a soft, feathery fringe effect.
The finished piece looks like the linen or cotton macramé pieces that sell for $40 to $80 at home goods stores. Your cost: $5 to $7 total.
Hang it above a bed, in a reading corner, or in a bathroom. The neutral beige tone works in almost any room and color scheme.
27. Paper Terrarium
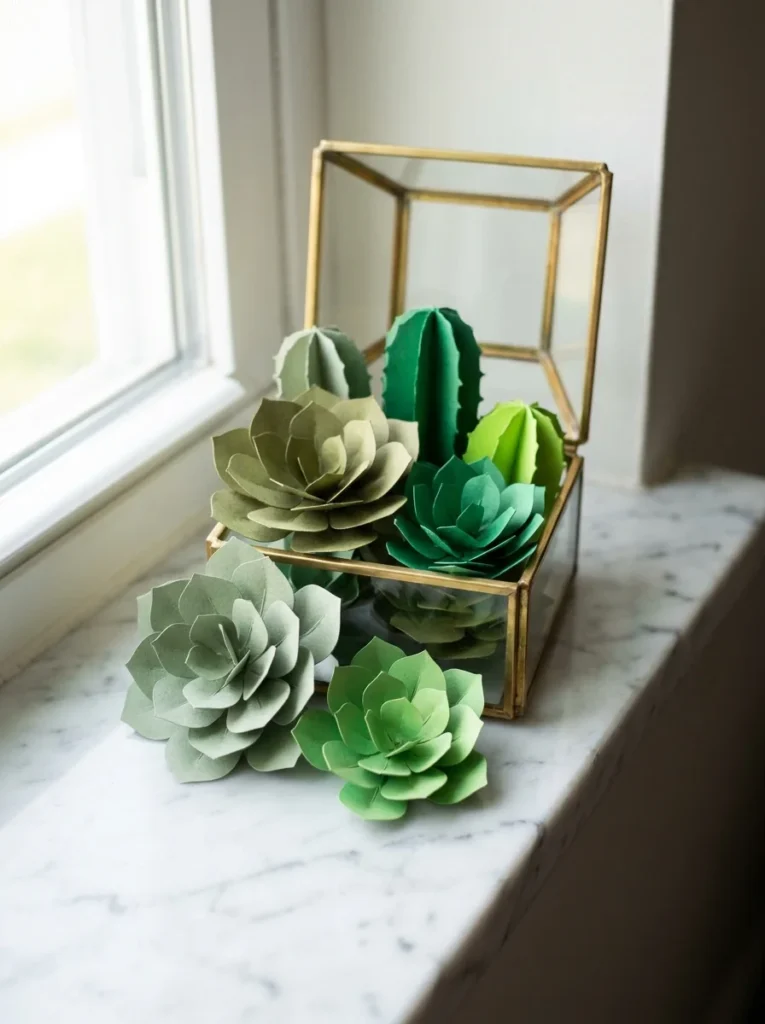
A paper terrarium is a zero-maintenance alternative to real plants, and it looks just as beautiful on a shelf.
Make the container: create an open geometric box from cardstock or thick paper. Hexagonal or diamond prism shapes look the most terrarium-like. Leave one or more sides open.
Fill it with paper succulents and cacti. Succulents are made from layered teardrop or oval petal shapes cut in graduated sizes. Layer from large (outer) to small (inner) and glue each layer at a slight angle to simulate the rosette form of a real succulent.
Free paper succulent templates are available online. Print on green cardstock in various shades, sage, forest green, blue-green, dusty rose.
Arrange a few different sizes together on a small patch of fake moss or painted sand (fine grit sandpaper works, or just colored paper crumpled into pebble shapes).
This is a zero-maintenance, allergy-friendly plant display. No watering, no wilting, no sunlight required.
The whole terrarium costs about $5 to $8 and can sit on any shelf, desk, or bathroom counter indefinitely.
28. Washi Tape and Paper Wall Grid
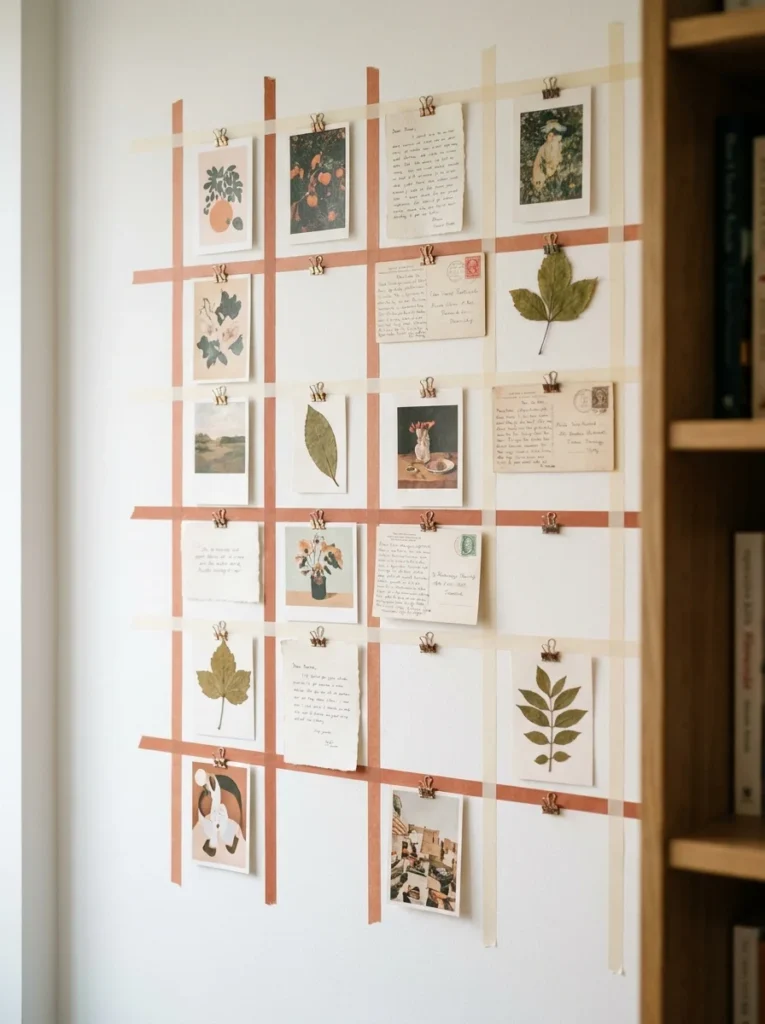
A paper grid display is one of the most personal and affordable ways to fill a wall.
Use washi tape to create a clean grid directly on the wall. Apply horizontal and vertical lines in evenly spaced rows and columns. Washi tape is repositionable, so you can peel it off and redo it without damaging the wall or paint.
Clip small pieces of paper to the grid lines using mini binder clips or clothespins. Fill the clips with postcards, printed photos, pressed leaves, hand-drawn art, quotes, fabric swatches, or paint chip samples.
This display is endlessly customizable and costs almost nothing if you use paper you already have. New washi tape runs about $2 to $4 per roll.
Swap out the contents as often as you like. Use it as a mood board, a memory board, or simply a rotating art display.
For a cohesive look, limit the paper pieces to two or three colors or a single visual theme — all black and white photos, for example, or all botanical illustrations.
This works in bedrooms, home offices, hallways, and kitchens. It grows and changes with you.
29. Paper Clock Face Art
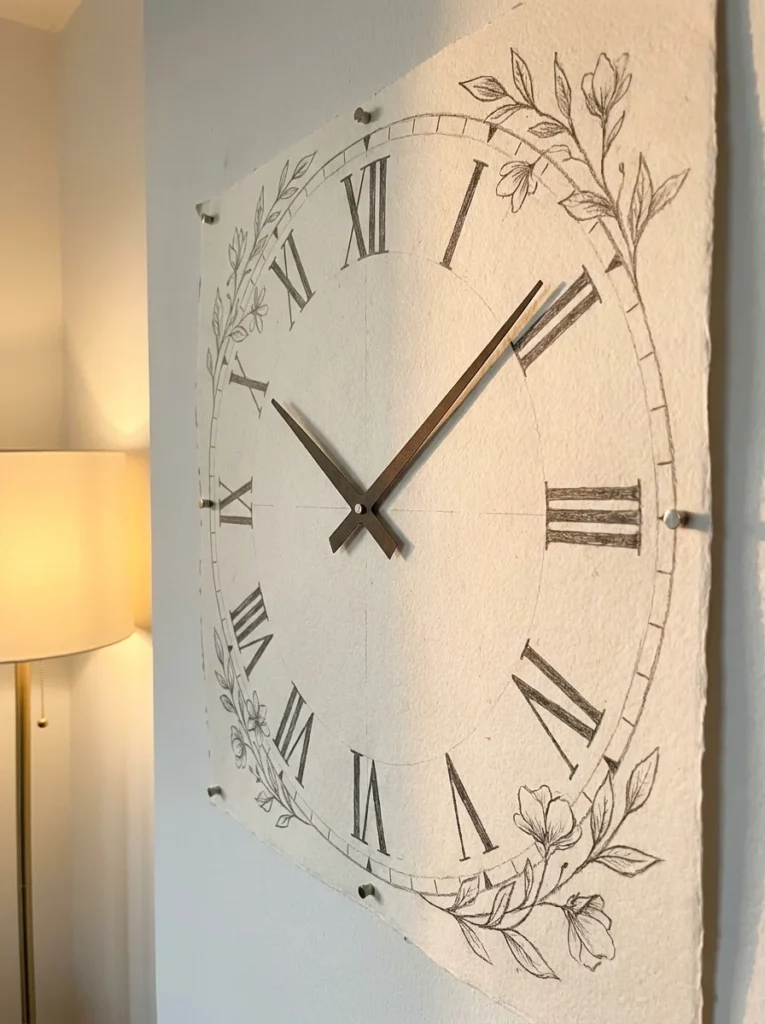
A decorative paper clock face is a large-scale wall art piece that makes a dramatic impression.
Cut a large circle from cardstock, kraft paper, or watercolor pape, the bigger the better. A 16- to 20-inch diameter circle works well for a living room wall.
Hand-draw the clock numerals around the edge using a ruler and fine-tip marker. Roman numerals look especially elegant. Add decorative elements around the face, botanical drawings, geometric borders, or fine line patterns.
Cut clock hands from dark cardstock or metallic paper. Mount them at the center of the circle with a brass brad so they sit flat but can still be rotated.
This is a decorative piece, not a functional clock. But it creates the same visual impact on a wall as a large, expensive wall clock.
Mount directly to the wall with pins through the paper, or frame it in a large circular frame for a more polished look.
The entire project costs about $2 to $4. It takes about 2 hours depending on how much detail you add.
This is particularly striking in dining rooms, entryways, or above a console table.
30. Paper Pinboard Gallery Wall
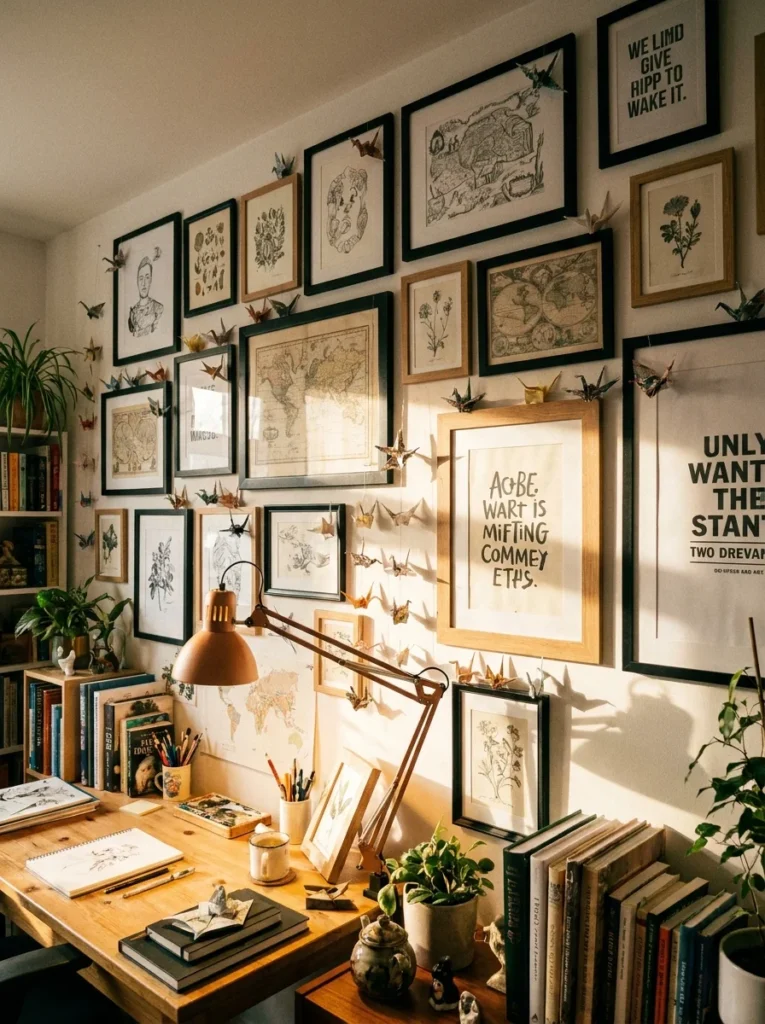
A gallery wall built entirely from paper-based art is one of the most affordable and personal displays you can create.
Collect or make your paper pieces: kraft paper botanical drawings, printed photos on cardstock, pages from old books with meaningful text, hand-lettered quotes, geometric paper cuts, or any other paper craft from this list.
Mix frame sizes and styles for an eclectic look, or keep frames consistent for a more uniform grid. Even mismatched thrift store frames painted the same color look intentional and cohesive.
Lay out the arrangement on the floor before committing to nailing anything to the wall. Move pieces around until the balance feels right.
Fill gaps with small paper elements that don’t need frames, a pressed leaf pinned directly, a paper star hung from a small nail, or a folded origami piece resting on a ledge.
Thrift stores often have frames for $1 to $3 each. Paper art can be made, printed, or pulled from old books for free.
A gallery wall like this is never truly “finished”, it grows and changes over time as you add new pieces and swap old ones. That ongoing quality makes it one of the most living, personal forms of home decor.
Conclusion
Paper crafts prove that the best home decor doesn’t have to be expensive, complicated, or bought from a store. With a few sheets of paper and a little time, you can make pieces that are genuinely personal, visually striking, and built exactly for your space. Start with one project, whichever caught your eye first and see how it feels to put something handmade on your wall. Most of these ideas take an afternoon or less. The materials cost almost nothing. And the result is decor that tells a real story about who made it and why. That’s something no store-bought piece can do. Pick one, make it, and go from there.