

Let’s be honest, we’ve all received a gift that was clearly wrapped in five seconds with leftover paper and a sad piece of tape. And we’ve all given one too. But here’s the thing: beautiful gift wrapping isn’t a talent you’re born with. It’s a handful of simple techniques and the right materials, and it takes maybe ten extra minutes.

When a DIY gift is wrapped beautifully, it doesn’t just look better, it feels more valuable before it’s even opened. The wrapping tells the recipient: you were worth the extra effort. Here’s how to make every handmade gift look like it came straight from a high-end boutique.
Start With the Right Materials (Skip the Cheap Stuff)
The single biggest upgrade you can make to your gift wrapping game? Ditch the thin, flimsy wrapping paper. It wrinkles, it tears, and it screams “last minute.”
Swap it for these premium-looking alternatives:
- Kraft paper, warm, rustic, and endlessly versatile; a roll costs almost nothing
- Thick matte paper, deep colors with no shine look sophisticated and intentional
- Fabric or linen, the Japanese furoshiki wrapping style is stunning and zero-waste
- Tissue paper in a tonal palette, layering two or three shades of the same color looks editorial
- Plain white or black paper, simple, clean, and lets your embellishments do the talking
The paper is your canvas. Choose something with enough structure to hold crisp folds, and you’re already halfway to a beautiful result.
Master the Sharp Corner Fold
Nothing separates a polished wrap from a messy one like the corners. Soft, bunched corners give it away every time. Sharp, department-store corners make people think you’ve done this professionally.
Here’s the technique:
- Cut your paper to the right size, about 2–3 inches of overlap on all sides
- Place the gift face-down in the center of the paper
- Fold one long side up first, creasing firmly along the box edge
- On the short sides, press the paper flat against the box to create a triangle flap
- Fold the triangle up neatly, crease the diagonal line, and tape flat
- Repeat on all four corners before folding the second long side up
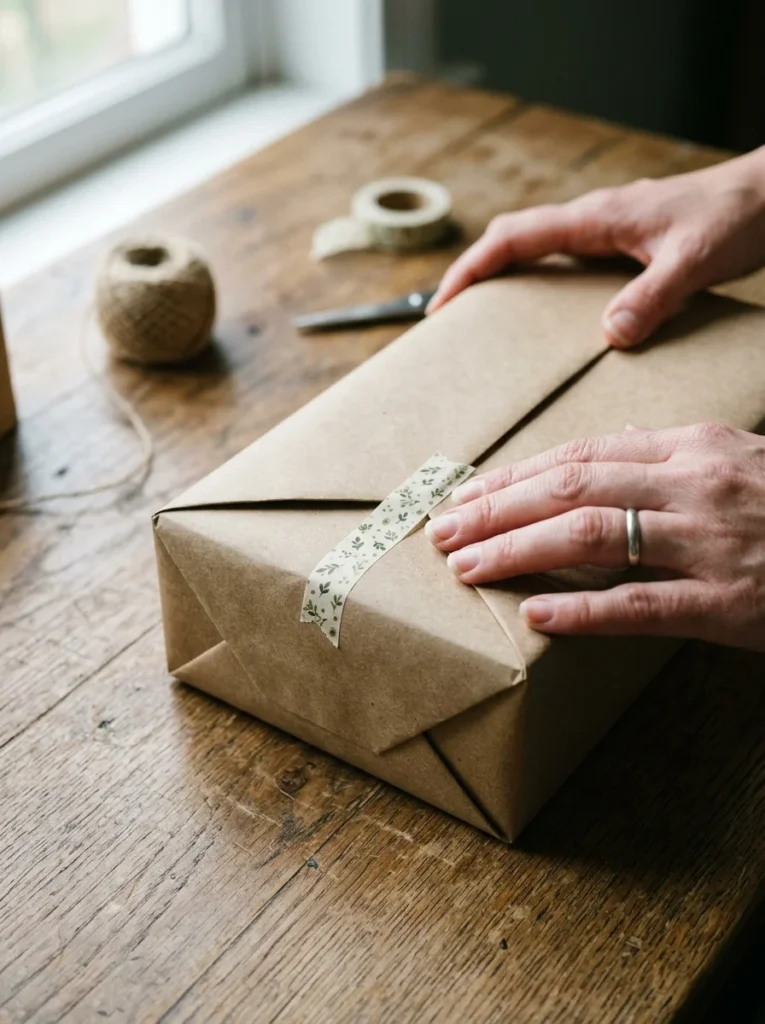
Take your time on the corners. They’re small, but they’re everything.
Elevate With Ribbons, Twine, and Natural Embellishments
This is where the magic happens. The right finishing touch transforms a neatly wrapped box into something genuinely beautiful.
Ribbon options by vibe:
- Satin ribbon, classic, elegant, ideal for birthdays and celebrations
- Velvet ribbon, luxurious and rich, perfect for winter holidays
- Natural twine, rustic, warm, pairs beautifully with kraft paper
- Grosgrain ribbon, structured and modern, great for clean minimalist looks
Natural add-ons that look stunning:
- A sprig of fresh or dried eucalyptus
- Cinnamon sticks bundled under the bow
- A dried orange slice tucked beside the knot
- Sprigs of rosemary, lavender, or pine
- A small dried flower or pressed leaf
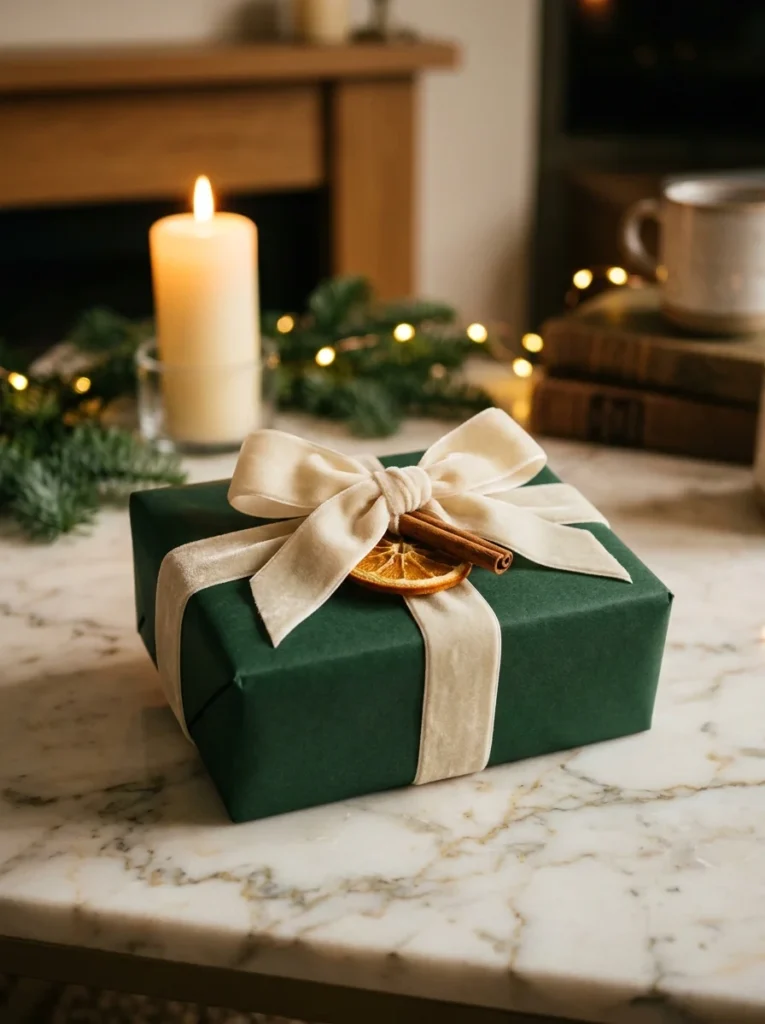
Layer two elements, a ribbon and a natural sprig — and the result looks effortlessly curated, like something you’d see in a luxury gift guide.
The Tag Is Not an Afterthought
A printed sticker label with “To/From” is the ketchup packet of gift wrapping, functional, but totally charmless. Your tag is the final signature on the whole presentation.
Do this instead:
- Write on a small piece of thick cardstock cut into a rectangle or tag shape
- Use a kraft paper tag with a punched hole and loop of twine
- Try handwritten calligraphy or brush lettering, even imperfect versions look charming
- Tuck a small folded note inside the bow rather than attaching a tag at all
- Stamp the tag with a botanical or geometric rubber stamp for texture
The handwriting doesn’t have to be perfect. It just has to be yours.
Themed Wrapping Styles Worth Trying
Matching your wrapping style to the occasion takes it to another level entirely:
- Minimal Luxury, white paper, black satin ribbon, single white dried flower
- Rustic Warmth, kraft paper, twine, cinnamon bundle, brown wax seal
- Soft Romance, blush tissue layers, cream ribbon, dried rose bud
- Modern Bold, black matte paper, gold ribbon, geometric washi tape accents
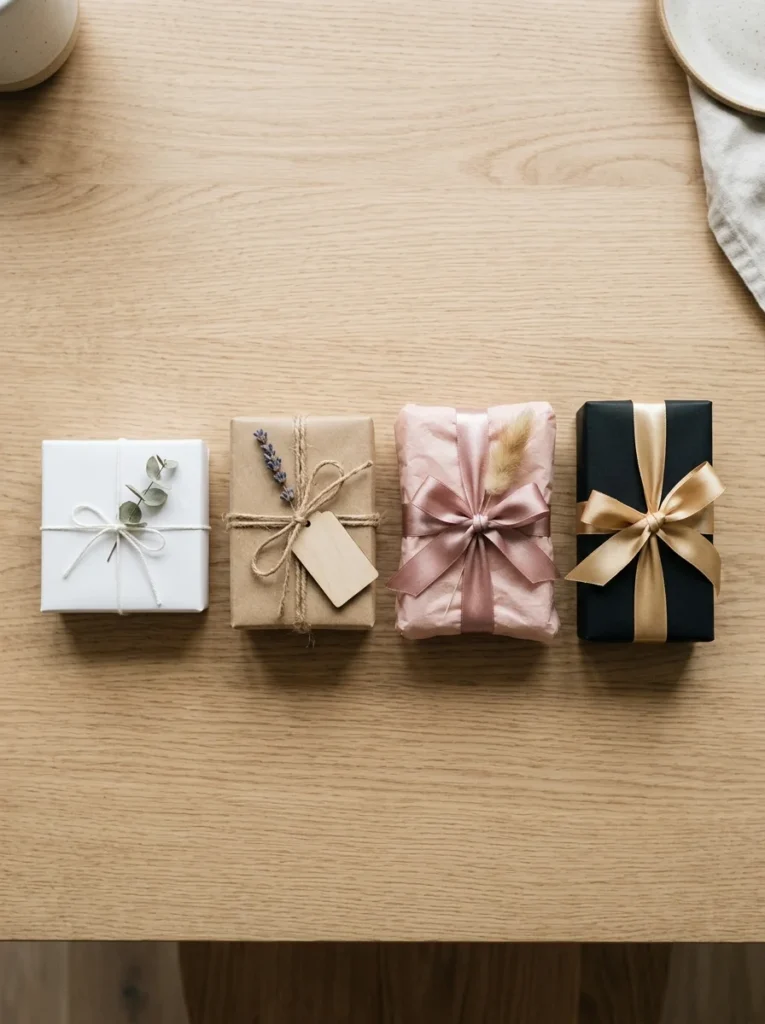
Each style uses the same basic technique, it’s just the materials that shift the entire mood.
Beautiful Wrapping Is a Gift in Itself
Here’s the truth: when someone receives a beautifully wrapped gift, they slow down. They notice the bow, they run their fingers along the ribbon, they take a photo before they even open it. That pause, that moment of feeling genuinely cared for, is something you created.
It costs almost nothing. It takes a little practice. And it makes every single handmade gift you give feel like it was worth ten times what it cost.
Save this article, gather your materials, and wrap your next gift like the thoughtful, creative person you absolutely are 📦🎀