

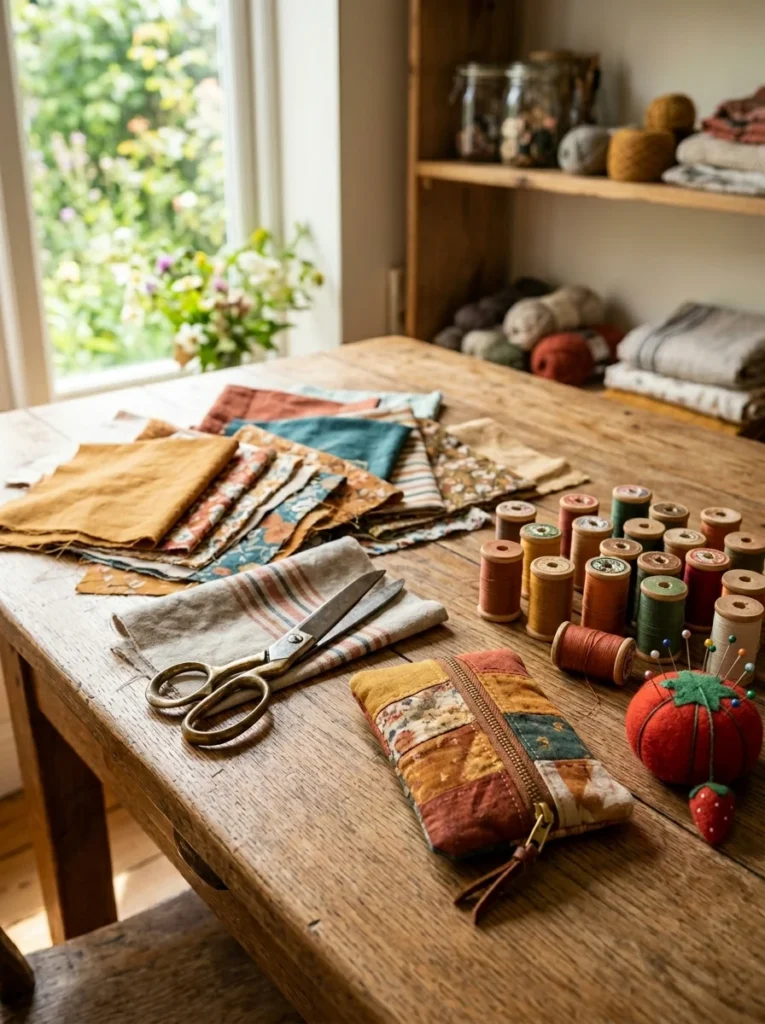
You don’t need a full weekend, a fancy machine, or years of experience to make something you’ll actually use. Small sewing projects are the sweet spot, quick wins that build real skills, use up fabric scraps, and leave you with something practical in just a few hours. Whether you’re a complete beginner picking up a needle for the first time or a seasoned crafter looking for a satisfying afternoon activity, these 25 projects cover everything from kitchen staples to thoughtful handmade gifts. Each one is designed to be low-cost, low-stress, and genuinely rewarding to finish.
1. Fabric Coasters
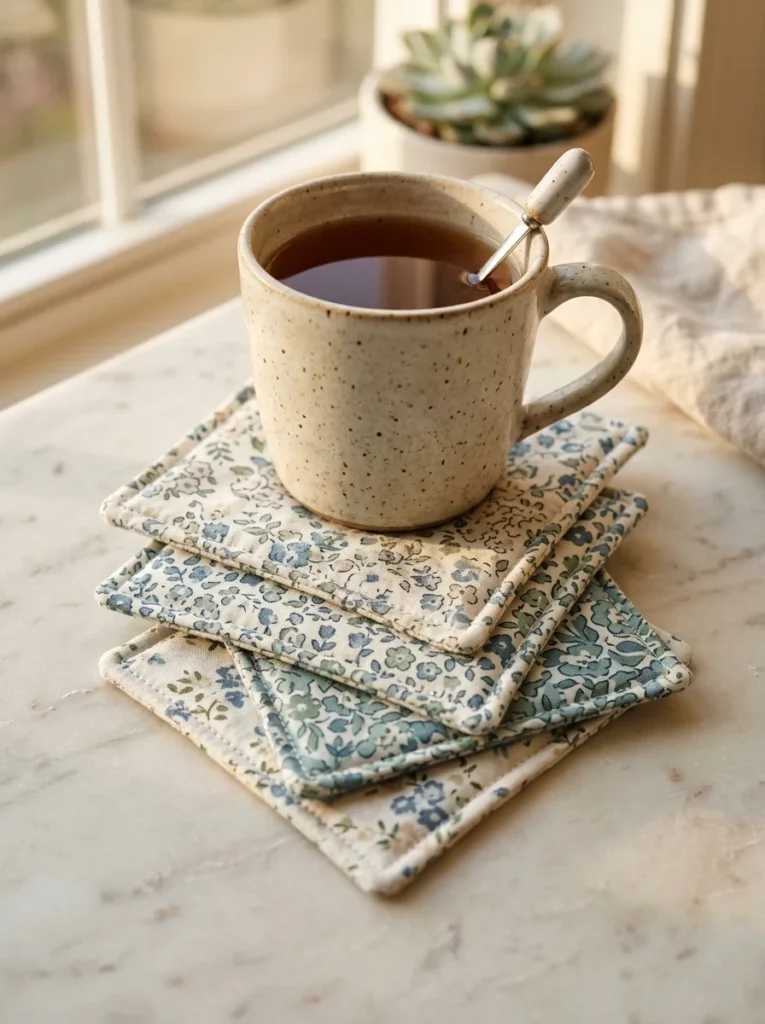
Fabric coasters are one of the fastest projects you can make. They take about 30 minutes for a set of four. All you need is two pieces of fabric, some batting, and basic stitching skills.
Cut two squares of cotton fabric, about 4×4 inches each. Add a layer of quilt batting in the middle for thickness. Sew around the edges, leave a small gap, flip it right-side out, and topstitch closed.
The beauty here is in the scraps. Use leftover fabric from old shirts, fat quarters from the dollar bin, or even worn-out jeans. Mix and match prints for a fun mismatched set.
These make excellent gifts. A set of six coasters in a matching print costs almost nothing to make, maybe $2 in materials if you’re starting from scratch. Wrap them with a piece of twine and you have a thoughtful, homemade present.
Want to level up? Try quilted coasters with a simple nine-patch patchwork front. Or add a decorative zigzag border stitch around the edge for texture. Small details make a big difference.
Stack a finished set next to your coffee machine. You’ll reach for them every morning and feel good knowing you made them yourself.
2. Drawstring Bag
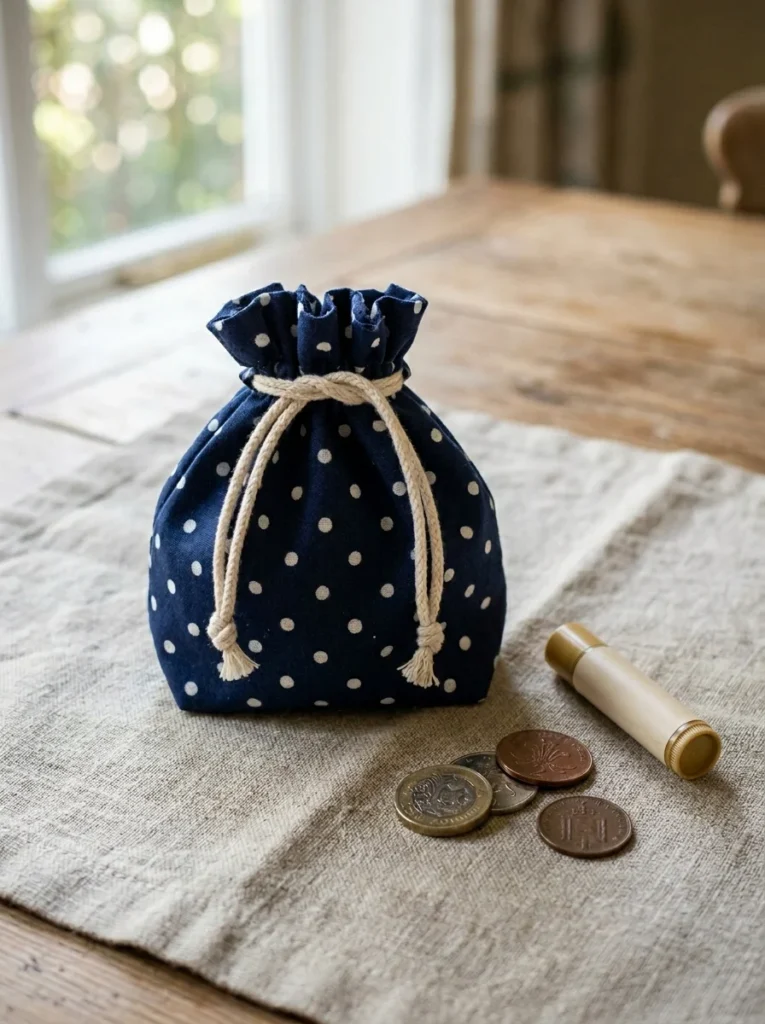
A drawstring bag is the gateway project for beginner sewers. It’s two rectangles, a channel at the top, and a cord. That’s it.
Cut two pieces of fabric the same size about 12×14 inches is a great starting size. Sew them together along three sides. Fold the top edges down twice to create a casing. Thread a ribbon, shoelace, or cotton cord through the casing. Done.
This project takes under an hour from cutting to finishing. It’s also endlessly useful. Use it as a gym bag liner, a shoe bag, a gift wrap alternative, or a snack pouch for kids.
For the fabric, quilting cotton works perfectly. But you can also use canvas, denim, or even an old pillowcase for a free zero-cost version.
Budget tip: Shoelaces from the dollar store make great drawstrings. So does ribbon bought by the roll usually a few dollars for several yards.
Once you’ve mastered the basic version, try adding a simple lining. Cut two inner pieces the same size, sew them to the inside before closing the seam, and you have a bag with a clean professional finish.
These bags take less than a yard of fabric. Make a dozen in an afternoon and you’ve solved your holiday gifting problem.
3. Pillowcase
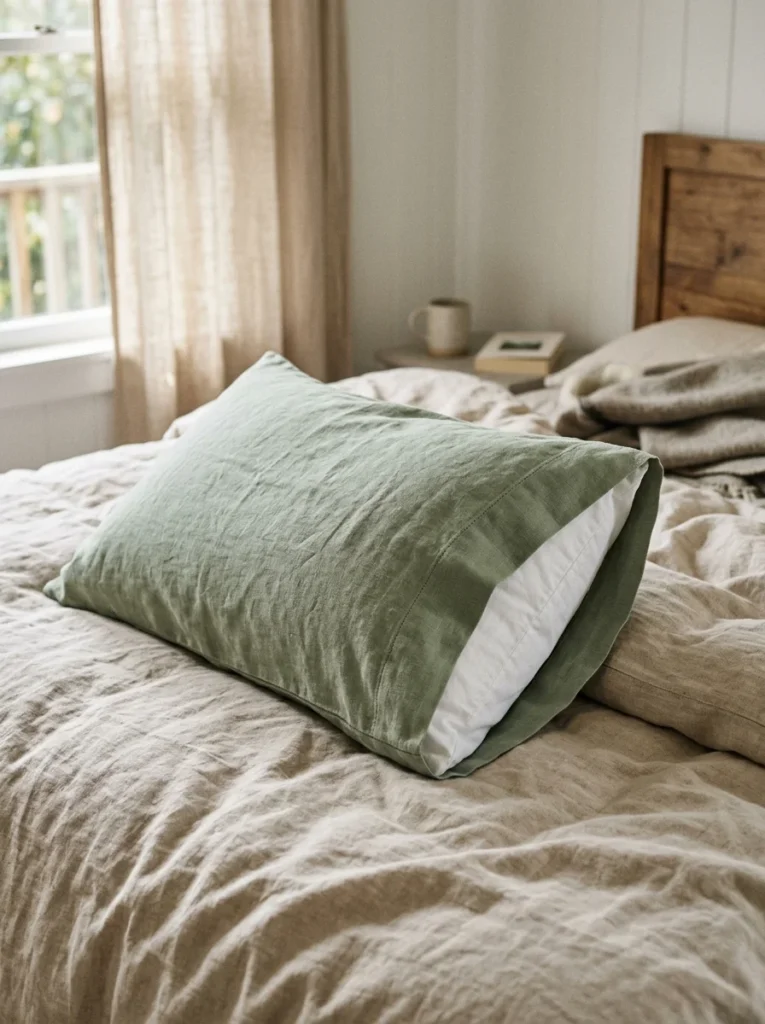
A pillowcase is one of the most practical things you can sew. You’ll use it every single day. And it takes about 45 minutes start to finish.
The easiest version is the envelope-style pillowcase. No zipper, no buttons. Just fabric that wraps around the back of the pillow. You need about a yard and a half of cotton.
Cut one large front piece and two smaller back pieces. Hem the inside edges of the back pieces. Overlap them in the center, place them face-to-face with the front, and sew around all four edges. Flip it right-side out and your pillow slides right in.
This technique means no hand stitching, no tricky closures, and a clean result every time. The overlapping back holds the pillow firmly in place.
Fabric cost: A yard and a half of quilting cotton or muslin typically runs $3–$8 depending on the store. Clearance fabric bins are goldmines for this project.
Want something more luxurious? Try a soft jersey knit for a stretchy T-shirt feel. Or use a cotton-linen mix for a crisp hotel-style look.
These also make excellent gifts when made in sets of two. Pair them with matching hand towels or a tote bag for a coordinated handmade set.
4. Reusable Produce Bags
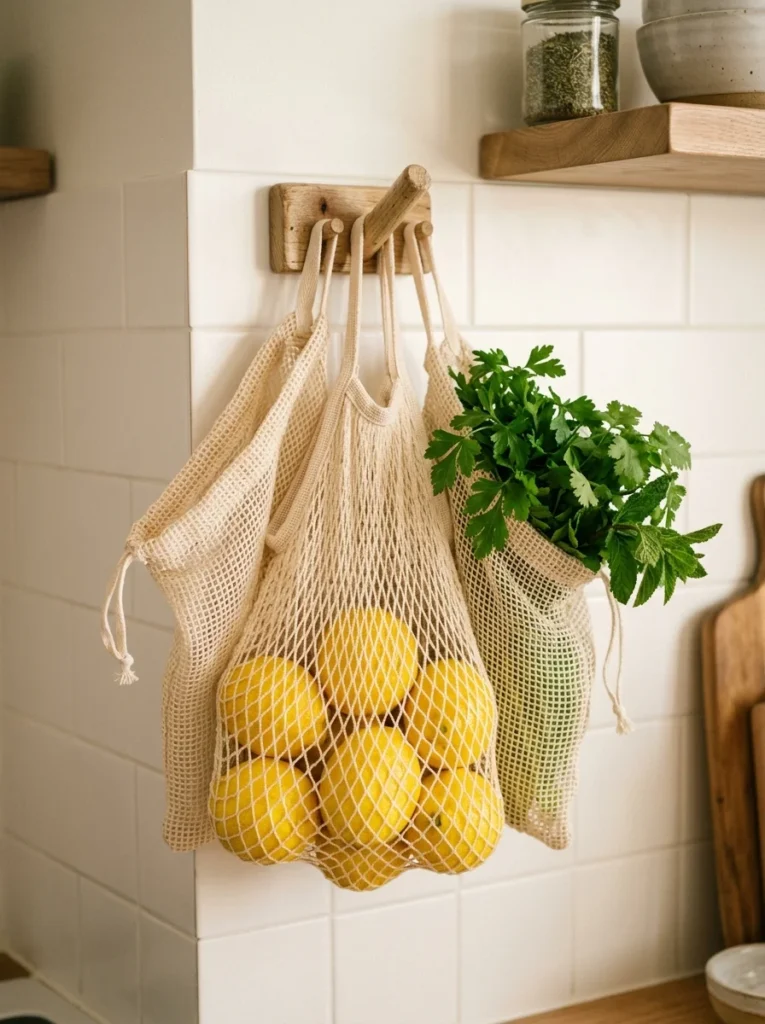
These are the project that actually changes a daily habit. Reusable produce bags replace single-use plastic at the grocery store, and they’re absurdly easy to make.
Use lightweight cotton muslin or mesh fabric for breathability. Cut two rectangles about 12×14 inches. Sew around three sides, leaving the top open. Fold the top edge down twice and sew a casing. Thread a ribbon through and tie the ends together.
The whole process takes maybe 20 minutes per bag. Make six in an afternoon and you’ve replaced every plastic produce bag in your weekly shop.
Free version: Cut up an old sheer curtain panel or lightweight linen sheet. No fabric cost at all.
Add a drawstring stopper, a small wooden bead threaded onto the ribbon before you tie the ends, so the bag stays closed in your cart.
These bags are also handy for storing loose herbs in the fridge, packing snacks for kids, or organizing tiny items in a drawer. The lightweight fabric won’t add noticeable weight when you’re buying produce by the pound.
If you want to get fancy, stamp them with a fabric marker, a small lemon print or a leaf shape, to make them feel more finished. A rubber stamp and some fabric ink costs about $5 total.
5. Pincushion
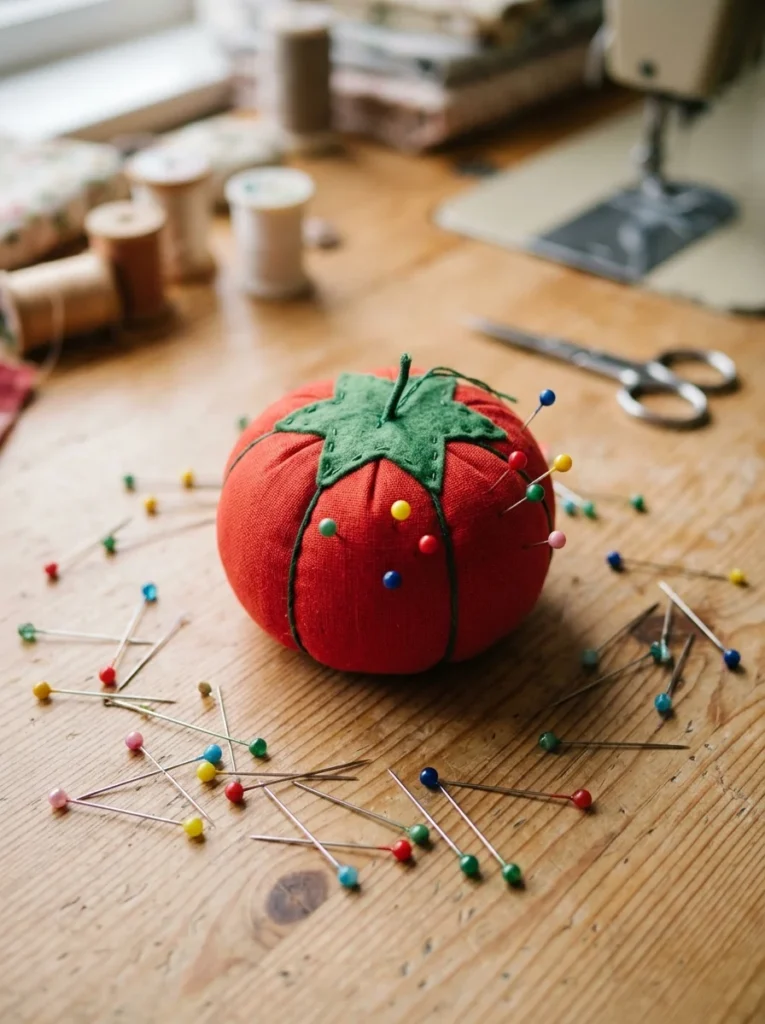
Every sewer needs a pincushion. It’s the most satisfying small project to start with because it’s useful the moment you finish it.
The classic round pincushion is just two circles of fabric, sewn together and stuffed. Cut two circles about 4 inches in diameter. Sew around the edge, leave a small gap, stuff firmly with polyfill, and close the gap with a ladder stitch.
The stuffing matters more than most beginners realize. Pack it tightly, more than you think you need. A firmly stuffed pincushion holds pins upright. A loosely stuffed one tips over constantly.
Budget stuffing tip: Old pantyhose or nylon tights make surprisingly good pincushion fill. Cut them into small pieces and pack them in. The nylon also gently sharpens pins as you push them in and out.
Want to try a tomato-style version? Sew a pie-shaped circle divided into six sections. Stuff each section before closing the top. Add a green felt stem and leaf. It’s a tiny bit more work but looks charming.
You can also make a wrist pincushion, an elastic band with a small stuffed pad attached. Slip it on your wrist while you sew and your pins are always right there.
Great first project. Quick win. Immediately useful.
6. Hand Towel With a Loop
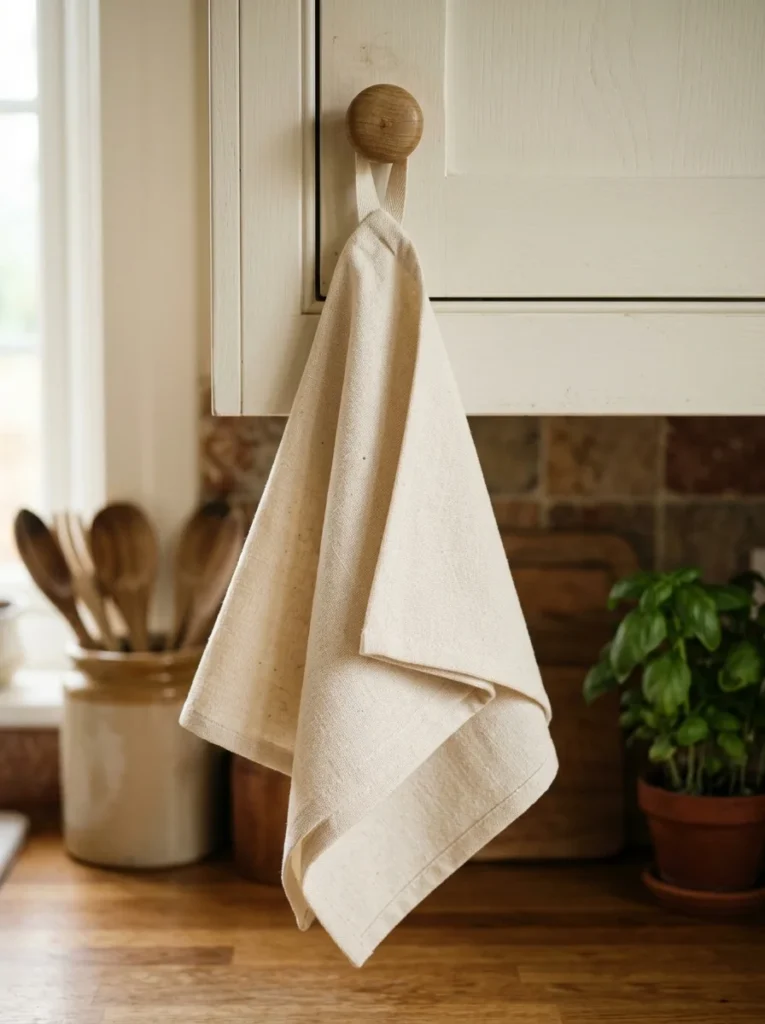
This is a five-dollar project that makes your kitchen feel more put-together. A hanging hand towel with a loop stays where you put it instead of falling to the floor every five minutes.
Start with a piece of cotton terry cloth or linen, about 14×20 inches. Hem all four edges with a simple folded hem. Then cut a small strip of matching fabric about 1×5 inches. Fold it in half lengthwise, sew it into a loop, and stitch it to the top corner of the towel.
The loop slips over a cabinet knob, oven handle, or refrigerator handle. It stays put even when wet. Much more practical than a regular hand towel draped loosely over a rail.
You can also make the decorative version: add a simple strip of contrasting fabric along the bottom third. It gives the towel a two-tone look without extra complexity.
Cost breakdown: A half-yard of cotton terry runs about $3–5. You can also repurpose an old bath towel that’s still clean but too worn for the bathroom.
Make a set of three in matching fabric and hang them together. It looks purposeful and coordinated without any major effort.
These also work as gift toppers. Fold one over a jar of homemade jam and tie with a ribbon. Practical, pretty, and personal.
7. Book Sleeve
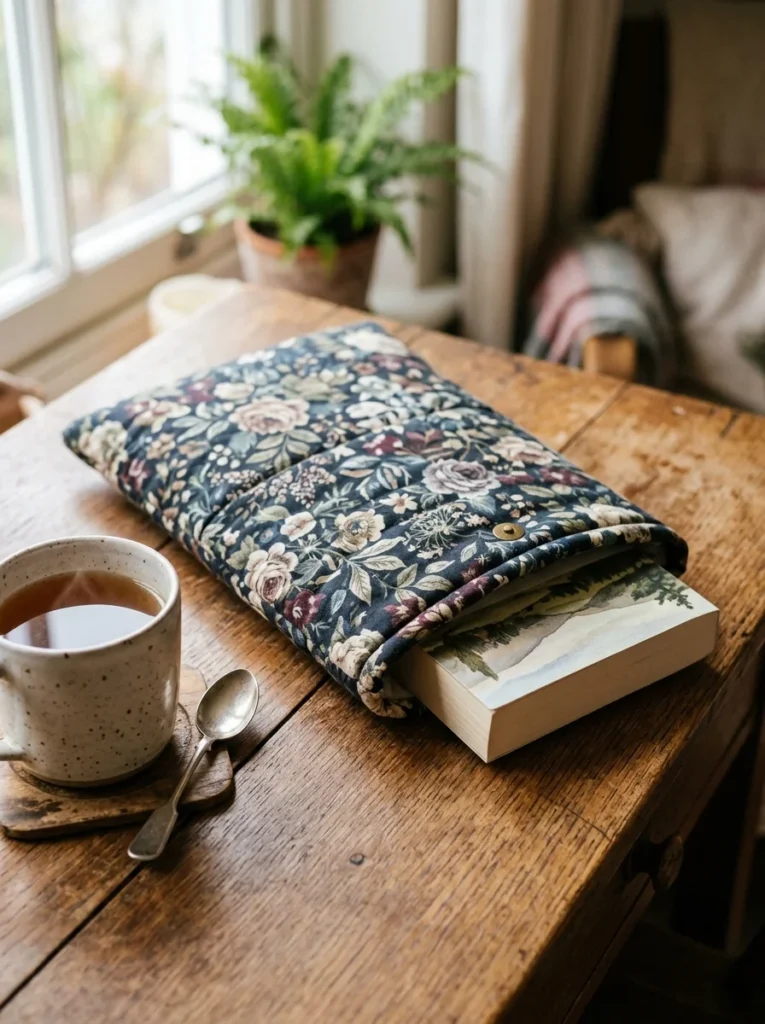
If you carry a book in your bag, you know the problem. Bent covers, broken spines, pages crushed against your keys. A fabric book sleeve solves all of that.
It’s basically a padded envelope with a flap closure. Cut two pieces of quilted fabric or sew batting between two layers of cotton. Size it to your book usually about 6×9 inches for a standard paperback. Sew three sides closed, leaving the top open. Add a simple button-and-loop closure at the top flap.
The padding protects the cover. The snug fit keeps pages from bending. The fabric makes your bag look more intentional.
Fabric options: Pre-quilted fabric from the fabric store saves time since the batting is already attached. Or layer regular cotton with a piece of fleece for a softer version.
Closures don’t have to be buttons. Magnetic snaps are easy to attach and feel satisfying to use. Velcro works too, though it can catch on loose threads over time.
Size variation: Make an e-reader sleeve the same way, just scaled down to 5×7 inches. Add a thin foam insert for extra screen protection.
These are one of those projects where the fabric choice tells the whole story. A moody dark floral makes it feel like a collector’s item. A bright stripe gives it a playful traveler vibe.
8. Fabric Bookmarks
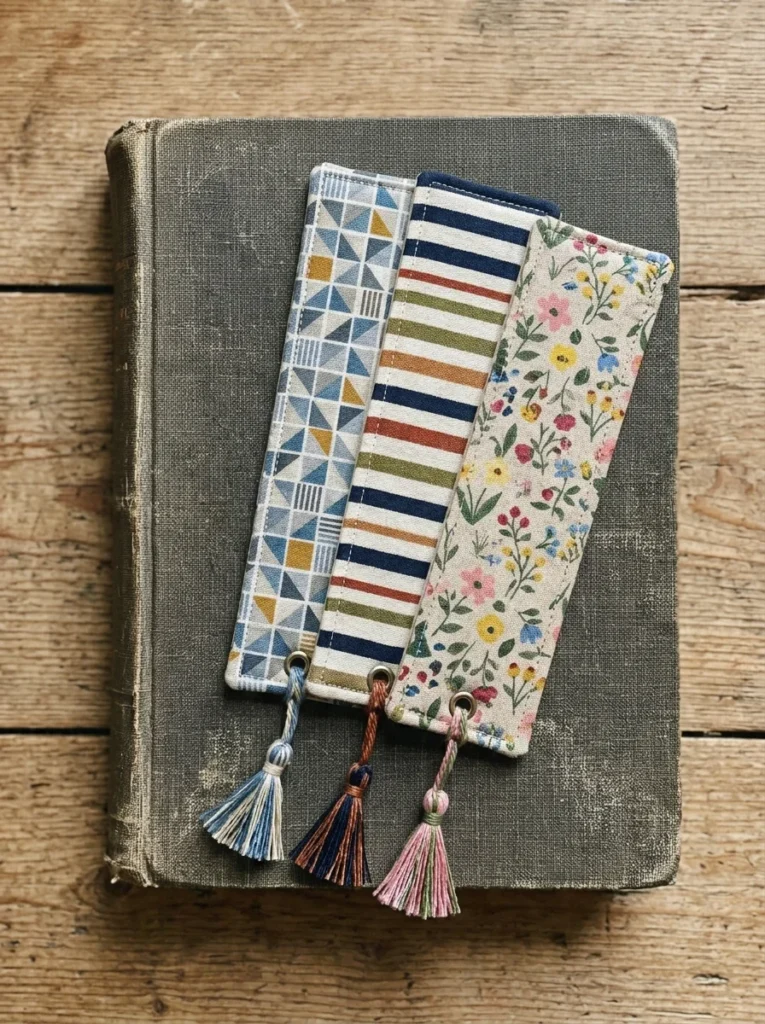
Fabric bookmarks are the perfect ten-minute project. They’re small, they use up even tiny scraps, and they make excellent little gifts.
Cut a strip of fabric about 2.5×9 inches. Cut a second strip the same size for the backing. Place them together face-to-face, sew around the edges, leave a gap at one end, flip right-side out, and topstitch around the whole thing.
The finishing touch: A small tassel at the bottom. Cut about twenty 4-inch pieces of embroidery floss. Fold them in half, loop the fold through the bottom of the bookmark, and pull the ends through. Secure with a tight knot. Takes three minutes and makes a huge difference.
For extra stiffness, iron a piece of fusible interfacing to one fabric piece before sewing. This makes the bookmark feel more rigid and polished.
Cost per bookmark: Almost nothing. A fabric scrap you’d otherwise throw away, a little thread, and an embroidery floss tassel that costs pennies.
These are perfect for:
- Stocking stuffers
- Teacher appreciation gifts
- Party favors
- Adding to a book as a gift
Make a batch of twelve in two hours. Sort them into sets of three by color and tie with a bow. You have a complete, thoughtful gift for under $1 in materials.
9. Zipper Pouch

A zipper pouch is the project that most beginners are slightly afraid of. But once you’ve done it once, you’ll wonder why it seemed hard.
The basic method uses a centered zipper sewn between two fabric panels. Cut two rectangles the same size, 10×7 inches is a great starter. Sew the zipper between the top edges of the front and back panels. Then fold the whole thing with the zipper on top, sew around the sides and bottom, clip the corners, and turn it right-side out through the open zipper.
Key tip: Open the zipper halfway before you sew the sides. This is how you get the pouch to turn right-side out at the end. Skip this and you’ll be stuck.
Zipper length doesn’t have to match exactly. A 9-inch zipper on a 10-inch pouch just means you sew a small tab at each end. Very common in handmade pouches and it looks intentional.
Budget zippers: Dollar store and craft store grab-bags often include assorted zippers. Buy a bag of mixed lengths for $3–5 and you’ll have enough for a dozen pouches.
These are endlessly useful for: makeup, cables, first aid supplies, snacks, pencils, jewelry, crafting tools. Make a few in different sizes and you’ll stop reaching for plastic zip bags.
10. Simple Tote Bag
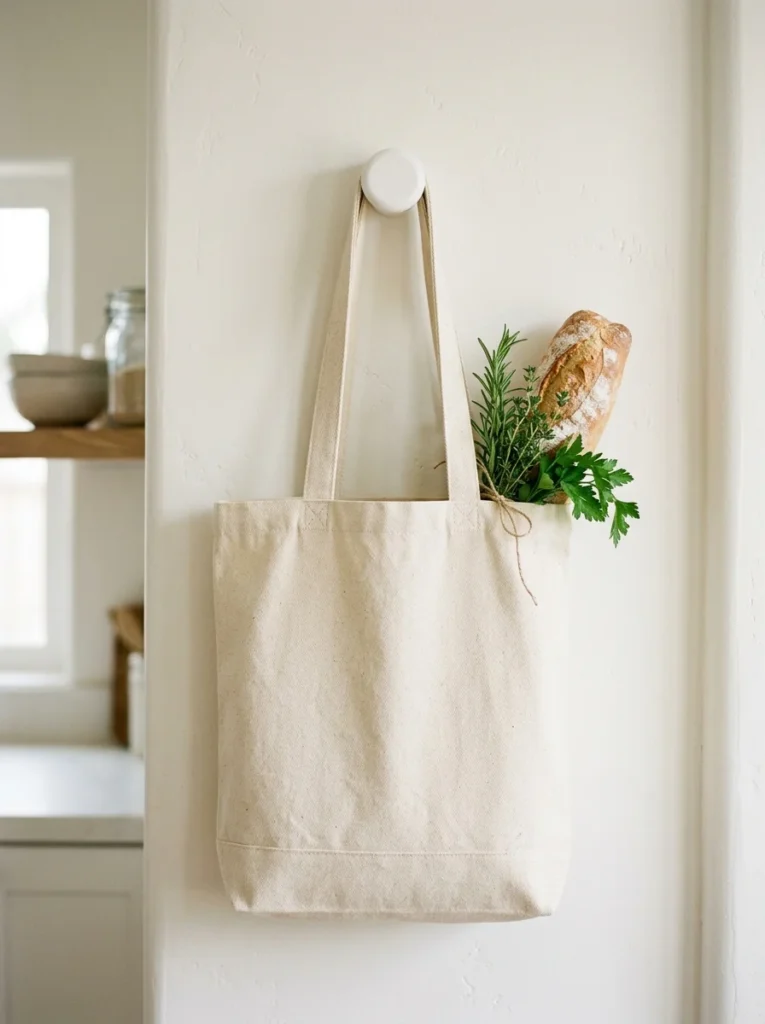
A basic tote bag is one of the most practical things you’ll ever sew. It takes about an hour, uses less than a yard of fabric, and you’ll reach for it constantly.
Cut two rectangles of canvas or heavy cotton, about 14×16 inches each. Cut two handle strips about 3×22 inches. Fold and press the handles in half lengthwise, sew them closed, and topstitch for strength. Sew the main panels together on three sides with a half-inch seam. Fold the top edge down and topstitch around it, catching the handles as you go.
Reinforcing the handles: Backstitch or bartack where the handles attach. This is the spot that takes all the weight. A few extra stitches here make the bag last for years.
For a flat bottom, sew the bottom corners into a small triangle before trimming. This creates a box shape. About two inches of depth is plenty for a practical carry bag.
Fabric ideas: Canvas drop cloth from the hardware store is extremely cheap, sometimes $5 for a large drop cloth you can cut multiple bags from. Denim from old jeans is free and works beautifully.
Customize with fabric paint, an iron-on design, or a small embroidered motif on the front panel. Even a simple stripe of contrasting fabric sewn across the bottom third makes it look finished.
11. Mug Cozy
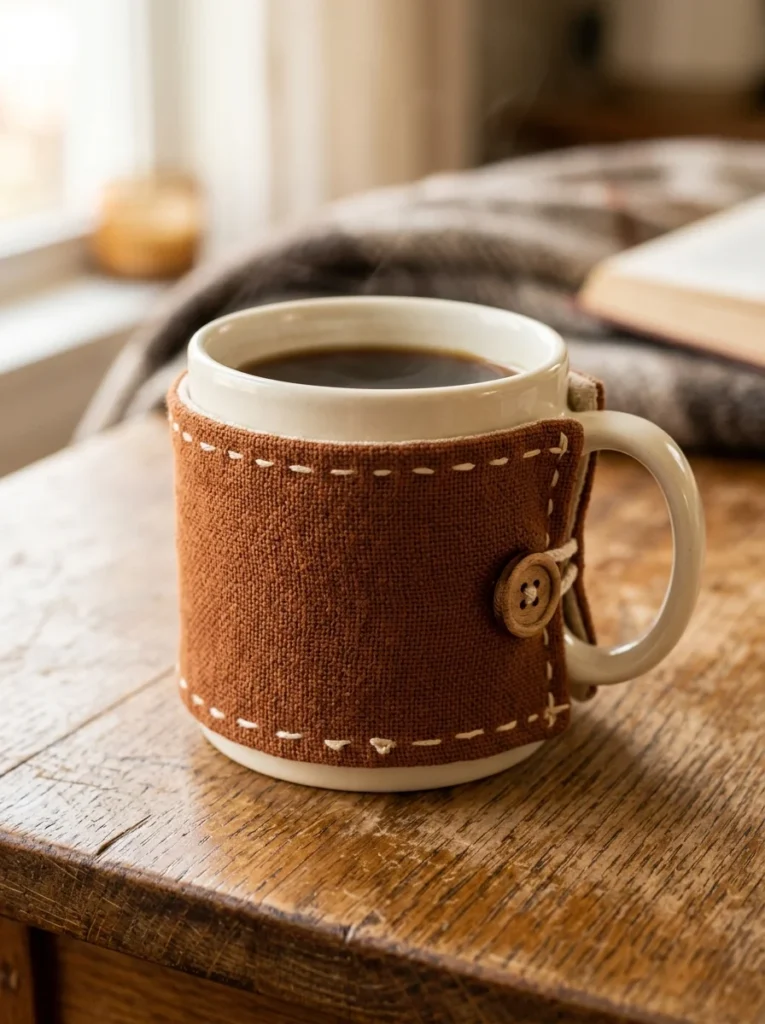
A mug cozy keeps your coffee hot longer and your hands comfortable holding a warm ceramic mug. It wraps around the mug like a small sleeve and snaps or buttons on one side.
Measure your mug first. Wrap a tape measure around the widest part and note the height. Cut a rectangle of fabric to fit, usually about 4×10 inches with a little extra for seam allowance.
Sew two layers together face-to-face, leave a gap to turn right-side out, then topstitch around the whole piece. Add a button on one end and a small loop of elastic on the other. Wrap it around your mug and button it closed.
For extra insulation, add a layer of fleece or batting between your two fabric layers before sewing. The difference in heat retention is noticeable.
Fabric choices matter here. Avoid synthetic fabrics that might melt near heat. Stick with cotton, wool, or felt. Heavy denim works perfectly and looks intentional.
These are made in under 30 minutes. Make a coordinating set with your fabric bookmarks and hand towels and you have a full cohesive handmade kitchen gift set.
Dollar tip: Felt sheets cost about 25 cents each at most craft stores. A single felt sheet can make two mug cozies. That’s a complete gift for under $1.
12. Fabric Gift Bags
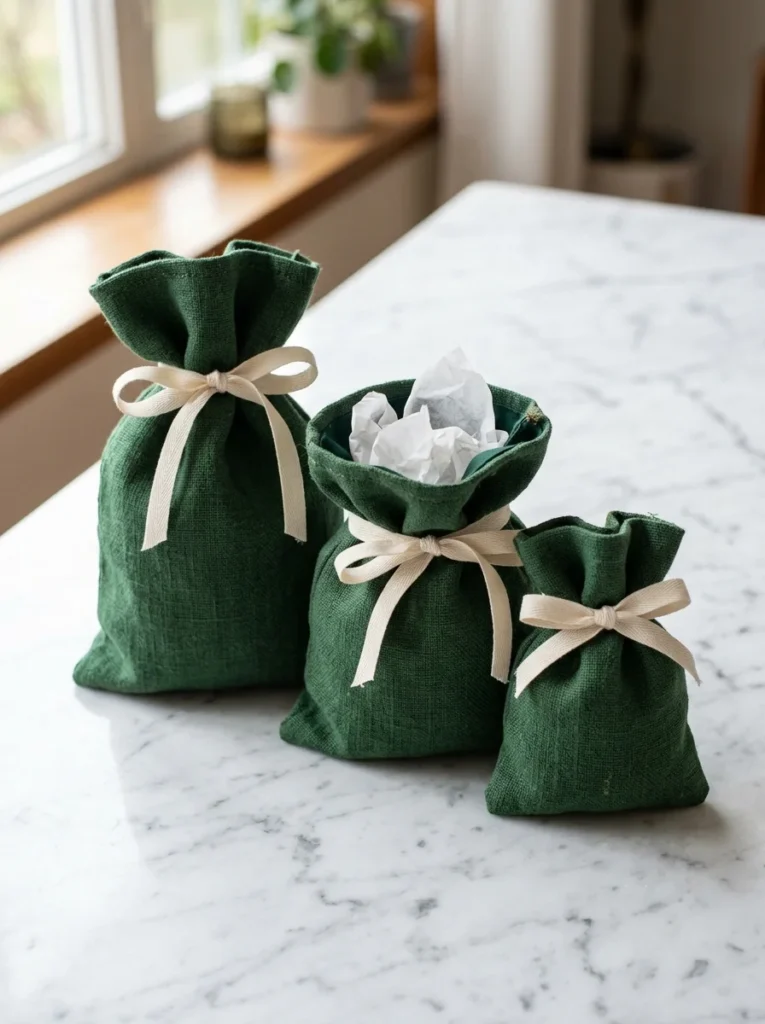
Fabric gift bags are reusable wrapping that actually looks more impressive than paper. They’re also faster than wrapping a box with tape and creases.
The construction is exactly like a drawstring bag. Cut two rectangles, sew three sides, fold the top over for a casing, and thread a ribbon through. The only difference from a produce bag is the fabric use something with more body and pattern.
Size guide:
- Small gift bag: 8×10 inches
- Medium gift bag: 12×14 inches
- Bottle bag: 6×15 inches
The bottle bag is especially useful. Wine, olive oil, a candle, all things that are awkward to wrap conventionally. A tall fabric bag with a ribbon makes it look elegant instantly.
Fabric suggestions: Fat quarters are perfect for this project. One fat quarter (18×22 inches) gives you enough for one medium bag or two small ones. They often go on sale for $1–2 each.
Line the bag with a contrasting print for a polished two-tone look. It adds ten minutes but makes the bag feel like something the recipient might actually keep and reuse which is the whole point.
A gift inside a handmade fabric bag says something different than tissue paper. It says you thought about it twice.
13. Beeswax Wrap Pouch (Fabric Version)
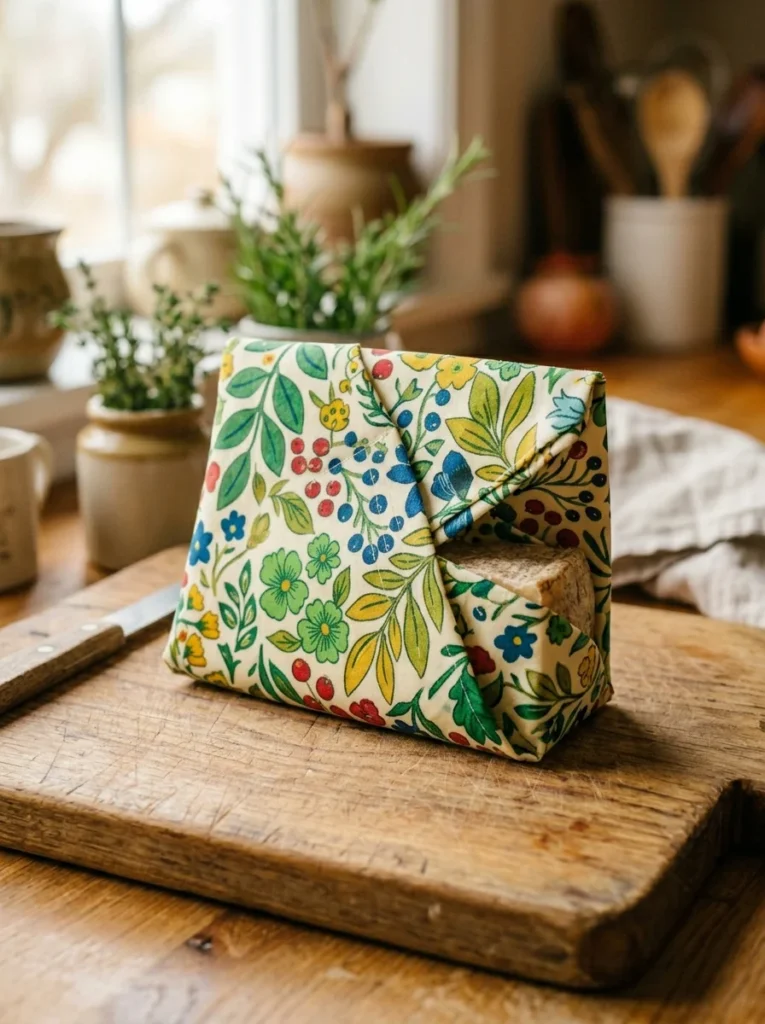
This is a fabric-only version of a food storage wrap, no wax or chemicals needed. It’s just a simple folded fabric pocket that works for wrapping snacks, cheese, half a lemon, or a sandwich.
Cut a square of cotton fabric, roughly 12×12 inches. Hem all four edges with a simple narrow hem. That’s the entire project.
Fold it around food just like you’d fold parchment paper. Tuck the corners under. The fabric holds the shape once folded.
For a more structured version: Cut two pieces and sew them together with batting in between. This gives the wrap more body and makes it easier to fold into a neat package.
The fabric is washable. Toss it in the laundry after use. It replaces plastic wrap for most everyday food storage needs.
Best fabrics: Tightly woven cotton without a loose weave works best. Avoid fabrics with a lot of surface texture that might harbor moisture.
These are the kind of project where function drives the design. A bold botanical print or a simple gingham check both work perfectly. Choose something that feels good in your kitchen.
Make a set of four in different sizes, small for half a lemon, medium for cheese, large for a sandwich. Store them folded in a drawer. You’ll use them constantly.
14. Eyeglass Case
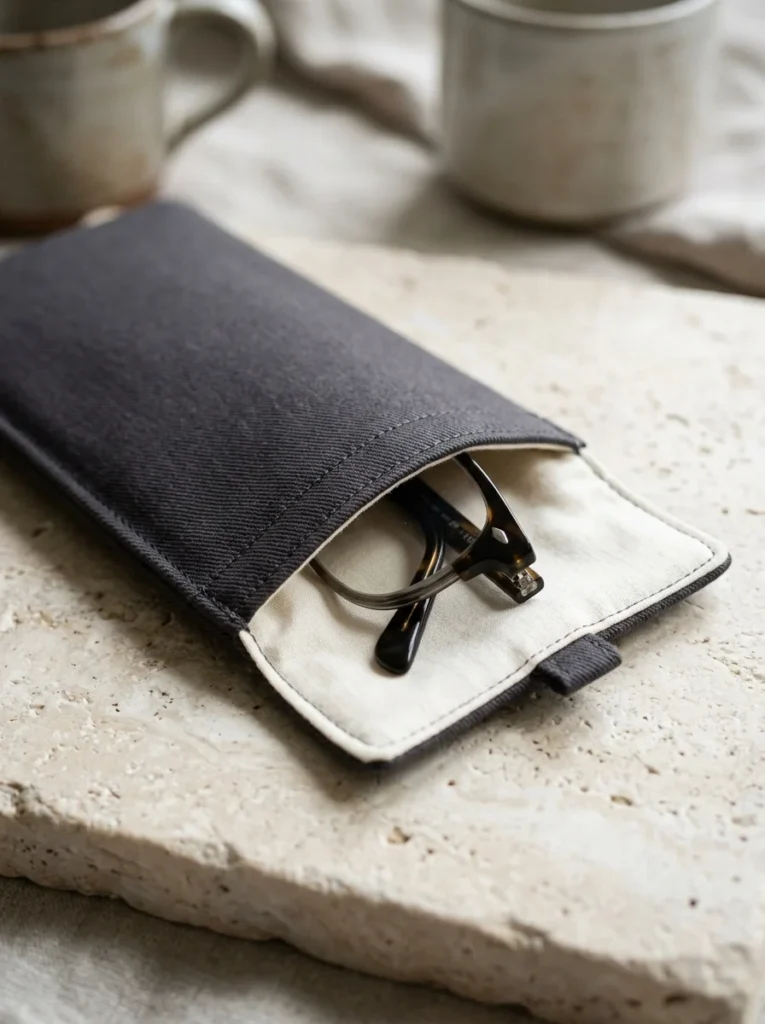
A fabric eyeglass case is one of the most functional small sewing projects there is. Glasses slip out of soft pouches. A padded case with a snap closure actually protects the lenses.
Cut two pieces of heavier fabric, canvas or denim works well, roughly 4×8 inches. Cut two matching lining pieces. Sew the outer pieces together on three sides. Sew the lining pieces together on three sides. Slide the lining inside the outer case, wrong sides together. Fold the top edges together and stitch closed.
For padding: Add a layer of foam or fleece between the outer fabric and lining before assembling. Even a thin layer makes a significant difference in protection.
A magnetic snap at the top closure is the easiest hardware to add. Mark the placement on both sides before sewing, install the snap pieces, and then assemble the case. The snap is satisfying to use and keeps everything secure.
Slim profile: The case should fit snugly in a bag pocket. Don’t make it too roomy or it won’t protect the frames from moving around.
Cost: About $3–5 in materials. A magnetic snap costs under $1. The foam comes from a cut piece of quilt batting.
Make one for your reading glasses, one for your sunglasses. A great gift for anyone who carries glasses in a bag.
15. Neck Warmer or Tube Scarf
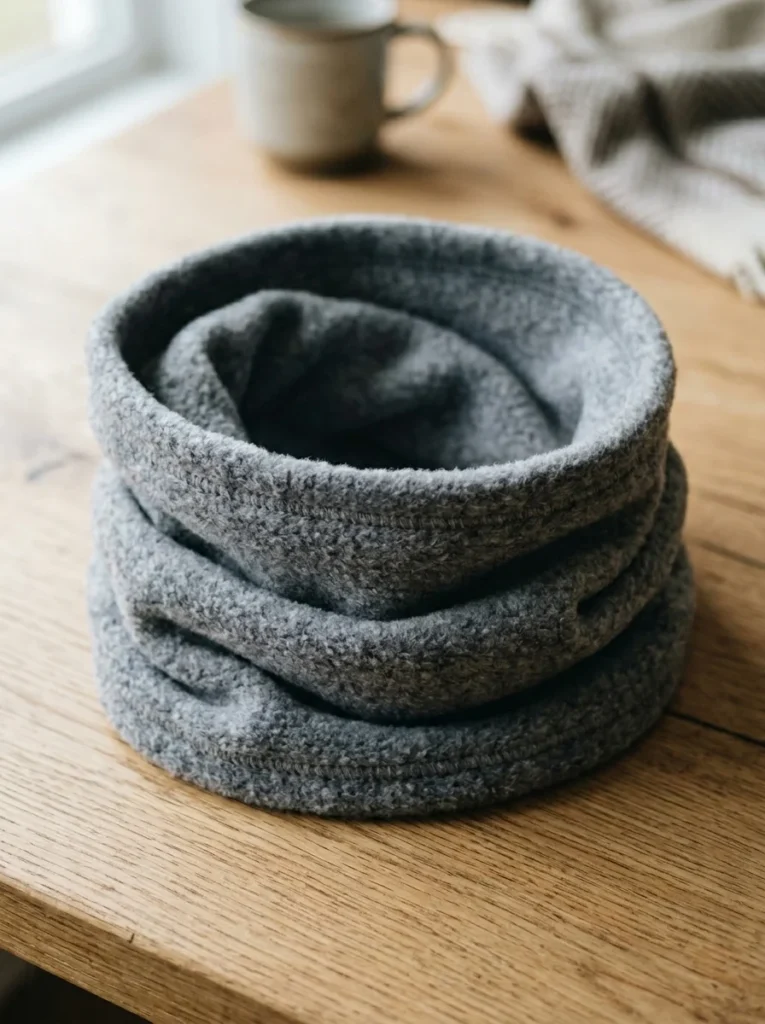
A tube scarf, also called a snood or infinity scarf, is one of the fastest wearable projects in sewing. No pattern. No closures. Just a loop of soft fabric you pull over your head.
Cut a rectangle of fleece or jersey knit fabric. For a standard neck warmer, cut about 12 inches wide and 24 inches long. Fold it in half so the short ends meet. Sew the short ends together with a stretch stitch or zigzag. You now have a loop. Turn it right-side out. Done.
Key tip: Use a stretch stitch or zigzag when sewing knit fabrics. A regular straight stitch will pop when the fabric stretches. Most machines have a built-in stretch stitch, check your stitch selector.
For a wider, longer infinity scarf, cut the fabric 22 inches wide and 60 inches long. Fold it in half and join the short ends. This creates a double-loop scarf.
Fleece advantage: Fleece doesn’t fray. You can leave the raw edges unfinished if you want an even quicker finish. Just sew the seam, flip it over, and wear it.
Cost: A half-yard of fleece at $2–4 gives you enough for one scarf with fabric left over. Warm, functional, and made in twenty minutes.
16. Fabric-Covered Hanger

Fabric-covered hangers are a small luxury that makes a closet feel more intentional. They also prevent slippery garments from sliding off and are a classic handmade gift.
Use thin wooden or plastic hangers as your base. Cut a long strip of cotton fabric about 1.5 inches wide and 50–60 inches long. You can cut this on the bias for a little stretch, which makes wrapping easier. Tie the strip to the hook at the top of the hanger. Wind it tightly and evenly down one arm and back up again until the hanger is fully covered. Tie off at the hook and add a ribbon bow.
Batting layer: For a padded effect, wrap the hanger first with a thin layer of polyfill batting, secured with a few stitches. Then cover with fabric strips. The padded version is gentler on delicate garments.
Lavender version: Sew a small lavender sachet and attach it to the hook. The hanger keeps clothes smelling fresh in the closet. This is a popular bridal shower gift.
Fabric options: Satin ribbon strips, cotton prints, or even strips torn from an old pretty blouse all work. The tearing method gives a slightly frayed edge that looks rustic and intentional.
Make a set of three or five in coordinating fabrics. Tie them together with a ribbon for a complete, elegant handmade gift.
17. Lavender Sachet
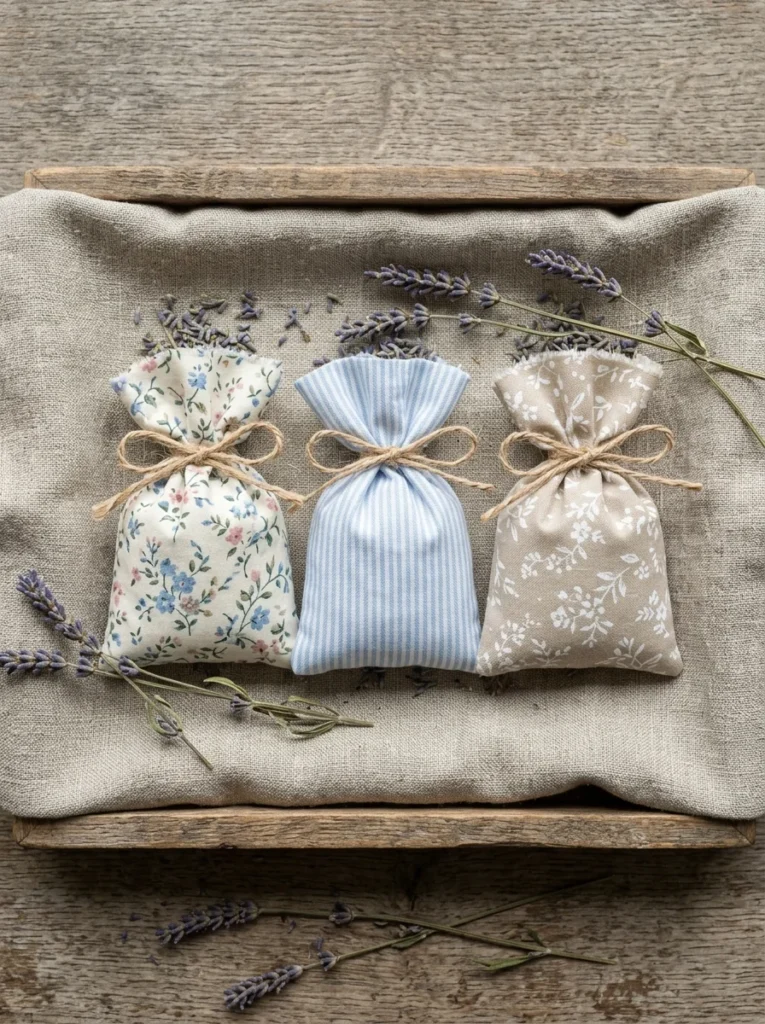
Lavender sachets are the perfect small project for absolute beginners. No complicated shapes. No closures. And the finished product smells wonderful.
Cut a small rectangle of breathable cotton fabric, about 5×10 inches. Fold it in half so you have a 5×5-inch square. Sew along two sides, leaving one side open. Fill with dried lavender. Sew the final side closed or tie it off with twine.
Breathable fabrics work best because they let the scent pass through. Muslin, linen, or loosely woven cotton all work well. Avoid tightly woven synthetic fabrics that trap the scent inside.
Dried lavender cost: A large bag of dried lavender runs about $5–8 and fills dozens of sachets. Buy once and make many.
These are used in:
- Dresser drawers to keep clothes smelling fresh
- Linen closets
- Under pillows for relaxation
- Car dashboards
- As gift wrap accents
The embellishment possibilities are endless. Add a small hand-stitched initial on the front. Tie with a bow instead of sewing the top. Use lace trim around the edges. Make a heart-shaped version for Valentine’s gifts.
At under $1 per sachet, they’re one of the most cost-effective handmade items you’ll ever make.
18. Cable Organizer Roll
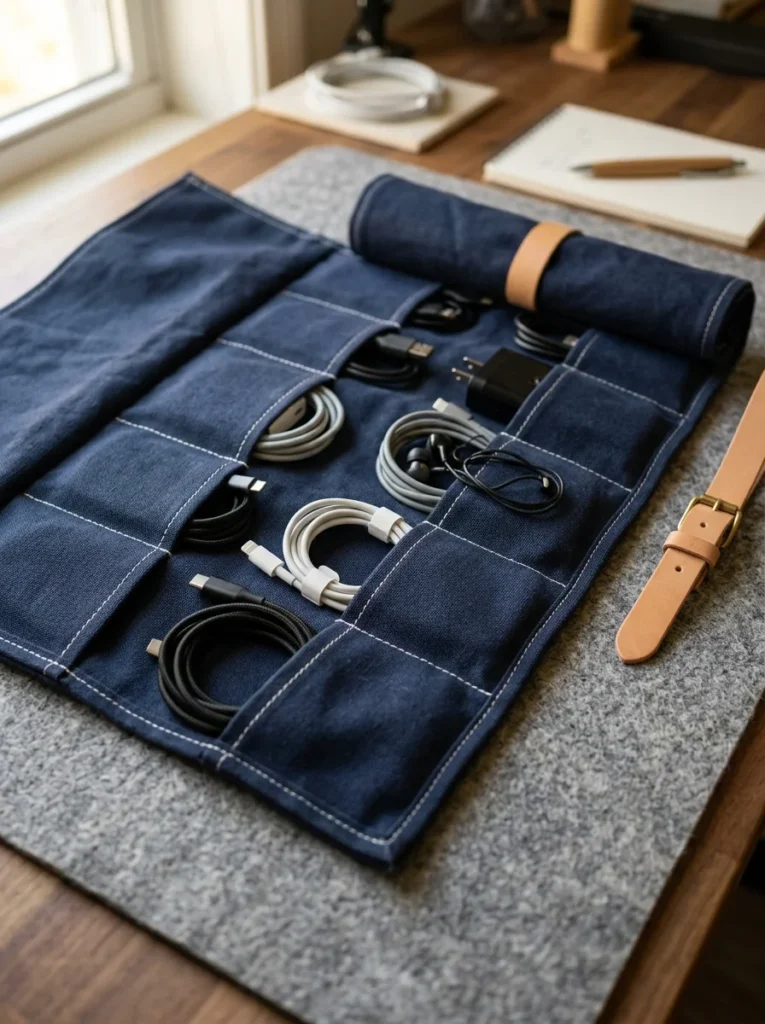
If you have a bag full of tangled cables, this project will genuinely change your travel life. A fabric cable roll keeps everything organized, flat, and easy to find.
Cut a rectangle of heavier fabric, canvas or denim, about 12×18 inches. This is your base. Cut several smaller strip pieces to create pockets of different widths. Sew the pocket strips across the lower half of the main piece, leaving the top half open. Stitch dividers through each pocket strip to create individual slots.
Pocket sizing guide:
- Narrow pockets (about 2 inches wide): charging cables
- Medium pockets (about 3 inches wide): earbuds, small adapters
- Wide pockets (about 4 inches wide): larger cables, a small power bank
Attach a ribbon or fabric tie to one edge. Roll the whole thing up and tie it closed. All your cables stay flat and separated inside.
Pocket depth: Make the pockets about 4 inches tall so items don’t fall out when you roll it up.
This is also a good project for makeup brushes, knitting needles, artist pencils, or small tools. The same construction works for all of them, just adjust the pocket widths for your specific items.
Canvas from a dollar-store tote bag or repurposed denim from an old pair of jeans gives you the perfect weight fabric for free.
19. Small Zippered Wallet

A slim fabric wallet is a great intermediate project once you’re comfortable with zippers. It takes about an hour and uses a surprisingly small amount of fabric.
The basic structure has an outer shell, an inner lining, a zipper along the top, and a few card pockets on the inside. Cut your outer fabric and lining in the same rectangle, about 8×4 inches when folded in half. Add the zipper between the outer and lining at the top, just like a zipper pouch. Then sew a smaller inner pocket piece that folds up to create card slots.
Creating card slots: Cut a rectangle for the interior pocket section. Fold it, then sew vertical lines across it to divide it into separate card-sized slots. Stitch this interior panel to the lining before assembling the wallet.
Best fabrics for wallets: Heavier fabrics like canvas, cork fabric, or waxed cotton hold their shape well. Avoid thin quilting cotton on its own, it wears out quickly with daily use. Interface it to add body.
Wipe-clean cork fabric has become a popular wallet material. It looks professional, repels moisture, and is easy to find online for about $8–10 per yard, enough for many wallets.
Make a slim card wallet version by reducing the size to 4×3 inches. Just enough for three cards and some folded bills. Minimal and practical.
20. Pot Holder
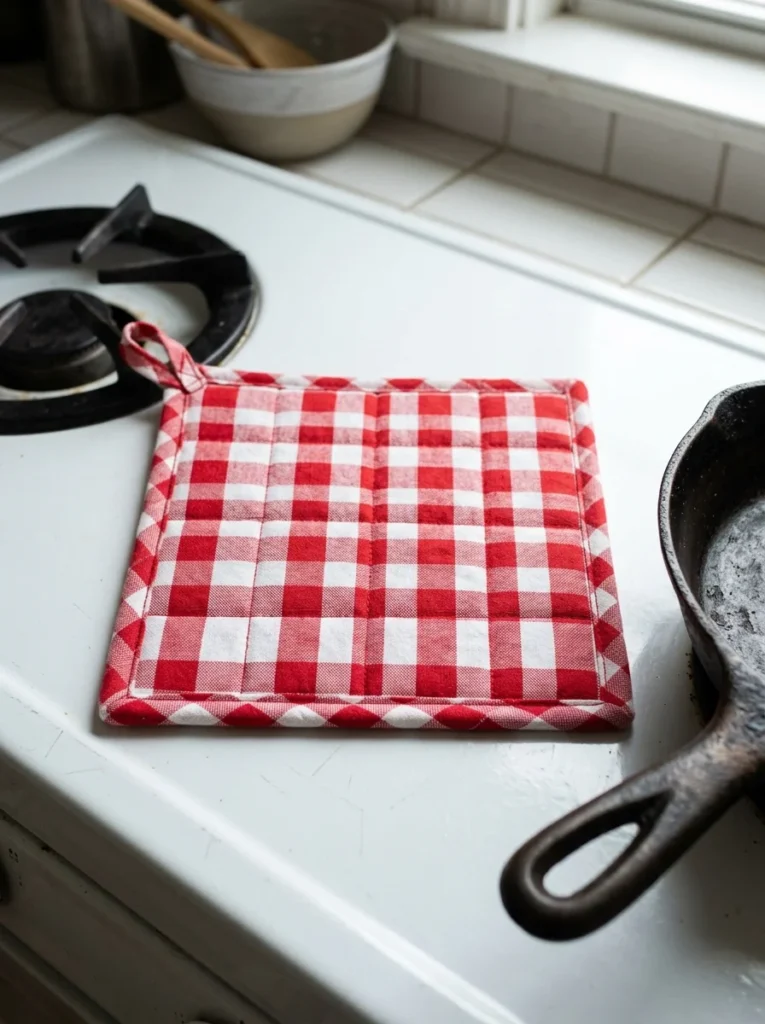
A pot holder is one of those projects where material choice is the whole game. You need the right insulating layers or you’ll burn yourself through a pretty piece of fabric.
The correct construction is: outer fabric, then two to three layers of insulating batting or Insul-Bright, then a backing fabric. Sew these layers together with quilting stitches to hold them in place. The quilting also adds texture and looks intentional.
Insul-Bright is a heat-reflective batting sold specifically for pot holders and oven mitts. A small packet costs about $3–5 and makes several pot holders. This is worth buying, it’s far more effective than regular quilt batting alone.
Cut a square about 8×8 inches for a standard pot holder. Layer your materials, baste them together, quilt in a simple grid, and then bind the edges with a strip of fabric folded over the raw edges.
Binding: The binding step is what makes pot holders look finished. Cut a 2.5-inch-wide strip of matching fabric. Fold in half, wrap it over the raw edge, and sew through all layers. Miter the corners for a crisp finish.
A pair of matching pot holders costs about $5 in materials. They last for years and make your kitchen feel more personal. A classic handmade household staple.
21. Hanging Wall Pocket Organizer
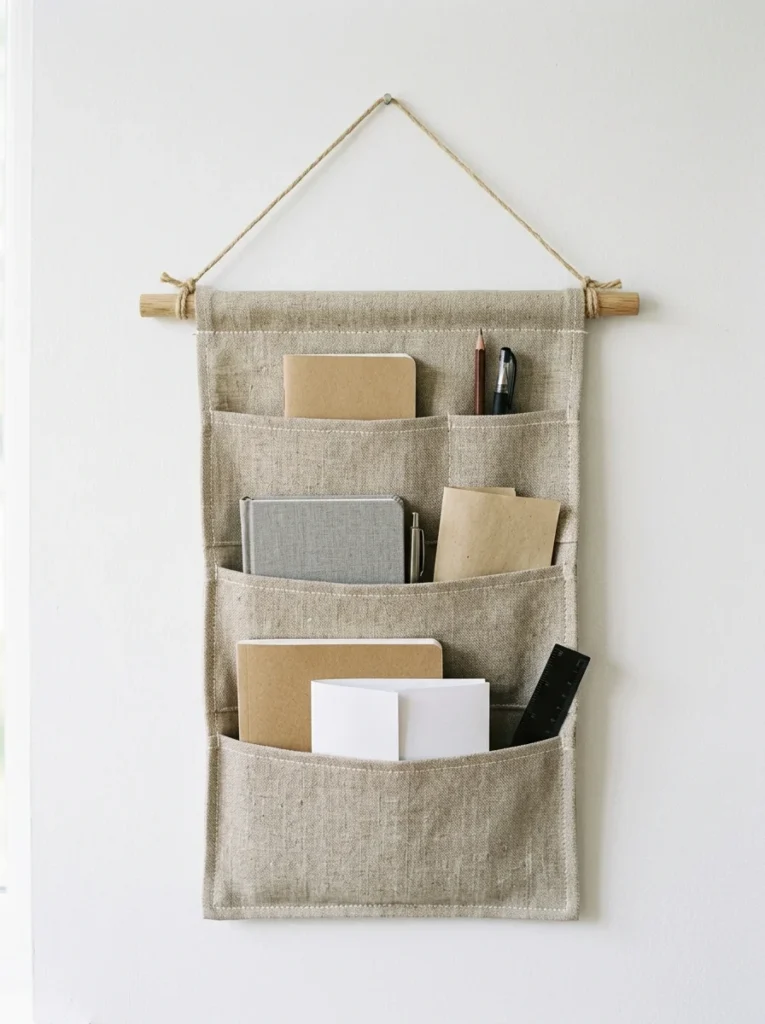
A wall pocket organizer is a project with serious practical payoff. Hang it near your desk, front door, or kitchen and it immediately gives everything a home.
The basic structure is a flat backing piece with fabric pockets sewn onto the front. Cut a large rectangle of linen or canvas for the backing about 14×20 inches. Cut three smaller rectangles for the pockets. Hem the top edge of each pocket, then sew the other three sides to the backing panel, overlapping the pockets slightly if you want a layered look.
Pocket variation: Make the pockets gradually deeper from top to bottom. A shallow top pocket holds papers and cards. A deeper bottom pocket holds notebooks, a water bottle, or a tablet.
Slide a wooden dowel through a casing at the top for hanging. Or fold the top edge over a strip of doweling and glue with fabric glue. Add two pieces of twine or ribbon at each end of the dowel to hang it.
Cost: A 20-inch wooden dowel costs about $1 at a craft store. Half a yard of linen or canvas costs $3–5.
Customize for specific use cases:
- Near the front door: keys, mail, sunglasses
- Above the desk: notebooks, pens, charger cables
- In a child’s room: small books, art supplies
Functional, clean, and finished in under two hours.
22. Sleep Mask
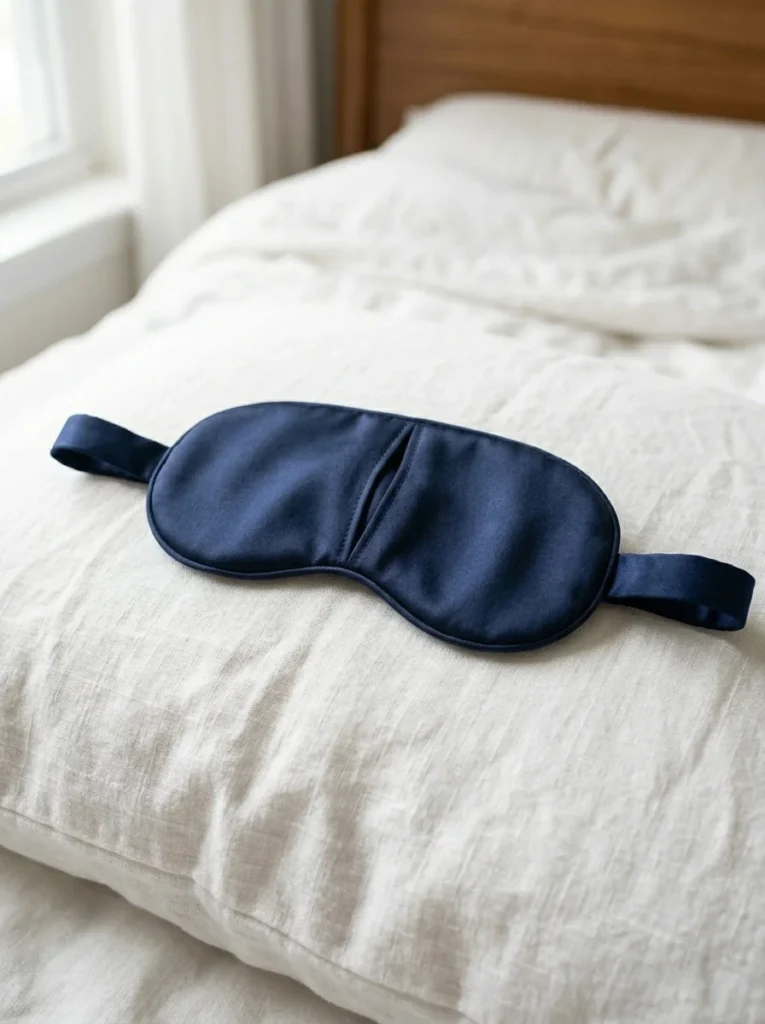
A fabric sleep mask blocks light, feels gentle on your skin, and costs almost nothing to make. Most commercial sleep masks are made from the same materials you can buy at any fabric store.
The basic shape is a curved oval, roughly 9 inches wide and 4 inches tall with a slight concave curve along the top edge that fits over the eyes comfortably. Print a simple template from any free online source, or draw one freehand on paper and adjust until it fits your face.
Materials: Use a soft fabric for the front, silk, satin, or a double-layer jersey feels nicest against skin. Back it with a cotton or flannel layer. Add thin batting between the layers for a padded feel.
Sew the layers together face-to-face, leave a small gap to turn right-side out, topstitch around the edge. Sew an elastic band to each side of the back so the mask stays on through the night.
Elastic placement: Position the elastic so the mask sits just above the ears without pressing into the temples. Test fit it before sewing the elastic permanently.
Personalization options: Embroider a small moon or star on the front. Use a novelty print that makes you smile every night before bed.
Total cost: about $2–3 in materials. A small luxury you made yourself.
23. Fabric Basket or Bowl
A coiled fabric basket is a slightly different technique from standard sewing, it involves wrapping fabric strips around a core material and stitching the coils together. But it’s simple, no-pattern required, and creates something genuinely beautiful.
Use cotton rope or clothesline cord as your core, about 50 feet for a small basket. Tear or cut fabric into long strips about 1.5 inches wide. Wrap the fabric strips tightly around the cord as you coil it into a flat spiral. Sew through each coil to attach it to the previous one.
Working method: Start at the center. Coil the wrapped cord in a flat circle for the base, stitching each round to the previous one. Once the base is the size you want, start coiling upward to build the walls.
No sewing machine needed for this project, a sharp hand needle and heavy thread works fine. Or use your machine’s free arm to zigzag through the coils.
Height control: Keep the walls straight by coiling straight up. Angle them outward slightly if you want a flared bowl shape.
Cost: A 50-foot clothesline cord costs about $3. Fabric strips come from old sheets, towels, or clothing. Total cost is minimal for a basket that looks intentional and handmade.
Use them for storing keys, small plants, jewelry, or craft supplies.
24. Hand-Stitched Coin Purse With a Clasp
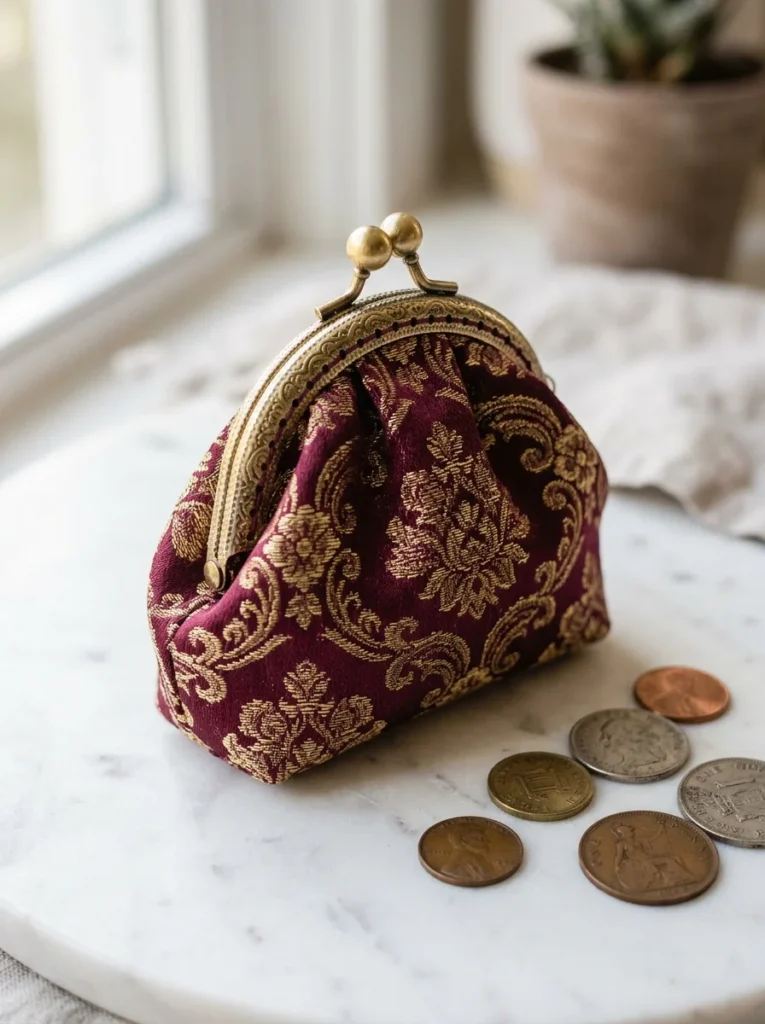
A coin purse with a kiss-lock clasp frame is one of those projects that looks significantly more advanced than it actually is. The metal clasp frame does most of the work, you just need to sew a fabric pouch that fits inside it.
Clasp frames are sold at most craft stores or online. They come in various sizes. A 3.5-inch frame is a good starting size for a coin purse that also holds a folded bill.
Construction: Make a small fabric pouch to match the width of the frame opening. The pouch shape is like a small U, wider at the bottom, narrowing slightly toward the top where it meets the frame. Cut two pieces, sew around the curved bottom, and leave the top open. Fold the raw top edge over and glue or sew it into the frame channel.
Attaching to the frame: Many clasp frames have a narrow groove along their inner edge. Apply fabric glue to the groove and push the fabric edge into it. Let it set. Some frames have small holes so you can hand-stitch the fabric in place instead.
Brocade or heavyweight cotton works best, it holds the structured shape the frame needs.
These make wonderful gifts. The finished purse looks like something you’d buy in a boutique. Total material cost: under $5.
25. Fabric Scrunchie
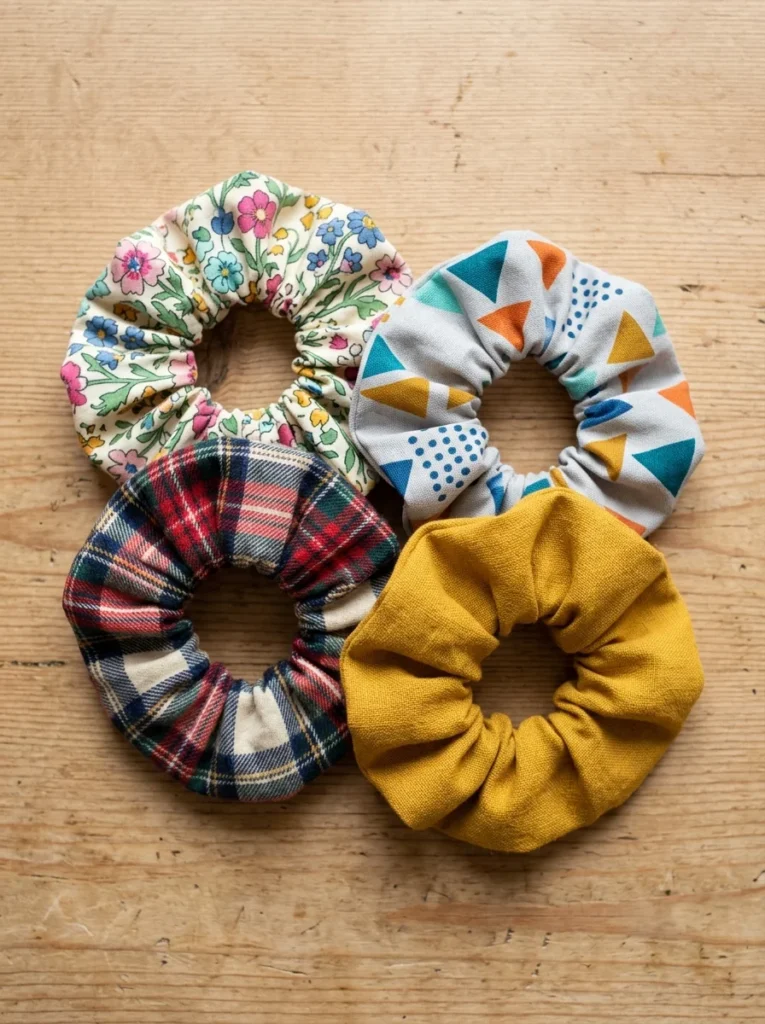
A fabric scrunchie is the most satisfying ten-minute project in all of sewing. Truly. You finish one and immediately want to make five more.
Cut a strip of fabric about 3 inches wide and 22 inches long. Fold it in half lengthwise, right sides together, and sew along the long raw edge to make a tube. Turn it right-side out. Thread a piece of elastic, about 7–8 inches of standard hair elastic, through the tube using a safety pin. Overlap the ends of the elastic slightly and stitch them together. Close the open end of the tube by turning in the raw edges and hand-stitching the gap closed.
Elastic alternatives: If you don’t have hair elastic, a standard 3/8-inch elastic works fine. Cut it slightly shorter for a tighter hold.
Fabric behavior: Silky and satin fabrics make the sleekest scrunchies. Cotton prints are cute and casual. Velvet cut from old clothing makes a luxurious version.
The full strip length matters. Longer strips create fuller, more gathered scrunchies. Shorter strips give a flatter, more minimal look.
One fat quarter of fabric makes about four to six scrunchies. That’s $2–3 in materials for a half dozen. A bag of a dozen scrunchies in coordinating fabrics is a genuinely thoughtful and practical gift, especially for teenagers, friends, or sisters.
Conclusion
Sewing doesn’t have to be complicated to be worthwhile. Each of these 25 projects proves that a few hours, a little fabric, and basic stitching skills are enough to make something real, something useful, something beautiful, something you made with your hands.
Start with whatever feels most approachable. The coasters. The scrunchies. The drawstring bag. Pick one project, gather your materials, and finish it today. That first finished project matters more than you think. It builds confidence, develops muscle memory, and makes the next one feel easier.
Most of these projects cost $5 or less in materials. Several cost nothing if you work from scraps and fabric you already have. The biggest investment isn’t money, it’s the hour or two of focused time you give yourself at the machine.
Keep a small bin of fabric scraps and a dedicated sewing basket. The next time you have a free afternoon, everything you need will already be there waiting. That’s when sewing stops feeling like a task and starts feeling like something you actually look forward to.