

Air dry clay is one of the most beginner-friendly craft materials you can buy. No kiln, no oven, no fancy equipment. You just open the package, shape it with your hands, let it dry, and paint it. A single pack costs just a few dollars and can produce dozens of projects.
Whether you want to make home décor, jewelry, or gifts for friends, clay gives you total creative freedom. The 24 projects below are simple, satisfying, and completely achievable, even if you have never touched clay before in your life.
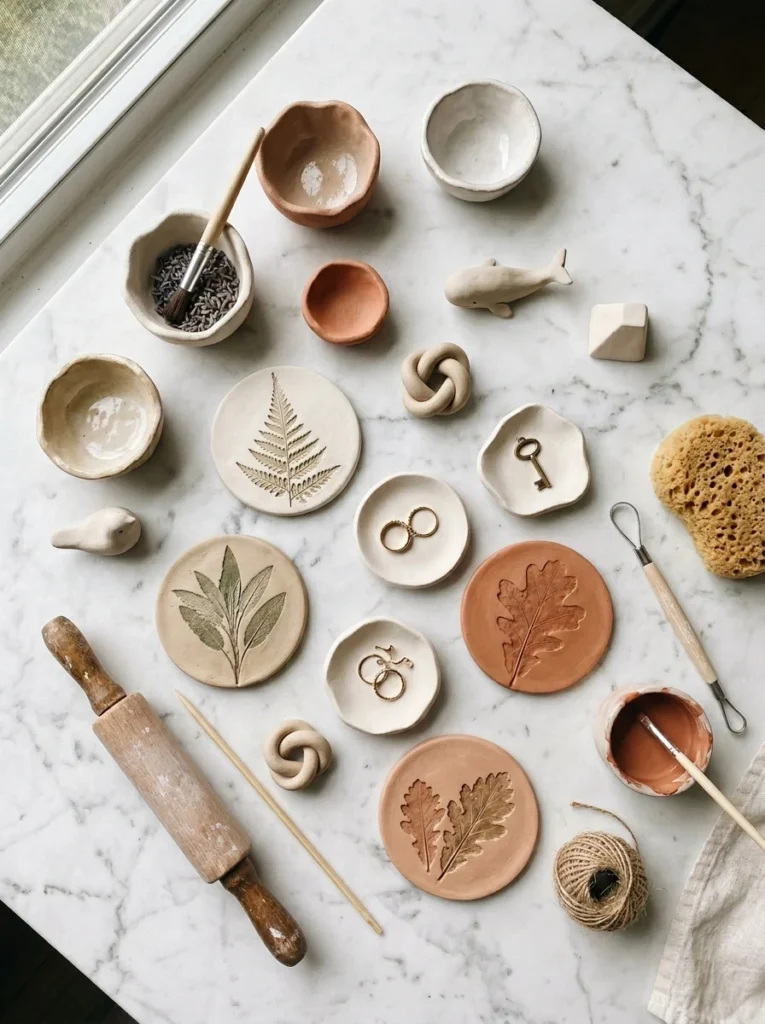
1. Simple Pinch Pot Bowl
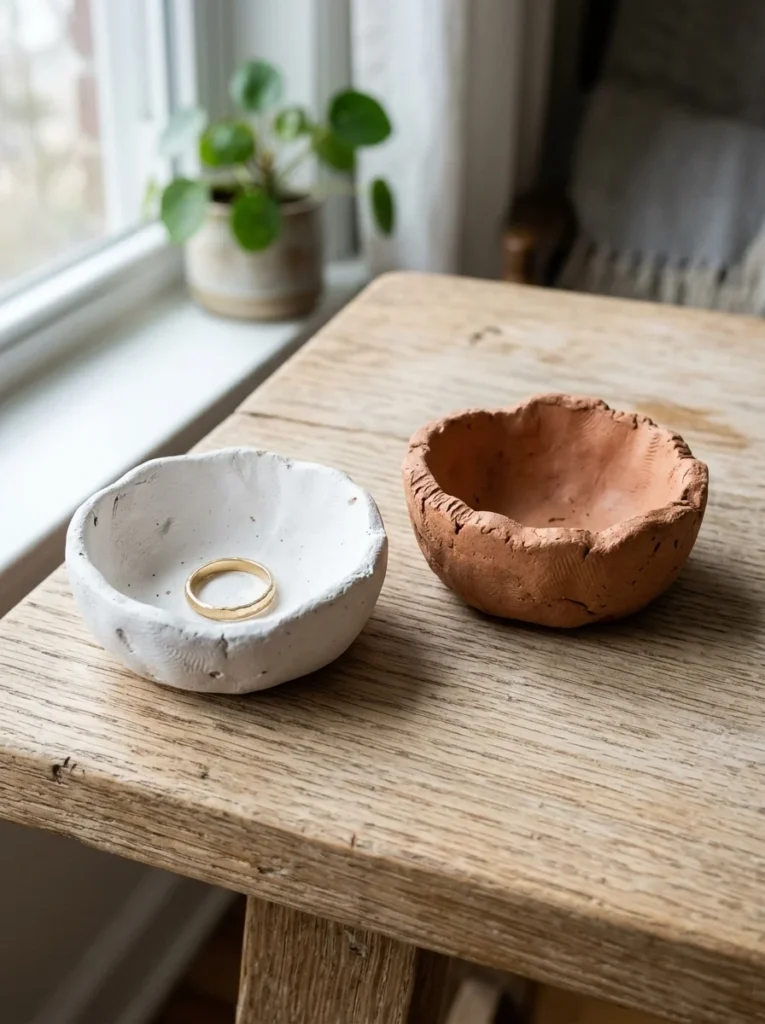
A pinch pot is the very first thing most people make with clay, and for good reason. It requires zero tools.
All you do is roll a ball of clay, press your thumb into the center, and pinch the walls outward. That’s it.
The walls will be uneven. That’s totally fine. In fact, the wonkiness is what makes it look handmade and charming.
Once dry, these little bowls are perfect for:
- Holding rings or earrings on your nightstand
- Storing paper clips on your desk
- Sitting on a shelf as simple décor
Budget tip: A $3 pack of air dry clay can make 8–10 small pinch pots easily.
After drying (usually 24–48 hours), sand the rough edges lightly with a nail file. Then paint with acrylic paint. Finish with a coat of Mod Podge to seal it and add a gentle shine.
You can make a matching set of three in different sizes. Line them up on a shelf. They look intentional and stylish, not like a craft project at all.
Don’t overthink the shape. The best pinch pots are the ones made with slow, patient pinching. Rotate the ball as you work so the walls stay even. That one habit makes a big difference.
2. Ring Dish with Scalloped Edges
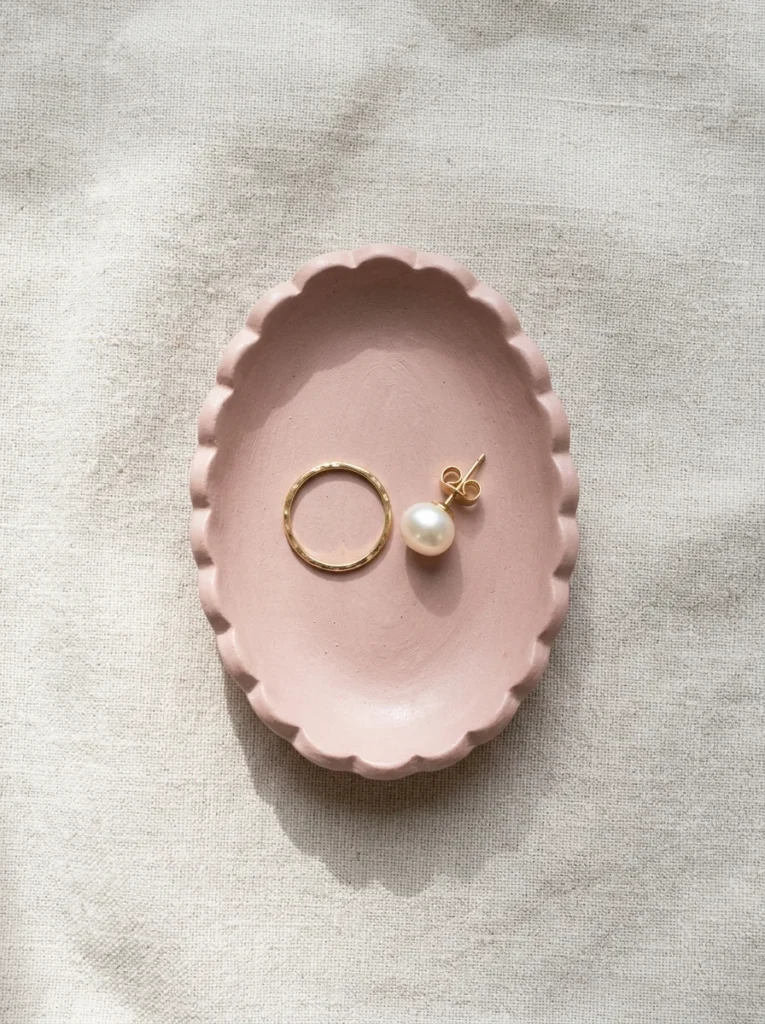
A ring dish is basically a flat pinch pot, but shaped into something that looks polished and purposeful.
Roll your clay flat with a rolling pin (or a smooth cup works fine). Cut out an oval or circle shape using a cookie cutter or a knife traced around a lid.
Then press the edges upward slightly with your fingers to create a little lip. Pinch the rim to make small scalloped waves. It takes about 5 minutes.
The scalloped edge is the detail that makes this look expensive.
Place the dish over a small bowl while it dries so it holds a gentle curved shape instead of drying completely flat.
Once dry, paint it any color you love:
- Dusty rose with gold details
- Matte white with a black rim
- Sage green with a cream inside
Use a thin brush to add simple details like dots or small dashes. You do not need to be an artist. Even a simple color-blocked design looks beautiful.
Budget tip: Buy basic acrylic paint sets from a dollar store. They work perfectly on sealed clay.
These make wonderful gifts. Package one in a small box with tissue paper, and it looks like something from a boutique shop — even though it cost under $2 to make.
3. Leaf Impression Coasters
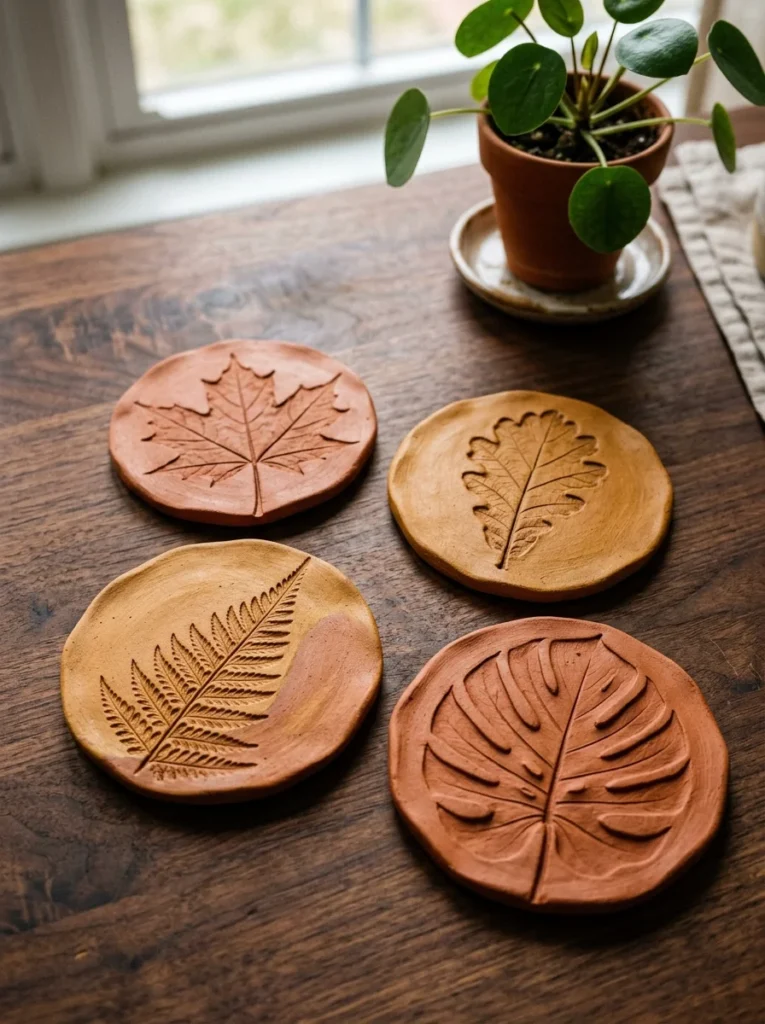
Go outside and pick up a few leaves. Seriously, that’s the hardest part of this project.
Roll your clay flat to about 1cm thickness. Place a leaf face-down onto the clay and press firmly with a rolling pin. Peel the leaf away slowly. You’ll see the full outline and all the veins pressed perfectly into the clay.
Cut around the impression with a knife or cookie cutter into a round or square shape.
Use a straw to poke a small hole in the top if you want to hang it. Or just let it be a flat coaster.
The result looks genuinely stunning. The detail captured from even a simple leaf is impressive.
Best leaves to use:
- Monstera (dramatic, graphic veins)
- Fern (delicate, feathery pattern)
- Maple (clean, recognizable shape)
- Oak (bold, chunky lobes)
Paint the coasters in earthy tones, terracotta, sage, sand, or deep green. You can also leave them unpainted for a natural look and just seal with Mod Podge.
Budget tip: Cut a piece of cork sheet (from a dollar store) and glue it to the bottom. This protects surfaces and makes the coaster look finished.
Make a set of four and gift them in a small stack tied with twine. People always assume you bought them somewhere special.
4. Mini Succulent Planter

You can make a tiny planter for succulents with just a few inches of clay and some patience.
Roll a slab, cut a circle for the base, and build up walls by pressing clay strips around the edge. Smooth the joins with a damp finger. It will hold together fine once it dries.
Poke a drainage hole in the bottom with a pencil before it dries. This is important, succulents hate sitting in water.
For texture, press a piece of burlap or lace fabric gently onto the outside walls before the clay dries. It leaves a beautiful woven impression.
Keep the planter small, about 3 inches wide is perfect for most desk succulents.
Decoration ideas:
- Paint stripes in two tones
- Add tiny dots with a toothpick
- Stamp a pattern with a pen lid before drying
Once sealed with Mod Podge, air dry clay is surprisingly water-resistant for light watering. Just don’t soak it.
Budget tip: Small propagated succulent cuttings cost almost nothing at plant swaps or farmers markets. Some grocery stores sell tiny ones for $1–2.
This project is also great for kids. Let them shape and decorate their own planters. Add their names with a toothpick before drying. It becomes a personalized keepsake they’ll actually use.
5. Tiny Animal Figurines
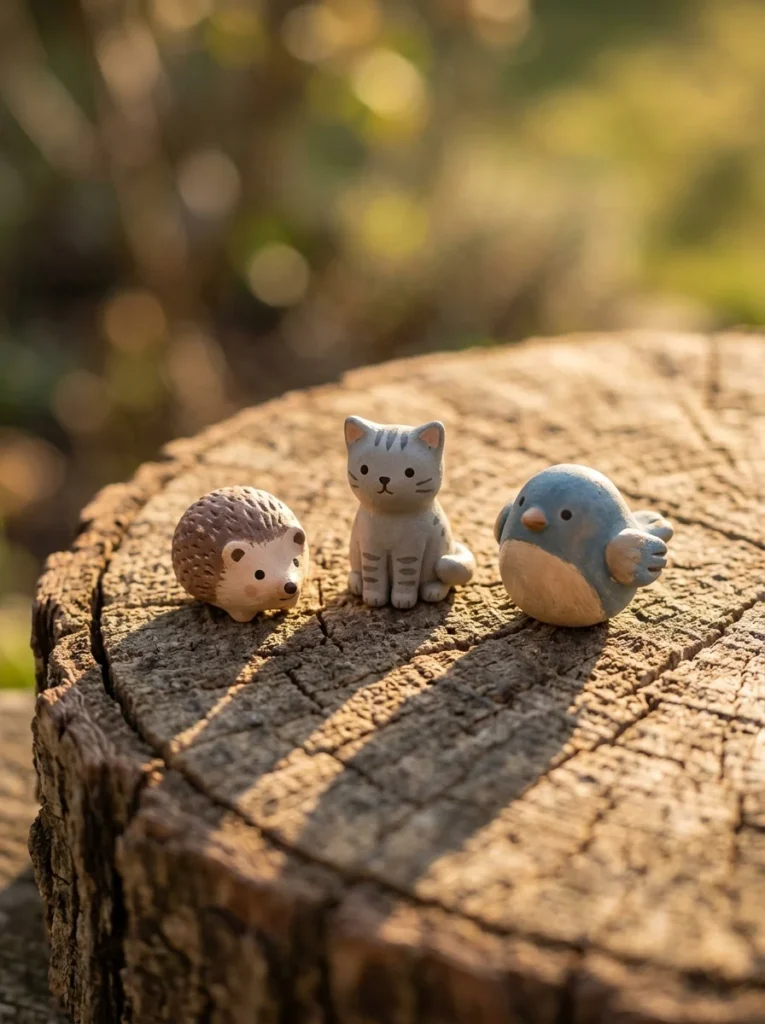
Making tiny animals is one of the most satisfying air dry clay experiences. You don’t need to be a sculptor.
Start with basic shapes:
- Roll a small oval for a body
- Add a smaller ball for the head
- Press tiny triangles on top for ears
That’s all it takes to make something that clearly looks like a cat or bear.
The key is keeping the proportions chunky. Thin legs or tails will crack when dry. Make everything short and solid.
For a hedgehog, roll an oval body and press a pointed tip at one end for the nose. Use a toothpick to poke rows of tiny holes across the back, those become the “spines” once painted with dark tips.
For a simple bird, make a round body, a tiny beak from a pinched piece of clay, and two small wing bumps on the sides.
Tools that help:
- Toothpick (for details and textures)
- Small knife (for cutting and scoring)
- Damp brush (for smoothing joins)
Paint with simple, flat colors. Add dot eyes with a fine brush or a toothpick dipped in paint.
Budget tip: Tiny figurines use almost no clay. One small block can make 20+ animals easily.
Arrange a small collection on a shelf or windowsill. They look adorable as a group and make excellent handmade gifts for children.
6. Geometric Wall Art Tiles
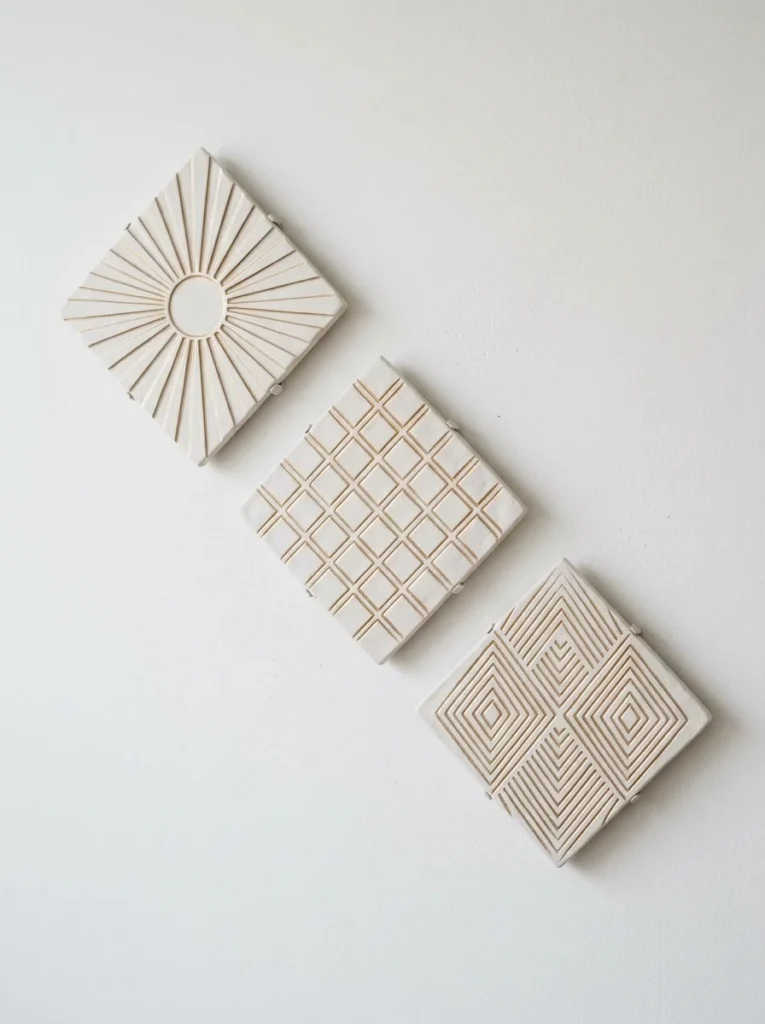
Flat clay tiles with geometric patterns look like something from a high-end home store.
Roll clay flat and cut into squares or hexagons. Use a ruler and knife for clean edges, or embrace slight wonkiness for a handmade look.
Press patterns into the surface before it dries:
- Use a pen lid to stamp circles
- Press a comb across the surface for lines
- Use a toothpick to draw geometric shapes by hand
You can also cut small shapes from a separate piece of clay and press them onto the tile surface to create raised patterns.
Poke two small holes near the top before drying. These become the hanging points.
Paint ideas:
- White base with gold painted lines
- Terracotta with cream detailing
- Black with a single pop of color
Once dry and painted, thread a piece of twine or thin rope through the holes. Hang as a single statement piece or group three together in a triangle arrangement on your wall.
Budget tip: Use a wooden skewer to draw the geometric lines. The grooves catch paint beautifully — paint the whole tile, then wipe back to reveal the lines filled with color.
This is a great weekend project. Make a batch of six tiles in one sitting. Let them dry overnight. Paint the next morning. Hang by afternoon.
7. Herb Garden Markers
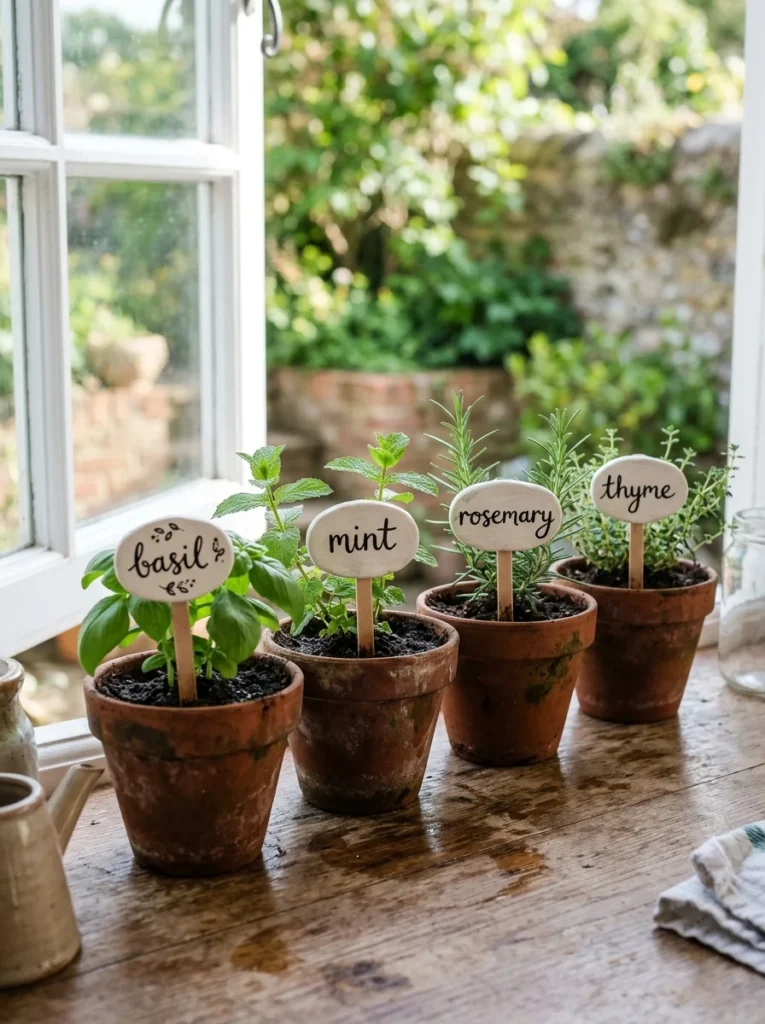
If you grow herbs in your kitchen or garden, clay markers are both practical and pretty.
Roll small oval or rectangle shapes. Push a wooden skewer or popsicle stick into the bottom of each piece while the clay is still soft. Let it dry fully with the stick in place, it will bond securely.
Write the herb names using a toothpick while the clay is still soft. Press the letters in clearly. Or let the clay dry and write on it with a permanent marker or paint pen afterward.
Simple design ideas:
- White clay with black painted text
- Terracotta-colored clay left natural, names written in white paint pen
- Small leaf impressions above the name for a botanical look
Make sure the stick is long enough to push deep into the soil, at least 4 inches works well for most pots.
What to write: Basil, Mint, Thyme, Rosemary, Parsley, Cilantro, Sage, Oregano.
Budget tip: Use free wooden coffee stirrers from a café instead of buying popsicle sticks. They work just as well.
Seal with outdoor-grade Mod Podge if the markers will be outside. Standard Mod Podge is fine for indoor herb pots on a windowsill.
This is a perfect project for a Sunday afternoon. Make the whole set in under an hour. Your kitchen garden will look immediately more put-together.
8. Clay Candle Holders
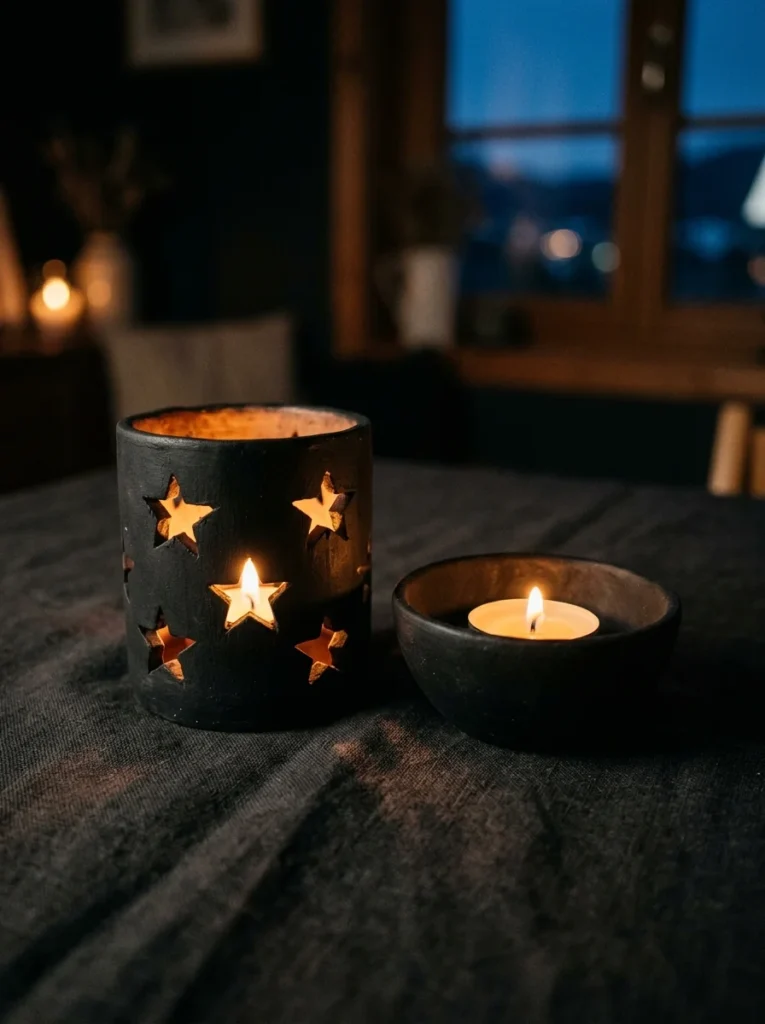
Clay candle holders look absolutely stunning when a candle glows inside them, especially if you cut small shapes into the walls.
For a simple holder: Roll clay into a thick cylinder. Press a tea light candle gently into the top while the clay is soft to create a perfect-sized impression. Remove the candle before drying.
For a glowing lantern: Roll a slab and form it into a cylinder shape. Use a small straw or toothpick to cut star or dot shapes through the wall before drying. When a candle sits inside, light shines through the holes.
Join the cylinder walls by scoring both edges with a toothpick and pressing them together firmly.
Decoration before drying:
- Press a lace piece onto the outside for texture
- Draw swirling lines with a toothpick
- Stamp a repeating dot pattern all over the surface
Safety reminder: Only use tea light candles, which sit low and contained. Never leave burning candles unattended.
Paint in dark tones for maximum drama, charcoal black, deep navy, or forest green. The contrast between the dark holder and warm candlelight is gorgeous.
Budget tip: Dollar stores often sell tea light candles in packs of 20 for $1. Stock up so you always have some on hand.
These make beautiful centerpieces for dinner tables or windowsills.
9. Clay Earrings
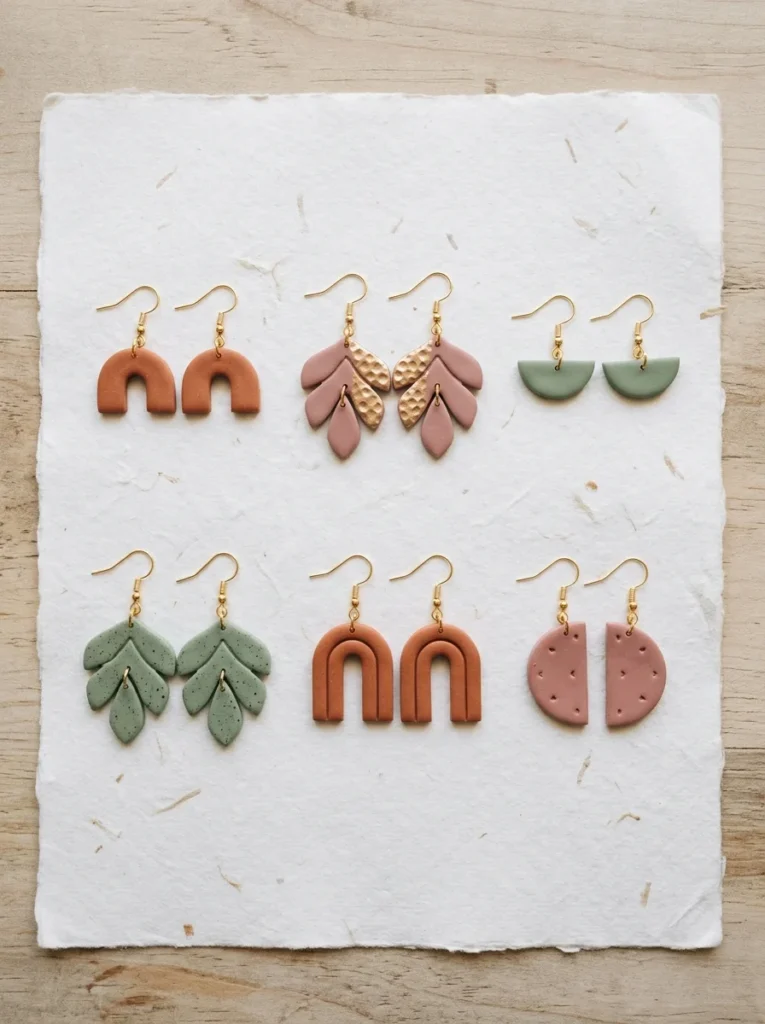
Clay earrings are the most popular air dry clay craft right now — and for good reason. They’re lightweight, stylish, and shockingly easy to make.
Roll clay very thin, about 3mm. Use a small knife or earring cutter to cut shapes:
- Half moons
- Small arches
- Abstract organic blobs
- Simple circles or squares
Poke a small hole near the top of each shape with a toothpick before drying. This is where the earring hook will attach later.
Let the shapes dry flat. Flip them halfway through to prevent curling.
Once dry and painted, attach earring hooks (sold cheaply at craft stores or online) using jump rings. Open the jump ring with two small pliers, thread it through the clay hole, attach the hook, and close it.
Paint combinations that look amazing:
- Terracotta with a gold edge
- Sage green with white dots
- Dusty pink with a thin black outline
Seal with glossy Mod Podge for a polished look.
Budget tip: A starter pack of earring hooks and jump rings costs about $3 and contains 100+ pieces. That’s enough for 50 pairs of earrings.
These sell well at markets and fairs too. Many people start making them as a hobby and turn it into a small business.
10. Monstera Leaf Sculpture
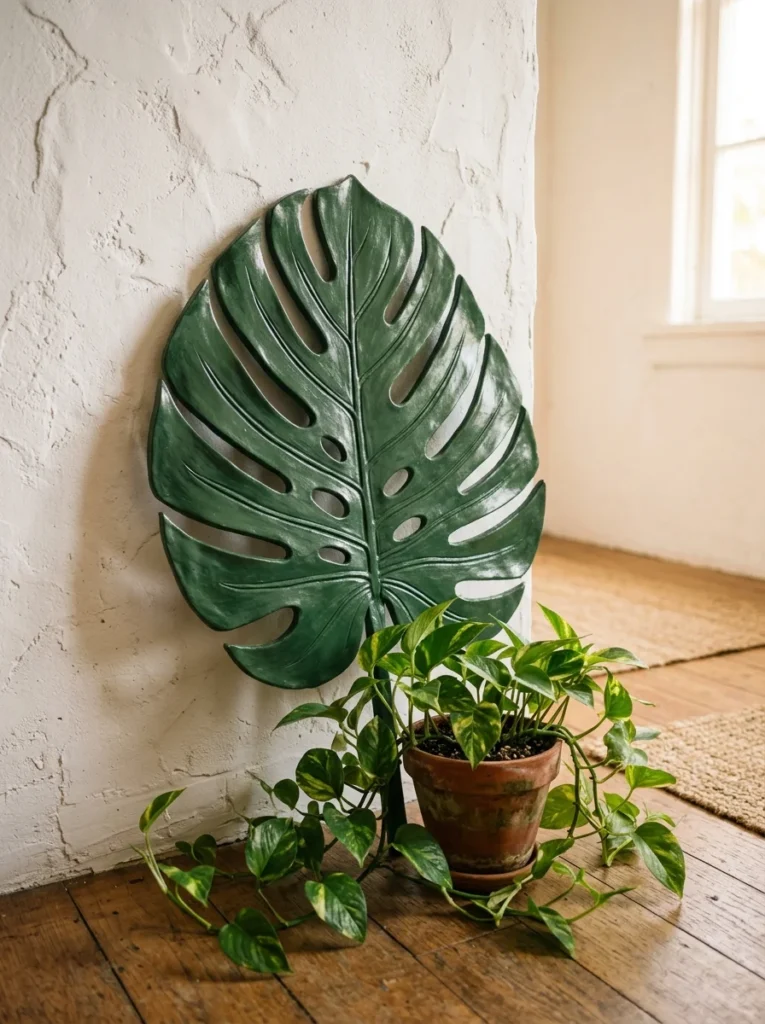
A flat monstera leaf sculpture is one of the most visually striking beginner clay projects, and it’s much simpler than it looks.
Roll out a large flat slab of clay. Freehand cut the outline of a monstera leaf shape. Monstera leaves have an oval base with sweeping curved edges and characteristic splits.
Use a knife or toothpick to cut the iconic split holes through the leaf while the clay is soft:
- Two or three elongated oval cuts on each side
- Leave a clean spine running down the center
Gently bend the leaf slightly before drying, this gives it a more natural, organic curve instead of looking completely flat.
Place it on a slightly crumpled sheet of paper while drying so the curve holds.
Painting:
- Base coat in deep green
- Dry-brush a lighter green over the surface for dimension
- Add a thin yellow-green highlight along the central spine
Once dry, lean it against a wall or in a corner of a shelf. No frame, no stand needed.
Budget tip: Prop it inside a vase or pot with a handful of dry rice or sand at the base to hold it upright. Simple and effective.
This project uses more clay than smaller pieces but the result feels like a statement art piece for your space.
11. Clay Photo Frame
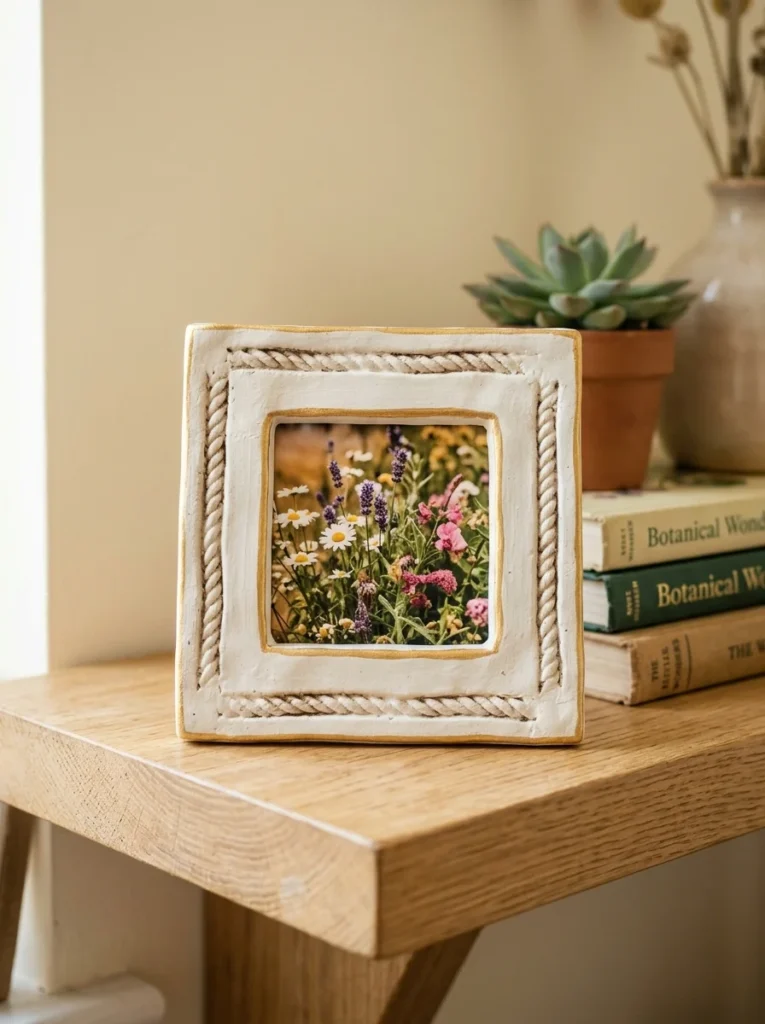
A clay frame makes a beautiful display piece, and it’s one of the most practical crafts on this list.
Roll a slab of clay and cut out a rectangle. Then cut a smaller rectangle from the center, that’s the window where your photo will sit. Leave a border of at least 2cm on all sides so the frame has strength.
Before drying, press textures into the border:
- Roll a piece of rope across the surface for a woven look
- Press a fork along the edges for simple lines
- Stamp small flower shapes with a pen lid
Add a stand:
Cut a small triangle or rectangle from leftover clay. Score the back of the frame and the base of the stand with a toothpick. Press together firmly. This becomes the kickstand that props the frame upright.
Or just glue a clothespin to the back once dry, that works just as well.
Let it dry completely (48 hours for thicker pieces). Sand any rough edges gently.
Paint, seal, and then attach your photo to the back with a small piece of tape or adhesive putty.
Budget tip: Print 3×3 photos at a pharmacy or print shop for under $0.50 each. The small size is perfect for clay frames.
Make a set of three in different sizes for a shelf display. It looks like a curated gallery wall on a tiny scale.
12. Mushroom Garden Ornaments
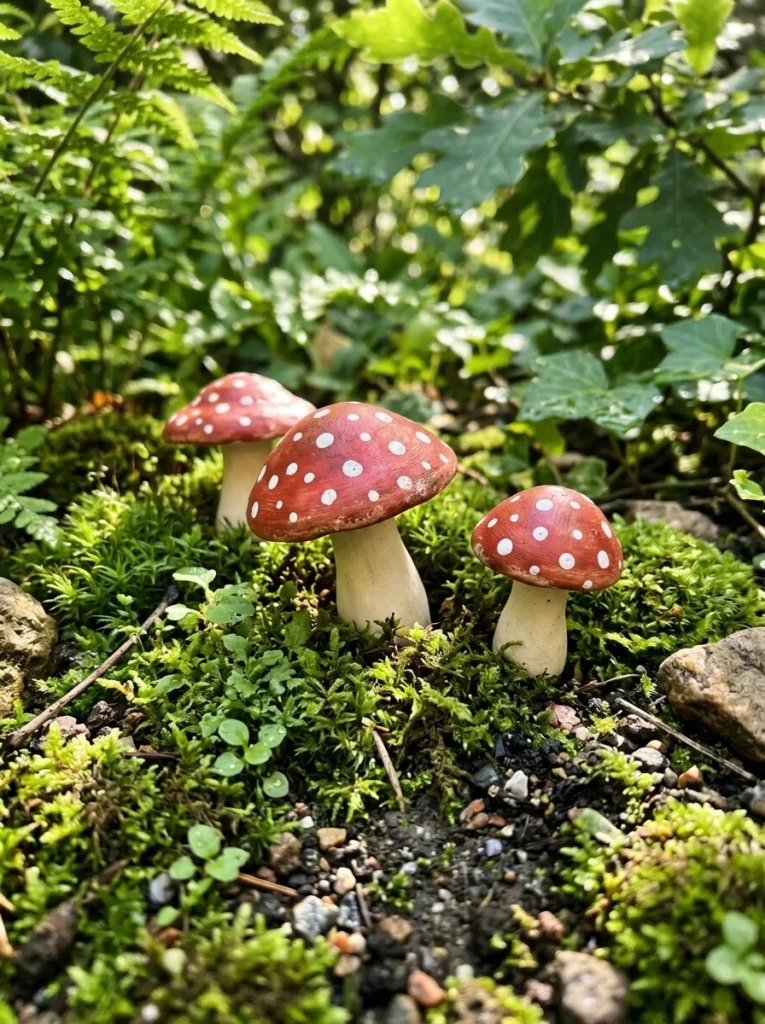
Mushroom ornaments are adorable, simple, and instantly recognizable. They work as garden décor, shelf pieces, or fairy garden additions.
Making the basic shape:
Roll a ball for the cap. Flatten the bottom slightly so it sits flat. Roll a short fat cylinder for the stem. Score the top of the stem and the bottom of the cap. Press together and smooth the join.
Make several mushrooms in different heights and sizes. Group them in clusters of three — it always looks better than a single piece on its own.
Classic mushroom designs:
- Red cap with white polka dots (toadstool look)
- Brown cap with cream gills pressed underneath
- White cap with a pale lavender stem
To add gills under the cap, use a toothpick to draw lines radiating from the center outward along the underside before drying.
For outdoor use, seal with at least three coats of waterproof Mod Podge or outdoor sealant.
Budget tip: Place them in a cluster inside a small terracotta pot with some fake moss from a dollar store. It becomes an instant fairy garden centerpiece worth gifting.
Kids absolutely love this project. Let them roll the balls and you handle the joining. It’s a genuinely fun activity for a rainy afternoon.
13. Moon Phase Wall Hanging
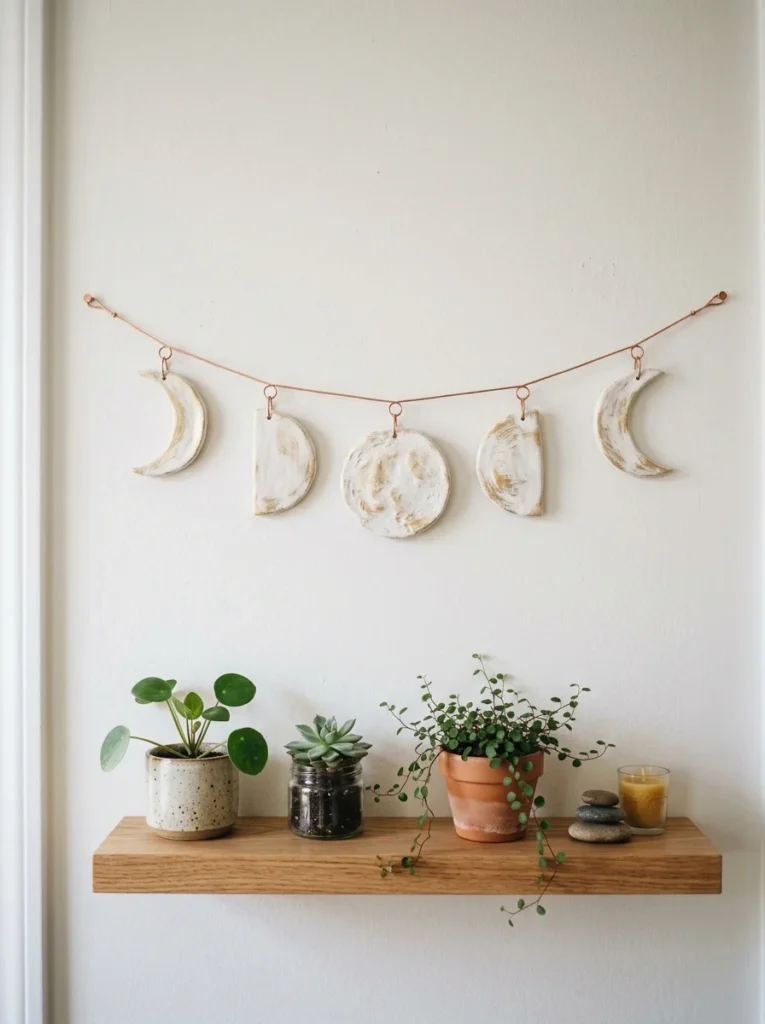
A moon phase wall hanging is one of the most popular home décor clay projects right now, and it’s completely beginner-friendly.
The shapes you need (from left to right):
- Thin crescent (first quarter)
- Half circle (half moon)
- Full circle (full moon)
- Half circle mirrored (waning)
- Thin crescent mirrored (last quarter)
Roll clay flat. Cut these shapes using a knife and a round cookie cutter. A sharp glass or jar lid works perfectly as a cutter too.
Before drying, poke a small hole near the top of each piece. Thread thin copper wire or twine through the holes and tie each piece to a small wooden dowel or stick.
Space the pieces evenly, about 2–3 inches apart.
Painting:
Paint all pieces matte white. Then lightly dry-brush gold paint across the surface for a subtle metallic sheen.
Hang the dowel from two nails or a single hook on the wall.
Budget tip: Copper wire costs very little from a hardware store. Buy a small coil and use it for multiple projects, it photographs beautifully.
This piece looks like something from a spiritual boutique. It fits well in bedrooms, meditation corners, or reading nooks.
14. Clay Keychains
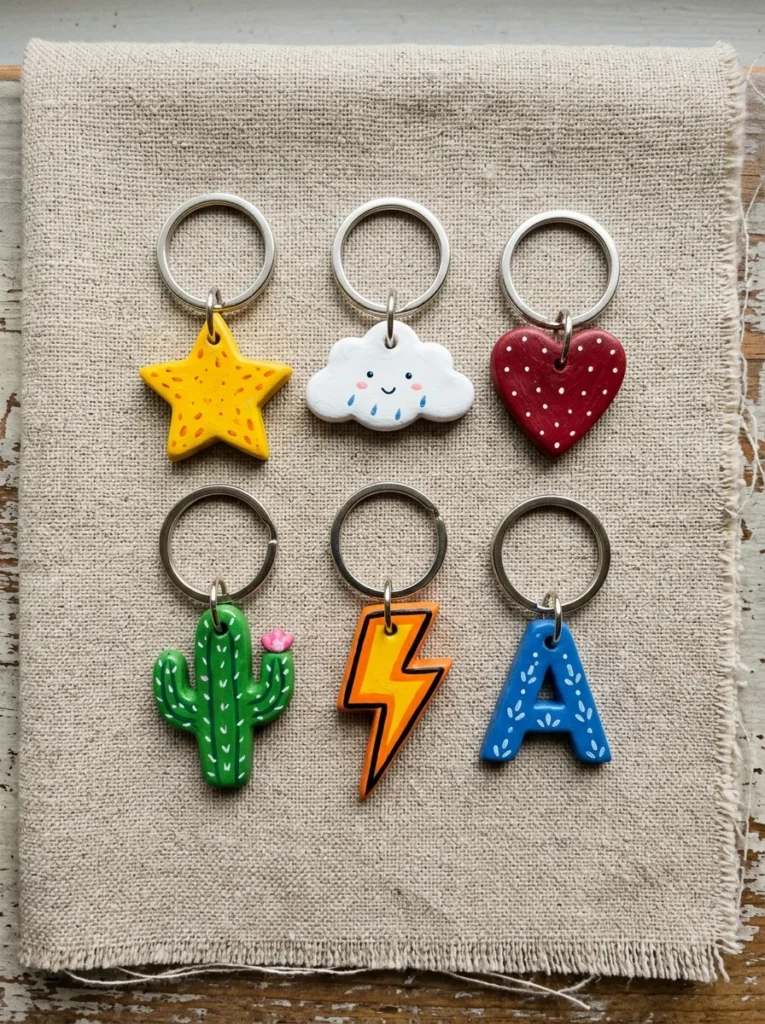
Clay keychains are quick, fun, cheap to make, and one of the most popular craft fair items to sell.
The process is simple:
Roll clay flat. Cut your shapes, stars, hearts, initials, clouds, lightning bolts, or anything you like. A mini cookie cutter set makes this even easier.
Poke a hole near the top with a toothpick before drying. This is where the keyring attaches.
Make sure the hole is wide enough for a jump ring to pass through, test it while the clay is still soft.
Let dry completely. Sand lightly. Paint in bold, saturated colors. Seal with glossy Mod Podge, two coats works best for something that will get daily handling.
Once sealed, attach a jump ring through the hole and clip a keyring onto the jump ring.
Popular shapes to make:
- Initial letters (personal and giftable)
- Tiny animals
- Food shapes (pizza, donut, avocado)
- Simple geometric shapes
Budget tip: Keyring hardware (rings + jump rings) comes in packs of 50+ for around $3. That gives you enough hardware for a full batch of keychains.
These are great for kids to make and give as birthday party favors. Adults love personalized initial keychains. Everyone has a use for a good keychain.
15. Decorative Clay Magnets
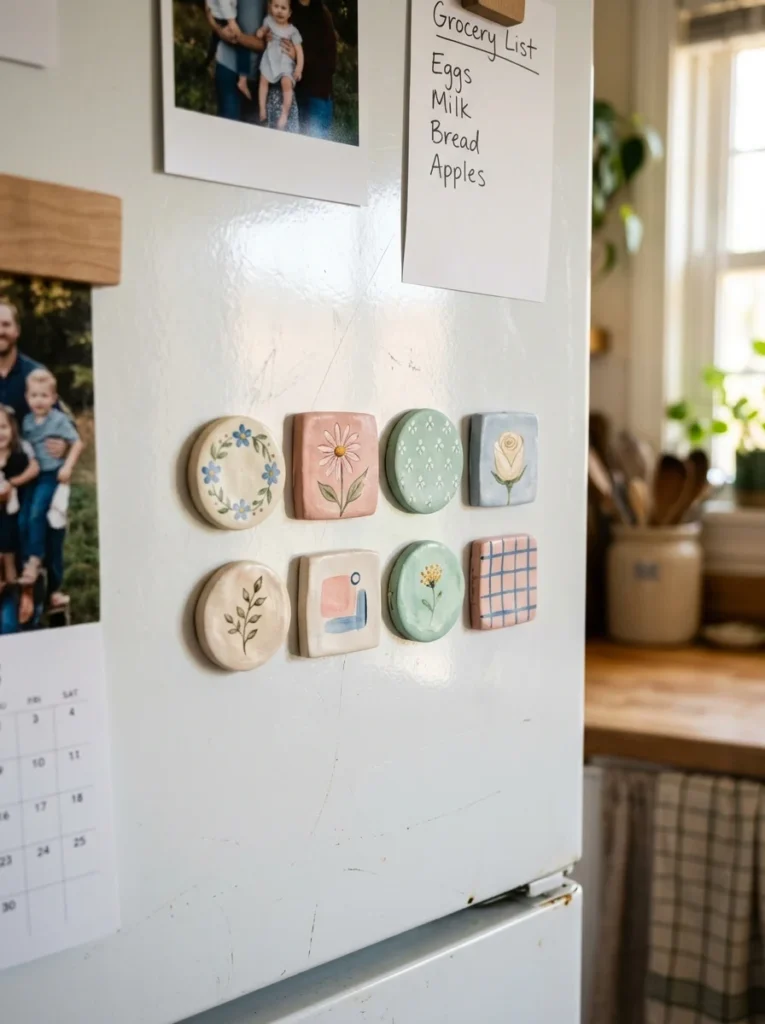
Fridge magnets are one of the simplest clay projects, and one of the most satisfying to use every day.
Roll clay flat and cut small shapes, circles, squares, stars, or small hearts. Keep each piece under 5cm so the magnet on the back can hold the weight.
Decorate the front while soft:
- Press small flower shapes on top
- Add texture with a toothpick
- Stamp dots or swirls across the surface
Let dry completely. Paint and seal.
Attaching the magnet:
Use small round neodymium magnets (they’re sold in packs for very little online or at craft stores). Glue one to the back of each clay piece with strong craft glue or a glue gun.
Hold the magnet flat against the clay as the glue sets. Don’t let it shift, once it’s set off-angle, it’s hard to fix.
Let the glue cure for a full 24 hours before using on the fridge.
Design themes that work well:
- Matching floral set in soft pastels
- Seasonal shapes (snowflakes, suns, pumpkins)
- Abstract splotch shapes with simple line detail
Budget tip: A pack of 50 small magnets costs about $3–5 online. That’s enough for 50 magnets — a full afternoon of crafting.
These make wonderful stocking stuffers and housewarming gifts. Package six together in a small tin or bag tied with ribbon.
16. Textured Trinket Tray

A trinket tray is bigger than a ring dish and more useful, think of it as your bedside catch-all, made beautiful.
Start with a thick rolled slab. Cut into a rectangle, then pinch the four sides upward to create low walls. Pinch the corners together and smooth them.
The texture is where this project gets really fun. Before drying, press things into the walls and base:
- A piece of bubble wrap for a bubble texture
- A toothpick dragged in grid lines
- Crumpled foil pressed gently for an abstract surface
The texture catches paint in the recesses and creates beautiful dimension.
Painting technique:
- Paint the whole tray your base color
- Let dry fully
- Dry-brush a slightly lighter or darker tone over the surface
- The brush will catch the raised texture and leave the recesses as the base color
This two-tone effect looks like professional ceramics.
Sizes to consider:
- Small (business card size), bedside ring tray
- Medium (postcard size), bathroom counter organizer
- Large (A5 size), desk catch-all
Budget tip: Use a damp sponge to smooth the clay walls instead of buying special tools. It creates a beautiful soft surface.
Make one for every room. Label the inside with a painted word, “Keys,” “Rings,” “Memos”, using a paint pen after sealing.
17. Braided or Rope-Texture Coil Pot

Coil building is a classic hand-building technique that creates beautiful natural texture without any special tools.
How it works:
Roll long ropes of clay between your palms, aim for pencil thickness. Coil these ropes on top of each other in a spiral, starting from a flat base circle.
Press each coil lightly to bond it to the one below. You can smooth the inside walls with a damp finger to strengthen them, while leaving the outside coils visible for texture.
Build up as many layers as you like. The taller the pot, the more impressive it looks.
The raw coil look is trending in home décor right now, so you don’t even need to smooth the outside.
Let it dry slowly. Thick-walled pots benefit from covering loosely with plastic wrap for the first 24 hours to prevent cracking.
Uses for a coil pot:
- Hold pens or brushes on a desk
- Store a tea light candle inside
- Display dried flowers or pampas grass
Paint with earthy tones, raw umber, terracotta, sand. Or leave completely natural and seal with matte Mod Podge.
Budget tip: This technique uses minimal clay. One small block of clay can produce a surprisingly tall pot.
The imperfections in coil pots are the point. Each one is completely unique.
18. Cactus Sculpture Set
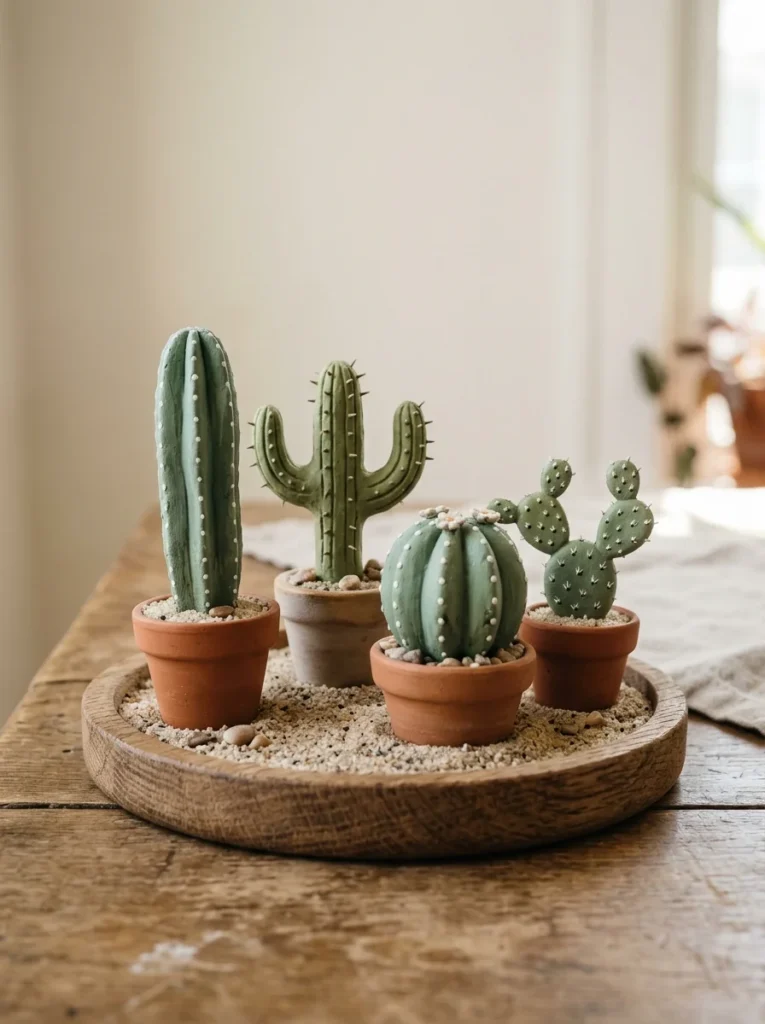
A set of miniature clay cacti makes the most charming desk or shelf arrangement, and each one takes about 10 minutes to shape.
Basic shapes to make:
- Saguaro: Tall cylinder with two arms branching up (the classic cactus shape)
- Barrel cactus: Short fat rounded cylinder
- Prickly pear: Two flat oval pads stacked
- Columnar cactus: Simple straight tall cylinder
Keep everything solid and chunky, thin pieces crack. Make a flat base for each one so they stand up without support.
For spine texture, poke rows of tiny dots all over the surface with a toothpick before drying.
Painting:
- Base in dusty sage or medium green
- Add tiny white dots for spines with a toothpick tip dipped in white paint
- Dry-brush a very light yellow-green over the tips for sun effect
Arrange them together on a small wooden tray or piece of slate. The grouping makes them look like a real miniature desert landscape.
Budget tip: Dollar stores often carry small decorative rocks and sand. Use these to fill the tray around the cacti for a genuine desert scene.
This is a great project for tweens and teens. The shapes are simple enough to be achievable but detailed enough to feel satisfying.
19. Name or Initial Plaque
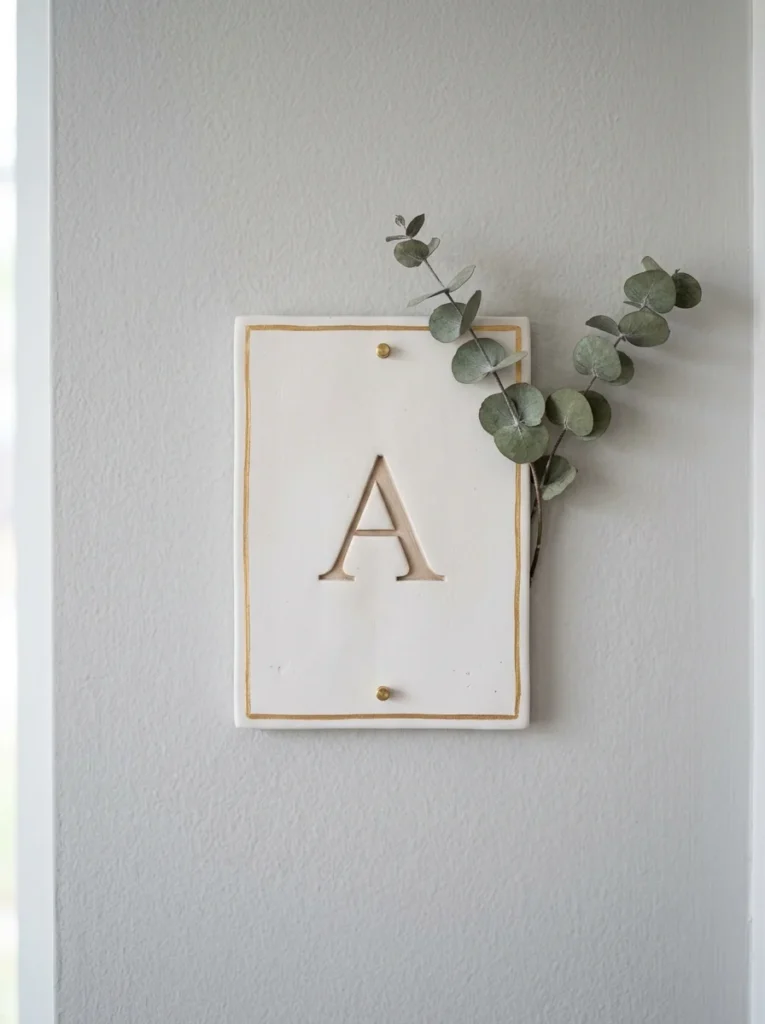
A personalized name plaque or initial sign is one of the most meaningful clay crafts you can make.
Roll clay flat and cut a rectangle or oval. Press your letter or name into the surface using two methods:
Method 1 — Toothpick carving: Use a toothpick to draw letters into the clay surface freehand. Go slowly. Keep letters deep and bold.
Method 2 — Stamp pressing: Buy small letter stamps from a craft store ($3–5 for a full alphabet set). Press firmly into the soft clay for clean, even letters.
Poke two small holes near the top for hanging before drying.
Once dry, sand lightly. Paint the whole plaque a base color. Then wipe a contrasting paint color into the recessed letters, wipe away the excess from the surface, leaving only the letters filled with color.
Classic looks:
- White plaque, gold letters
- Black plaque, white letters
- Terracotta plaque, cream letters
Thread twine through the holes and tie in a bow. Hang on a wall or door.
Budget tip: Alphabet stamp sets from dollar stores or discount craft shops work perfectly. You don’t need brand-name stamps.
This makes an exceptional personalized gift, especially as a nursery piece with a baby’s name.
20. Flower Press Wall Art

This is one of the most strikingly beautiful beginner projects, and it involves pressing real flowers into clay.
Pick flowers that press flat naturally:
- Daisies
- Pansies
- Small wildflowers
- Fern fronds
Roll a slab of clay. Press your flower face-down firmly into the surface with a rolling pin. Peel away the flower carefully.
You’ll have a perfect impression of every petal and leaf pressed into the clay.
Cut the clay into a circle or square around the impression. Poke a hole for hanging. Let dry.
Two directions to take it:
- Paint over the impression in a flat color so only the texture shows — very subtle, very elegant
- Paint the flower details, white petals, yellow center, so it looks like a botanical illustration in clay
Both are beautiful.
Seal with glossy Mod Podge for a ceramic-like finish.
Budget tip: Wildflowers from your garden or roadside are free. Pick them fresh and press them directly into soft clay for the sharpest detail.
Frame multiple impressions in a grid arrangement on a wall. Five or six different flower impressions, all painted the same color, hung in a row, it looks like gallery art.
21. Woven-Texture Flat Pendant
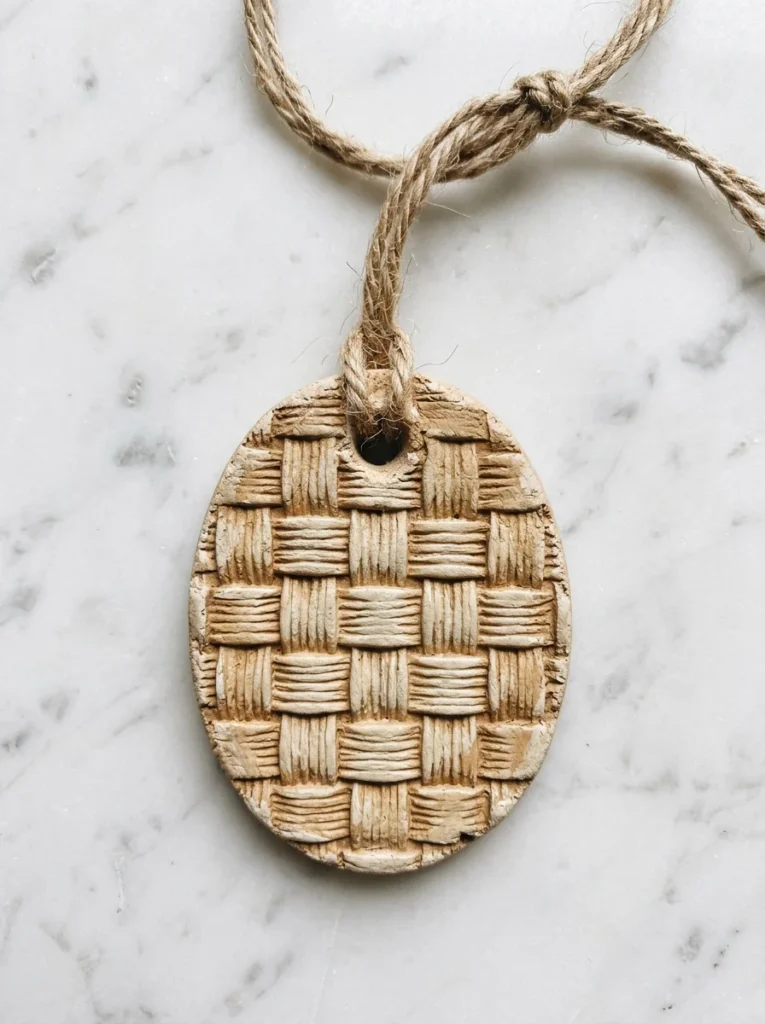
This pendant is the jewelry version of a textured tile, and it’s one of the most wearable pieces you can make from clay.
Roll clay flat (slightly thicker than earrings, about 5mm). Cut a large oval or irregular organic shape. This will be a statement necklace pendant, so make it 4–6cm wide.
Before drying, press a piece of actual woven fabric (burlap, lace, or mesh) firmly onto the surface. Peel it away to reveal the woven impression.
Poke a hole near the top, large enough for cord to thread through.
Let dry completely. Sand the edges smooth with a nail file.
Painting approaches:
- Raw sand tone left almost natural, sealed with matte finish
- Painted white with gold paint rubbed into the woven texture
- Deep terracotta with cream dry-brushed over the raised threads
Thread with a thick piece of natural jute cord, leather cord, or suede lace. Tie in a simple knot at the desired length.
Budget tip: Jute cord from a hardware store costs almost nothing and looks beautiful with clay. A 10-meter roll lasts for dozens of projects.
Wear it with a plain white t-shirt or linen shirt for a look that seems artisan and considered.
22. Clay Star Ornaments
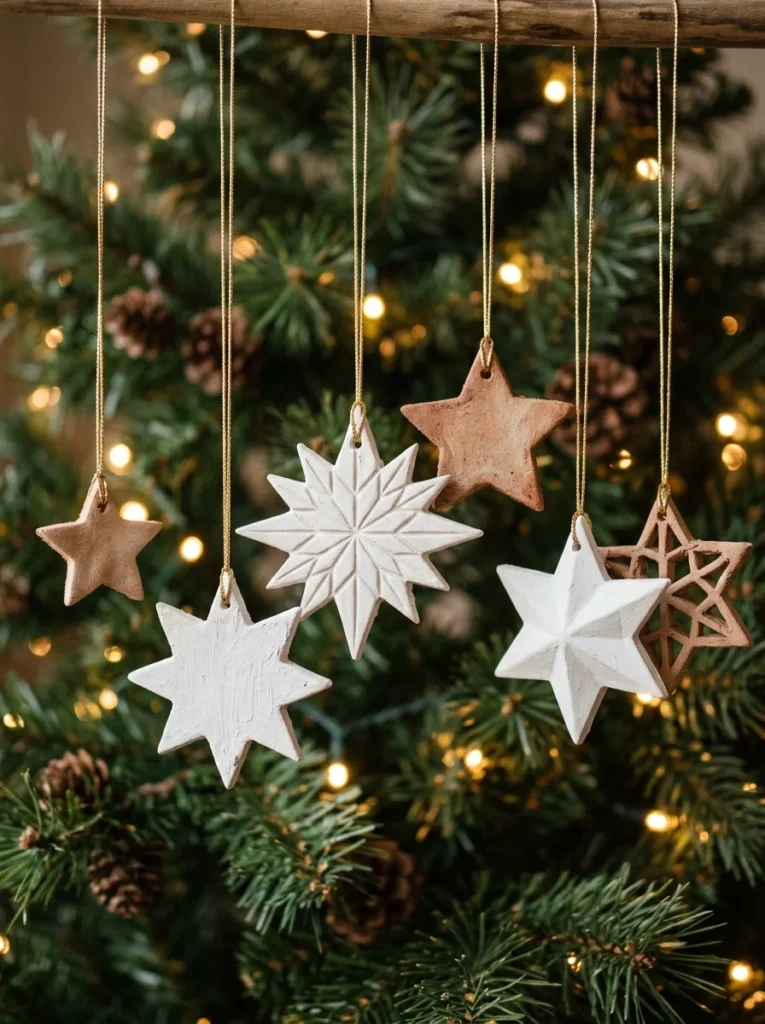
Clay star ornaments are among the most satisfying projects to batch-make in a single afternoon.
Roll clay flat and cut star shapes using a cookie cutter. A sharp knife and a printed template also work if you don’t have cutters.
Make stars in different sizes:
- 8cm for statement ornaments
- 5cm for mid-size
- 3cm for small accents
Before drying, poke a hole near the top of each star with a toothpick or drinking straw. Thread twine or gold cord through after drying.
Texture ideas:
- Press a crumpled piece of foil gently onto each star for an abstract surface texture
- Use a toothpick to draw radiating lines from the center
- Press dots in concentric rings around the middle
Paint options:
- Matte white with gold painted edges
- Natural clay color, sealed with matte Mod Podge
- Deep burgundy with a gold glitter Mod Podge topcoat for festive versions
Hang them from a tree, a garland, a branch display in a vase, or even from curtain rods.
Budget tip: Make a batch of 20 in one afternoon. Gift them in sets of 5 with a small card. Beautiful, personal, and costs almost nothing.
These aren’t just for holidays, white and natural-toned stars look wonderful as year-round décor.
23. Mini Clay Books for a Shelf Vignette
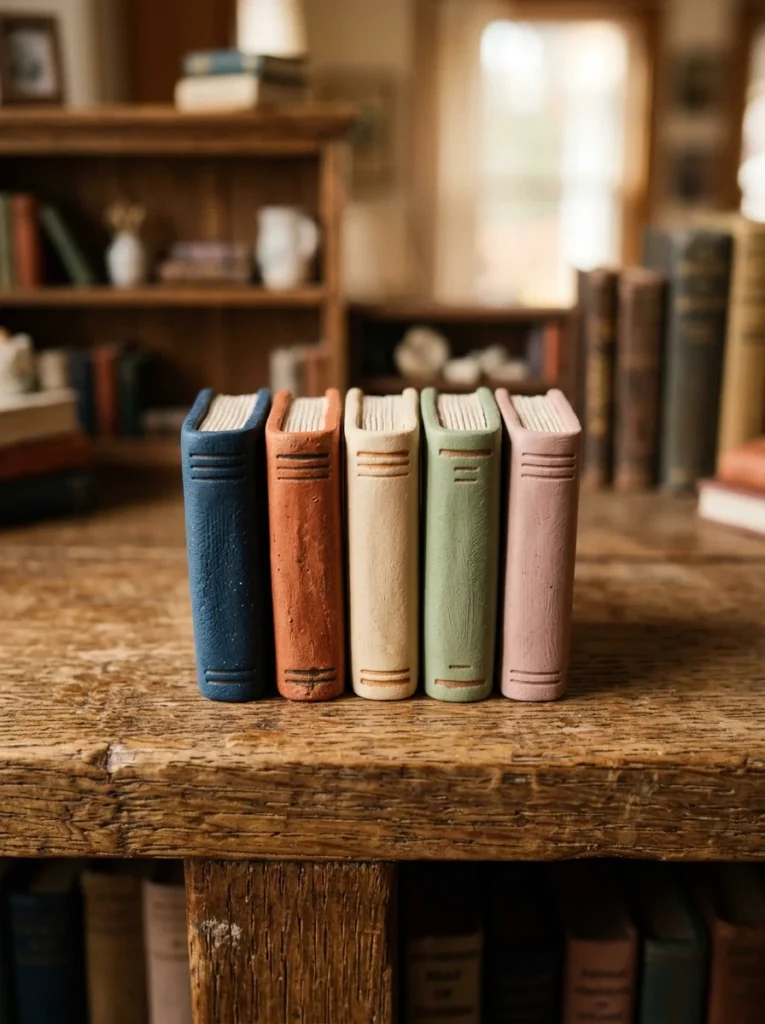
Miniature clay books are a quirky, original project that fits into any bookshelf or shelf vignette beautifully.
How to make them:
Form a small rectangular block of clay, think the size of a matchbox. This is your book body.
Press lines across the bottom and top edges with a toothpick to suggest pages. Add a thin strip of clay down the front edge for a spine. Press a small strip across the top for a bookmark ribbon.
Make five or six in slightly different proportions, some fat, some thin, some tall, some short.
Stand them upright while drying by propping against a row of actual books.
Painting:
- Each book gets its own cover color
- Paint the “page” edges in gold or cream
- Add a thin title line on the spine with a paint pen or fine brush
No need to write actual words, a simple line or dot pattern looks like a decorative binding.
Arrange them in a small cluster on a bookshelf, windowsill, or next to a candle.
Budget tip: Leftover clay scraps work perfectly for these. Collect oddly shaped pieces and press them into book shapes. Nothing goes to waste.
These make a beautiful birthday gift for anyone who loves books, especially if you match the cover colors to their personality.
24. Textured Clay Wall Pocket Vase
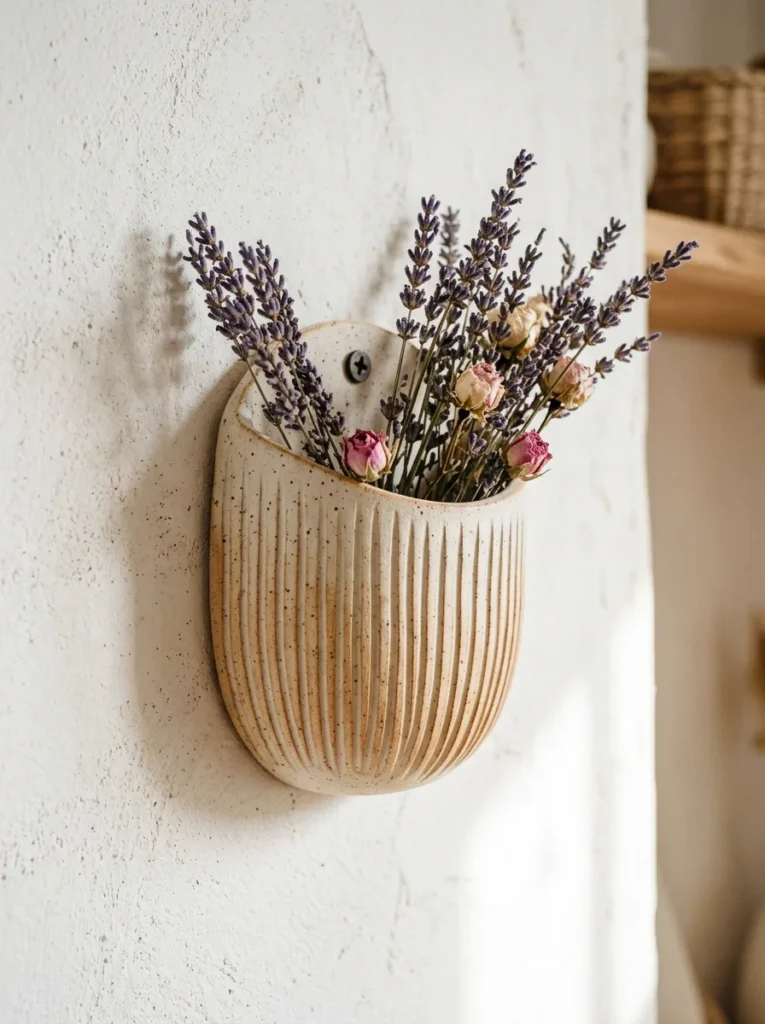
A wall pocket vase is a flat-backed clay piece that mounts directly on your wall and holds a small bunch of dried flowers or stems. It looks like a museum piece and costs almost nothing to make.
Building it:
Form a half-moon or teardrop shape from clay. Make it hollow in the front — think of a tiny wall-mounted cup with a flat back.
The back is flat so it can hang against the wall. The front is curved and open at the top to hold stems.
Press deep vertical lines down the front using a toothpick before drying. These create shadow lines that give the piece incredible visual depth.
Attach a small loop of wire or clay to the back for hanging before drying, or poke a single hole for a nail.
Painting:
- Cream base with warm beige painted into the grooves
- Terracotta with white dry-brushed on raised lines
- Matte black for a dramatic minimalist look
Once mounted, tuck in a small bunch of dried lavender, eucalyptus, or pampas grass.
Budget tip: Dried flower bunches from a farmers market cost $3–5. They last for months and don’t need water — perfect for a clay vase that isn’t waterproof.
This is the kind of project that stops guests in their tracks. It looks architectural and intentional — nothing like a typical craft project.
Finally…
Air dry clay is genuinely one of the most accessible creative hobbies available. The projects above prove that you don’t need a pottery wheel, a kiln, expensive tools, or any prior experience. You need clay, your hands, a few basic supplies, and a bit of patience.
Start with just one or two projects from this list. A pinch pot and a set of earrings, maybe. Once you feel the satisfaction of making something with your hands and watching it go from raw clay to a finished piece you’re proud of, it becomes addictive in the best way.
Most of these projects cost under $5 in materials. Many use clay scraps and things you already have at home. None of them require perfection. In fact, the small imperfections, the fingerprints, the slightly uneven walls, the handmade edges, are exactly what makes clay crafts beautiful.
Pick up a pack of clay this weekend. Clear a small space on your kitchen table. Put on a podcast or playlist you love. And just start shaping. You’ll be surprised how quickly it feels natural, and how satisfying it is to make something real with your own two hands.